Mobile Corner
Design Time Data with Windows Phone and Windows 8
Windows Phone tooling is more advanced than that for Windows 8. But savvy developers can use that to their advantage when building Windows Store apps.
- By Nick Randolph
- 08/12/2013
There's a significant overlap in the development story for Windows Phone and Windows 8. One area where Windows Phone developers have the upper hand is that we're now on the third iteration of the tooling for Windows Phone. What this means is that features such as IntelliSense and design-time data have been refined, making it much more efficient to create amazing applications. In this article I'll look at how you can take design-time data created for Windows Phone and use it to design Windows Store apps for Windows 8.
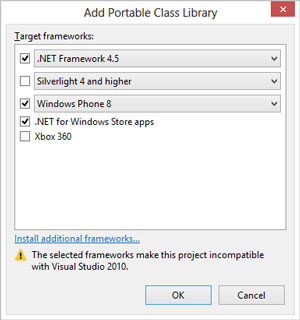
Before I look at design-time data, I'll walk you through setting up the basic structure of an application, which will have three projects: a Windows Phone application (DesignForWP), a Windows Store app (DesignForWin) and a Portable Class Library, or PCL (DesignShared). As Figure 1 illustrates, in the PCL I've removed support for Silverlight and older versions of Windows Phone.
 [Click on image for larger view.]
Figure 1. Configuring target frameworks for the Portable Class Library.
[Click on image for larger view.]
Figure 1. Configuring target frameworks for the Portable Class Library.
Make sure both Windows Phone 8 and Windows Store applications reference the PCL, as this is where the view model that will power the interface will reside.
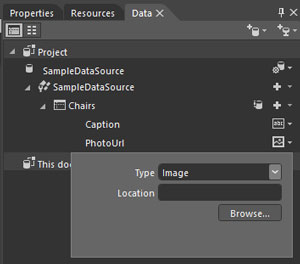
I'll leave Visual Studio for a moment and step across to Blend for Visual Studio in order to create some design-time data. In Blend, open the MainPage of the Windows Phone application. Then from the Data window, click on the "Create sample data" icon in the top-right corner, and select New Sample Data. Accept the default name and location of the new set of design-time data, but uncheck the "Enable sample data when application is running" checkbox. When you click OK, you'll see that a SampleData folder is created in the Windows Phone application and nodes are added to the Data window. Figure 2 shows the structure of the sample data you want to work with after renaming the collection and properties. You should have a collection called Chairs, where each item has a String, Caption, and an Image, PhotoUrl.
 [Click on image for larger view.]
Figure 2. Structuring your design-time data.
[Click on image for larger view.]
Figure 2. Structuring your design-time data.
With your design-time data created, you just need to drag the Chairs node across into the main area of the design surface. When you release the mouse cursor, Blend will create a ListBox, data bind the ItemsSource property (at design time, to the Chairs collection of your design-time data) and create an initial ItemTemplate that controls how each item in the ListBox is presented. Right-click on the ListBox and select Reset Layout | All, which will resize the ListBox to take up the available space. Before moving on, you'll tweak the ItemTemplate slightly. Right-click the ListBox and select Edit Additional Templates | Edit Generated Items (ItemTemplate) | Edit Current. You're now in template-editing mode, where you can adjust the layout of each item in the ListBox. Adjust the XAML for the ItemTemplate to be the following, where the image is placed alongside the caption:
<DataTemplate x:Key="ChairsItemTemplate">
  <Grid Margin="12,0,0,24">
    <Grid.ColumnDefinitions>
      <ColumnDefinition Width="100"/>
      <ColumnDefinition/>
    </Grid.ColumnDefinitions>
    <Image Source="{Binding PhotoUrl}"/>
    <TextBlock Text="{Binding Caption}" Grid.Column="1"
      Style="{StaticResource PhoneTextNormalStyle}"/>
  </Grid>
</DataTemplate>
With your design-time data prepared and wired up for your Windows Phone application, it's time to switch across to the Windows Store app. Before you can adjust the layout in Blend, you'll need to make a few adjustments in Visual Studio to include your design-time data in the Windows Store app project. In Visual Studio, start by copying the entire SampleData folder from the Windows Phone project into the Windows Store app project. Unfortunately, Visual Studio attempts to outsmart you by setting the Build Action and Custom Tool properties automatically for each item added. You'll need to set the Custom Tool property for the .xaml file to MSBuild:MarkupCompilePass1, and then the Build Action on the .xsd file to DesignTimeOnly.
If you attempt to build at this point, you'll notice that there are still some incompatibilities between the design-time data you've copied across and Windows 8. Luckily, these incompatibilities are easily fixed. In the SampleDataSource.xaml.cs, find and replace System.Windows.Media with Windows.UI.Xaml.Media. Next, replace the SampleDataSource constructor with the following:
public SampleDataSource(){
  Windows.UI.Xaml.Application.LoadComponent(this,
    new Uri("ms-appx:///SampleData/SampleDataSource/SampleDataSource.xaml"),
    Windows.UI.Xaml.Controls.Primitives.ComponentResourceLocation.Application);
}
Last, open the SampleDataSource.xaml and replace "clr-namespace" with "using" in the xmlns declaration at the start of the file, and /DesignForWP;component/SampleData with just /SampleData for each of the images. Now your Windows Store application should again be compiling. Essentially, all you've done is made adjustments to cater for differences in namespaces and the way design-time data can be loaded from the XAML file.
In order to use the design-time data, you still need to create an instance of the design-time data within your application. This was done automatically in the Windows Phone application when you dragged the sample data onto the design surface. Open MainPage.xaml in Visual Studio and add the following attribute to the Page element, which references the sample data namespace:
xmlns:sd="using:Expression.Blend.SampleData.SampleDataSource"
Next, add the following attribute to the Grid element:
d:DataContext="{d:DesignInstance IsDesignTimeCreatable=True, Type=sd:SampleDataSource}"
This creates an instance of the SampleDataSource class at design time only (hence the "d" prefix to the DataContext attribute). This completes the steps necessary to wire up the sample data. Now you're able to start laying out the page.
Page Layout
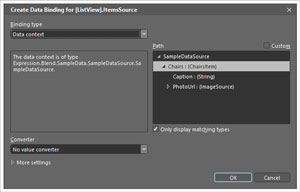
Switch back to Blend and rebuild the solution (if the design-time data doesn't appear, you may need to reload the project). Add a ListView to the page and from the Properties window locate the ItemsSource property. Click the square box next to the ItemsSource property and select Create Data Binding. You should see that Blend detects the current data context and provides you with the ability to select the Chairs collection to data bind to, as shown in Figure 3.
 [Click on image for larger view.]
Figure 3. Configuring ListView data binding in Windows 8.
[Click on image for larger view.]
Figure 3. Configuring ListView data binding in Windows 8.
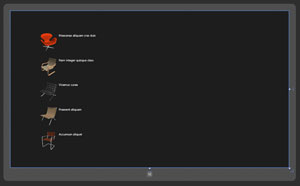
When you click OK you'll see that the ListView is populated with a number of items all showing the class name. Go ahead and create an ItemTemplate by right-clicking on the ListView and selecting Edit Additional Templates | Edit Generated Items (ItemTemplate) | Create Empty. If you want to match the layout of the Windows Phone application, you can simply copy the ItemTemplate used earlier (you'll need to remove the reference to the Windows Phone TextBlock style, though). This should update the layout of your application so you can now see your design-time data, similar to what's shown in Figure 4.
 [Click on image for larger view.]
Figure 4. Designing your Windows Store application.
[Click on image for larger view.]
Figure 4. Designing your Windows Store application.
With all your design work done -- well, at least a first pass at presenting data -- it's time to wire up some real data. I'll demonstrate how to pull some basic image data from Flickr and connect it to your applications.
In the PCL, create a class called MainViewModel. You'll also need to add NuGet references to Json.NET and the Microsoft HTTP Client Libraries. Update your MainViewModel.cs file with the code shown in Listing 1, which exposes a Chairs collection (mirroring your design-time data) and has a LoadChairs method, which will be called on application startup.
Listing 1. Exposing a Chairs collection.
using System;
using System.ComponentModel;
using System.Diagnostics;
using System.Net.Http;
using System.Runtime.CompilerServices;
using System.Runtime.Serialization;
using System.Threading.Tasks;
using Newtonsoft.Json;

namespace DesignShared
{
  public class MainViewModel : INotifyPropertyChanged
  {
    private ChairInfo[] chairs;

    public ChairInfo[] Chairs
    {
      get { return chairs; }
      set
      {
        if (Chairs == value) return;
        chairs = value;
        OnPropertyChanged();
      }
    }

    public async Task LoadChairs()
    {
      try
      {
        var url =
          "http://api.flickr.com/services/feeds/photos_public.gne?format=json&nojsoncallback=true&tags=chair";
        var http = new HttpClient();

        var str = await http.GetStringAsync(url);
        var data = JsonConvert.DeserializeObject<FlickrData>(str);
        Chairs = data.Chairs;
      }
      catch (Exception ex)
      {
        Debug.WriteLine(ex.Message);
      }


    }

    public event PropertyChangedEventHandler PropertyChanged;

    protected virtual void OnPropertyChanged([CallerMemberName] string propertyName = null)
    {
      PropertyChangedEventHandler handler = PropertyChanged;
      if (handler != null) handler(this, new PropertyChangedEventArgs(propertyName));
    }
  }

  [DataContract]
  public class FlickrData
  {
    [DataMember(Name = "items")]
    public ChairInfo[] Chairs { get; set; }
  }

  [DataContract]
  public class ChairInfo
  {
    [IgnoreDataMember]
    public string Photo { get { return Media != null ? Media.ImageUrl : null; } }
    [DataMember(Name = "title")]
    public string Caption { get; set; }

    [DataMember(Name = "media")]
    public MediaInfo Media { get; set; }

    [DataContract]
    public class MediaInfo
    {
      [DataMember(Name = "m")]
      public string ImageUrl { get; set; }
    }
  }
}
You'll notice that the MainViewModel implements the INotifyPropertyChanged event, which is used to indicate to the UI when it needs to update via data binding. There are also mapping classes used to parse the JSON that comes back from Flickr into a list of ChairInfo objects that you can data bind to.
In order to wire up this data, you need to add the following to MainPage.xaml in both the Windows Phone and Windows Store apps:
Page/PhoneApplicationPage
xmlns:designTimeShared="using:DesignTimeShared"

Page.Resources/PhoneApplicationPage.Resources
<designTimeShared:MainViewModel x:Key="Main"/>

Grid
x:Name="RootLayout"
DataContext="{StaticResource Main}"
This creates an instance of the MainViewModel as a Page resource and sets it as the DataContext for the RootLayout Grid, which will cascade down to all child elements, including the ListBox and ListView elements. Last, in the OnNavigatedTo method for the page, you need to invoke the LoadChairs method:
protected override void OnNavigatedTo(NavigationEventArgs e)
{
  base.OnNavigatedTo(e);

  (RootLayout.DataContext as MainViewModel).LoadChairs();
}
And there you have it -- design-time data for both Windows Phone and Windows Store apps, coupled with the ability to load runtime data using a shared PCL. As you've seen in this article, it's possible to get a reasonable amount of reuse between Windows Phone and Windows 8. It's not perfect, and it's not 100 percent reuse; nor is it a single executable, like other platforms. However, you do have the support of best-of-breed development and design tools. The upshot is that any time lost in having to duplicate design or sample data assets is more than made up for by the design capabilities available in Blend.
About the Author
Nick Randolph runs Built to Roam, a consulting company that specializes in training, mentoring and assisting other companies build mobile applications. With a heritage in rich client applications for both the desktop and a variety of mobile platforms, Nick currently presents, writes and educates on the Windows Phone platform.