Code Focused
Run ASP.NET Web API Inside Your Application
ASP.NET Web API is a solid communications framework, and many applications can benefit from breaking free of IIS by including an embedded ASP.NET Web API server.
- By Ondrej Balas
- 08/16/2013
In 2011, Microsoft released ASP.NET Web API, a set of tools for building HTTP-based services using the Microsoft .NET Framework. With it, clients can request data in various formats, such as JSON, XML or OData. And because it communicates over the ubiquitous HTTP protocol, a wide variety of clients can consume those services. One downside to ASP.NET Web API, however, is that it normally requires IIS to be installed on the host machine. Fortunately, you can bypass this requirement by self-hosting ASP.NET Web API within your application.
If you're unfamiliar with ASP.NET Web API and want to learn more, take a look at "Creating an HTTP Service with ASP.NET Web API" by Sam Nasr.
Being tied to IIS can be extremely limiting, as there are so many use cases for an application being able to respond to requests. One of the biggest limitations is in deployment; if you're writing an application being deployed to client machines instead of servers, you'll need IIS installed on all of those machines. And if they're running Home editions of Windows, you're out of luck -- there's no IIS support there. A good example of this is Windows Services: A service running ASP.NET Web API could be much easier to communicate with from a wide variety of clients than if you chose more traditional forms of communication.
Setting up a Self-Hosted ASP.NET Web API Follow along as I create a console application that self-hosts ASP.NET Web API, and can be deployed to machines not running IIS.
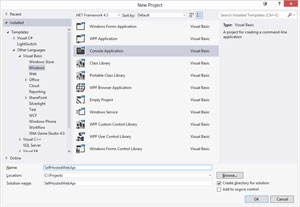
The first step is to create a new application. In this case I'll create a Console Application, as shown in Figure 1.
 [Click on image for larger view.]
Figure 1. Creating a new Console Application.
[Click on image for larger view.]
Figure 1. Creating a new Console Application.
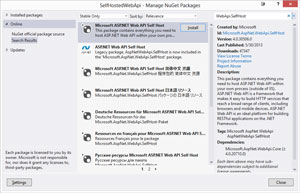
Next, open NuGet by right-clicking the solution in the Solution Explorer window and selecting Manage NuGet Packages. Once there, search for Microsoft ASP.NET Web API Self Host, as shown in Figure 2. From the search results, install the Microsoft ASP.NET Web API Self Host package.
 [Click on image for larger view.]
Figure 2. Adding the Microsoft ASP.NET Web API Self Host NuGet package.
[Click on image for larger view.]
Figure 2. Adding the Microsoft ASP.NET Web API Self Host NuGet package.
Once you've done that, go ahead and add the Controllers and Models folders to your SelfHostedWebApi project, as shown in Figure 3. Now things should be starting to look familiar.
 [Click on image for larger view.]
Figure 3. Add the Controllers and Models folders.
[Click on image for larger view.]
Figure 3. Add the Controllers and Models folders.
ASP.NET Web API is similar to ASP.NET MVC in that controllers -- and, within them, actions -- are the entry point to responding to incoming requests. By default, ASP.NET Web API uses conventions that make your API RESTful by responding to the HTTP verbs differently. Normally when you start an ASP.NET Web API project from a template, the wiring up of that functionality is done for you. Because you didn't start with an ASP.NET Web API template in this case, you'll need to add that configuration code yourself. Replace the code in Module1.vb with the code in Listing 1.
Listing 1. Configuring the ASP.NET Web API HttpSelfHostServer and starting it up.
Imports System.Web.Http.SelfHost
Imports System.Web.Http

Module Module1
  Sub Main()
    Dim config As New HttpSelfHostConfiguration("http://127.0.0.1:21212")

    config.Routes.MapHttpRoute( _
      name:="DefaultApi", _
      routeTemplate:="api/{controller}/{id}", _
      defaults:=New With {.id = RouteParameter.Optional} _
    )

    Using server As New HttpSelfHostServer(config)
      Try
        server.OpenAsync().Wait()
        Console.WriteLine("Listening.")
      Catch aggEx As AggregateException
        Console.WriteLine("Error opening server.")
        Console.WriteLine()
        Console.WriteLine("This error usually means that either this application or Visual Studio itself ")
        Console.WriteLine("is not running with elevated permissions.")
        Console.WriteLine()
        Console.WriteLine("Try running Visual Studio as Administrator by right-clicking on the ")
        Console.WriteLine("Visual Studio icon, and selecting ""Run as Administrator""")
        Console.WriteLine()
        Console.WriteLine("Another work around is to open a command prompt as administrator and type:")
        Console.WriteLine("netsh http add urlacl url=http://+:21212/ user=machine\username")
        Console.WriteLine("replacing machine\username with your machine name, and user name.")
      End Try

      Console.WriteLine()
      Console.WriteLine("Press enter to stop listening and exit.")
      Console.ReadLine()
    End Using

  End Sub
End Module
Take note of the MapHttpRoute method call as part of the creation of the HttpSelfHostConfiguration object. When developing with the standard ASP.NET Web API project template, you'd usually find this in the App_Start\RouteConfig.vb file. I left it in the Sub Main here, but when you start developing a real application you might want to move your routing code to a separate file. Once the configuration object is created, it's used to create the server and then start the server using the OpenAsync method.
Adding the Controller
Next, you'll need to create the controller -- but first you'll need a Product class. I added it to the Models folder:
Public Class Product
  Public Property Id As Integer
  Public Property Name As String
End Class
Now, create the controller by adding a new class to the Controllers folder, named ProductsController; it inherits from ApiController. You can replace the code in ProductsController.vb with the code in Listing 2.
Listing 2. The ProductsController.
Imports System.Web.Http

Namespace Controllers
  Public Class ProductsController
    Inherits ApiController

    Private Shared Products As List(Of Product)

    Shared Sub New()
      Products = New List(Of Product)()
      Products.Add(New Product() With {.Id = 1, .Name = "Balloon"})
      Products.Add(New Product() With {.Id = 2, .Name = "Cake"})
      Products.Add(New Product() With {.Id = 3, .Name = "Party Hat"})
    End Sub

    ' GET api/products
    Public Function GetProducts() As IEnumerable(Of Product)
      Return Products
    End Function

    ' GET api/products/2
    Public Function GetProduct(id As Integer) As Product
      Return Products.Single(Function(p) p.Id = id)
    End Function

    ' POST api/products
    Public Sub PostProduct(<FromBody()> product As Product)
      Products.Add(product)
    End Sub

    ' PUT api/products/5
    Public Sub PutValue(ByVal id As Integer, <FromBody()> product As Product)
      Products.Single(Function(p) p.Id = id).Name = product.Name
    End Sub

    ' DELETE api/products/2
    Public Sub DeleteValue(ByVal id As Integer)
      Products.Remove(Products.Single(Function(p) p.Id = id))
    End Sub
  End Class
End Namespace
In this code, all the ASP.NET Web API methods are acting against a shared list of products so that you can see the changes persisted between requests.
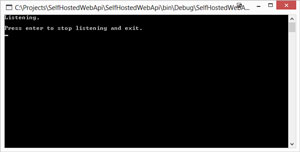
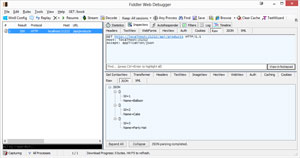
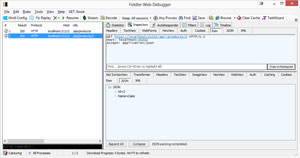
Now try running the application. You'll need to be running Visual Studio with Administrator privileges (see the next section for more information). Once started, you should be presented with a console window, as shown in Figure 4. At this point, Web API is running and ready to respond to your requests. The first thing to try is a simple GET request on /api/products. I've done this in a tool named Fiddler2. As Figure 5 shows, the server correctly responds with the three products created in the shared constructor of the ProductsController class.
 [Click on image for larger view.]
Figure 4. Starting up the self-hosted ASP.NET Web API server.
[Click on image for larger view.]
Figure 4. Starting up the self-hosted ASP.NET Web API server.
 [Click on image for larger view.]
Figure 5. Sending a GET request to /api/products returns all products.
[Click on image for larger view.]
Figure 5. Sending a GET request to /api/products returns all products.
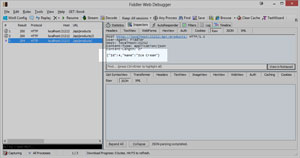
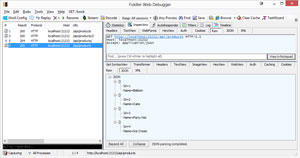
I can also request just one product by performing a GET request on /api/products/2; an example is shown in Figure 6. Adding new products is easy, too. In Figure 7, I make a POST request with a JSON payload containing a new product: Ice Cream. Then in Figure 8, things come full circle, and I make another GET request to api/products. I get all four products back now -- the original three, plus the ice cream that was added in the previous request.
 [Click on image for larger view.]
Figure 6. A GET request sent to /api/products/2 returns the product with an Id of 2.
[Click on image for larger view.]
Figure 6. A GET request sent to /api/products/2 returns the product with an Id of 2.
 [Click on image for larger view.]
Figure 7. You can add a product by sending a POST request with the new product in the body of the request
[Click on image for larger view.]
Figure 7. You can add a product by sending a POST request with the new product in the body of the request
 [Click on image for larger view.]
Figure 8. A GET request returns the new product as well as the original three.
[Click on image for larger view.]
Figure 8. A GET request returns the new product as well as the original three.
Administrative Permissions Required
As I mentioned previously, attempting to run this code in Visual Studio without elevated permissions will cause an exception to be thrown when starting the server. The easiest workaround is to right-click on the Visual Studio icon and select Run as Administrator when starting Visual Studio.
A more permanent solution is to use the netsh.exe tool that comes with Windows to create a URL reservation. Do this by opening a command prompt "as Administrator," and entering this netsh command:
netsh http add urlacl url=http://+:21212/ user=machine\username
Be sure to replace machine\username with the name of your machine and username. You'll also need to change the port if you plan to run the server on a different port. Once complete, you'll no longer need to run Visual Studio with elevated permissions to launch the server.
As you can see, creating an application that self-hosts its own ASP.NET Web API server is a relatively trivial thing to do. And once you lay the groundwork for it, writing code for it is almost identical to writing code for a traditional Web API project. Now you can use this powerful communications layer in a much wider variety of applications and deployment scenarios.
About the Author
Ondrej Balas owns UseTech Design, a Michigan development company focused on .NET and Microsoft technologies. Ondrej is a Microsoft MVP in Visual Studio and Development Technologies and an active contributor to the Michigan software development community. He works across many industries -- finance, healthcare, manufacturing, and logistics -- and has expertise with large data sets, algorithm design, distributed architecture, and software development practices.