C# Corner
Web API 2 Routing Attributes, Part 2
Create a Windows Store app that consumes a Web API service.
Click here for Part 1
In Part 2 of this series on using the new Web API 2 API, I'll be covering the client side of things. I'll go over how to create a Windows Store App within Visual Studio 2012 that consumes the Web API 2 service that was created in Part 1 of the series.
To get started, download the code for Part 1, so you'll be able to run the Web API server that will be consumed by the Windows Store Application. Next, load up the code for Part 1 and start up the Web API server. After you have the server up and running, start up Visual Studio 2012 and create a new Windows Store Blank App (XAML).
The sample application will allow the user to retrieve, created, update, delete and filter blog post records using the Web API service created in Part 1. The first step is to create the BlogPost model class. Create a new directory named Entities within your project, then create a new class file for the BlogPost class.
The BlogPost class is almost the same as it was in Part 1, except I've implemented the INotifyPropertyChanged event to make it behave a little more nicely within the Windows Store application. You'll need to be sure to give the class the same namespace as it is within your Web API 2 server application. Here's the completed BlogPost class implementation:
using System;
using System.ComponentModel;
using System.ComponentModel.DataAnnotations;
using System.Runtime.CompilerServices;

namespace WebApiAttributeDemo.Entities
{
    public class BlogPost : INotifyPropertyChanged
    {
        private long _id;
        private string _title;
        private string _author;
        private string _content;

        [Required]
        public long Id
        {
            get { return _id; }
            set
            {
                if (_id == value) return;
                _id = value;
                NotifyPropertyChanged();
            }
        }

        public string Title
        {
            get { return _title; }
            set
            {
                if (_title == value) return;
                _title = value;
                NotifyPropertyChanged();
            }
        }

        public string Author
        {
            get { return _author; }
            set
            {
                if (_author == value) return;
                _author = value;
                NotifyPropertyChanged();
            }
        }

        public string Content
        {
            get { return _content; }
            set
            {
                if (_content == value) return;
                _content = value;
                NotifyPropertyChanged();
            }
        }

        public DateTime CreatedOn { get; set; }
        public DateTime ModifiedOn { get; set; }

        public event PropertyChangedEventHandler PropertyChanged;

        private void NotifyPropertyChanged([CallerMemberName] String propertyName = "")
        {
            if (PropertyChanged != null)
            {
                PropertyChanged(this, new PropertyChangedEventArgs(propertyName));
            }
        }
    }
}
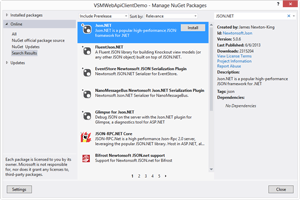
The next item to tackle is the BlogServiceClient class, which will encapsulate all the logic needed to call the Web API web service to handle retrieving and modifying blog posts. Create a new class file named BlogServiceClient within the root of the project. I've chosen to leverage the JSON.NET NuGet package to handle the needed JSON serialization for the BlogServiceClient class, as it's more robust than the built-in DataConstractJsonSerializer class that comes with .NET. Install JSON.NET via the NuGet Package Manager now, as seen in Figure 1.
 [Click on image for larger view.]
Figure 1. Installing Json.NET NuGet package.
Once you have Json.NET installed, open up your BlogServiceClient class file and add a using statement for your Entities namespace:
using WebApiAttributeDemo.Entities;
Next, add a private member variable to store the URI for the Web API service endpoint:
private readonly Uri _webApiUri;
Then initialize the _webApiUrl within the class's constructor:
public BlogServiceClient(string serviceUri)
{
    _webApiUri = new Uri(serviceUri);
}
Next, add the Deserialize<T> method that wraps up the JSON deserialization method from Json.NET:
private async static Task<T> Deserialize<T>(string json)
{
    return await Newtonsoft.Json.JsonConvert.DeserializeObjectAsync<T>(json);
}
Then add the Serialize<T> method that wraps up the JSON serialization method from Json.NET:
private async static Task<string> Serialize<T>(T data)
{
    return await Newtonsoft.Json.JsonConvert.SerializeObjectAsync(data);
}
Next is the GetAllBlogs method, which receives all blogs from the api/blog/Web API service route through the HttpClient's GetAsync method. Then I read in the JSON data from the Web service via the ReadAsStringAsync method on the response's content. Deserialization is handled through the Deserialize method and an ObservableCollection of BlogPost is returned:
public async Task<ObservableCollection<BlogPost>> GetAllBlogs()
{
    using (var client = new HttpClient())
    {
        var response = await client.GetAsync(_webApiUri);
        string content = await response.Content.ReadAsStringAsync();
        var posts = await Deserialize<IEnumerable<BlogPost>>(content);
        return new ObservableCollection<BlogPost>(posts);
    }
}
Now it's time to add the FilterPosts method, which uses the new Web API 2 attributed routes to correctly filter by either an author or date from the given filter. If "*" is passed as the filter, all blog posts are returned via the GetAllBlogs method. Just like the GetAllBlogs method, the FilterPosts method returns an ObservableCollection of BlogPosts from the Web service:
public async Task<ObservableCollection<BlogPost>> FilterPosts(string filter
 {
     filter = filter.Replace(" ", "%20");
     if (filter == "*")
         return await GetAllBlogs();

     using (var client = new HttpClient())
     {
         var response = await client.GetAsync(_webApiUri + "/" + filter);
         string content = await response.Content.ReadAsStringAsync();
         var posts = await Deserialize<IEnumerable<BlogPost>>(content);
         return new ObservableCollection<BlogPost>(posts);
     }
 }
The CreatePost method sends the given BlogPost record to the Web service to be inserted into the database. The first step is to serialize the given post through the Serialize method, then create a new StringContent object with a media type of "application/json", along with the serialized blog post. Next, use the PostAsync method on the constructed HttpClient to send the blog post to the Web service via the /api/blog/ route. Finally, call the EnsureSuccessStatusCode on the response object to ensure that an HTTP 200 code was received. If any other HTTP status code is returned, an exception is thrown:
public async Task CreatePost(BlogPost post)
{
    using (var http = new HttpClient())
    {
        string content = await Serialize(post);
        var stringContent = new StringContent(content);
        stringContent.Headers.ContentType = new System.Net.Http.Headers.MediaTypeHeaderValue("application/json");
        var response = await http.PostAsync(_webApiUri, stringContent);
        response.EnsureSuccessStatusCode();
    }
}
The UpdatePost method is almost the same as the CreatePost method, except the PutAsync method is used on the HttpClient and the route used is api/blog/id:
public async Task UpdatePost(BlogPost post)
{
    using (var http = new HttpClient())
    {
        string content = await Serialize(post);
        var stringContent = new StringContent(content);
        stringContent.Headers.ContentType = new System.Net.Http.Headers.MediaTypeHeaderValue("application/jso
        var response = await http.PutAsync(new Uri(_webApiUri + "/" + post.Id), stringContent);
        response.EnsureSuccessStatusCode();
    }
}
The DeletePost method takes a given BlogPost object and uses an HttpClient to perform an HTTP Delete to the /api/blog/id route. Like the UpdatePost method, the EnsureSuccessStatusCode is called upon the received response at the end of the method, to ensure an HTTP 200 was received:
public async Task DeletePost(BlogPost post)
 {
     using (var http = new HttpClient())
     {
         var response = await http.DeleteAsync(_webApiUri + "/" + post.Id);
         response.EnsureSuccessStatusCode();
     }
 }
The BlogServiceClient class is now complete:
using System;
using System.Collections.Generic;
using System.Collections.ObjectModel;
using System.Net.Http;
using System.Threading.Tasks;
using WebApiAttributeDemo.Entities;

namespace VSMWebApiClientDemo
{
    public class BlogServiceClient
    {
        private readonly Uri _webApiUri;

        public BlogServiceClient(string serviceUri)
        {
            _webApiUri = new Uri(serviceUri);
        }

        private async static Task<T> Deserialize<T>(string json)
        {
            return await Newtonsoft.Json.JsonConvert.DeserializeObjectAsync<T>(json);
        }

        private async static Task<string> Serialize<T>(T data)
        {
            return await Newtonsoft.Json.JsonConvert.SerializeObjectAsync(data);
        }

        public async Task<ObservableCollection<BlogPost>> GetAllBlogs()
        {
            using (var client = new HttpClient())
            {
                var response = await client.GetAsync(_webApiUri);
                string content = await response.Content.ReadAsStringAsync();
                var posts = await Deserialize<IEnumerable<BlogPost>>(content);
                return new ObservableCollection<BlogPost>(posts);
            }
        }

        public async Task<ObservableCollection<BlogPost>> FilterPosts(string filter)
        {
            filter = filter.Replace(" ", "%20");
            if (filter == "*")
                return await GetAllBlogs();

            using (var client = new HttpClient())
            {
                var response = await client.GetAsync(_webApiUri + "/" + filter);
                string content = await response.Content.ReadAsStringAsync();
                var posts = await Deserialize<IEnumerable<BlogPost>>(content);
                return new ObservableCollection<BlogPost>(posts);
            }
        }

        public async Task CreatePost(BlogPost post)
        {
            using (var http = new HttpClient())
            {
                string content = await Serialize(post);
                var stringContent = new StringContent(content);
                stringContent.Headers.ContentType = new System.Net.Http.Headers.MediaTypeHeaderValue("application/json");
                var response = await http.PostAsync(_webApiUri, stringContent);
                response.EnsureSuccessStatusCode();
            }
        }

        public async Task UpdatePost(BlogPost post)
        {
            using (var http = new HttpClient())
            {
                string content = await Serialize(post);
                var stringContent = new StringContent(content);
                stringContent.Headers.ContentType = new System.Net.Http.Headers.MediaTypeHeaderValue("application/json");
                var response = await http.PutAsync(new Uri(_webApiUri + "/" + post.Id), stringContent);
                response.EnsureSuccessStatusCode();
            }
        }

        public async Task DeletePost(BlogPost post)
        {
            using (var http = new HttpClient())
            {
                var response = await http.DeleteAsync(_webApiUri + "/" + post.Id);
                response.EnsureSuccessStatusCode();
            }
        }
    }
}
Now that the BlogServiceClient has been implemented, it's time to add the UI for the application. Open up the MainPage.xaml file and copy the root <Grid> element's content:
<Page
    x:Class="VSMWebApiClientDemo.MainPage"
    xmlns="http://schemas.microsoft.com/winfx/2006/xaml/presentation"
    xmlns:x="http://schemas.microsoft.com/winfx/2006/xaml"
    xmlns:local="using:VSMWebApiClientDemo"
    xmlns:d="http://schemas.microsoft.com/expression/blend/2008"
    xmlns:mc="http://schemas.openxmlformats.org/markup-compatibility/2006"
    mc:Ignorable="d">

    <Grid Background="{StaticResource ApplicationPageBackgroundThemeBrush}">
        <StackPanel Margin="12">
            <TextBlock>Filter (* for all)</TextBlock>
            <TextBox Name="Filter" Text="*"></TextBox>
            <Button Name="Fetch" Click="Fetch_Click">Fetch</Button>
            <ListView Name="Posts" ItemsSource="{Binding}" SelectionChanged="Posts_OnSelectionChanged">
                <ListView.ItemTemplate>
                    <DataTemplate>
                        <StackPanel Name="Post" Margin="4,2">
                            <StackPanel Orientation="Horizontal">
                                <TextBlock Margin="0,0,2,0">Title:</TextBlock>
                                <TextBlock Name="Title" Text="{Binding Title}"></TextBlock>
                            </StackPanel>
                            <StackPanel Orientation="Horizontal">
                                <TextBlock Margin="0,0,2,0">Author:</TextBlock>
                                <TextBlock Name="Author" Text="{Binding Author}"></TextBlock>
                            </StackPanel>
                            <StackPanel Orientation="Horizontal">
                                <TextBlock Margin="0,0,2,0">Posted On:</TextBlock>
                                <TextBlock Name="UpdatedOn" Text="{Binding ModifiedOn}"></TextBlock>
                            </StackPanel>
                            <TextBlock Name="Body" Text="{Binding Content}" TextWrapping="NoWrap"></TextBlock>
                        </StackPanel>
                    </DataTemplate>
                </ListView.ItemTemplate>
            </ListView>
            <StackPanel Name="CurrentPost">
                <TextBlock>Title</TextBlock>
                <TextBox Name="Title" Text="{Binding Title, Mode=TwoWay}"></TextBox>
                <TextBlock>Author</TextBlock>
                <TextBox Name="Author" Text="{Binding Author, Mode=TwoWay}"></TextBox>
                <TextBlock>Body</TextBlock>
                <TextBox Name="Body" Text="{Binding Content, Mode=TwoWay}" TextWrapping="Wrap" MinHeight="200" Margin="0,2"></TextBox>
                <Button Name="Save" Click="Save_Click">Save</Button>
                <Button Name="Delete" Click="Delete_Click">Delete</Button>
            </StackPanel>
        </StackPanel>
    </Grid>
</Page>
The UI allows the user to type in some filter criteria via the Filter TextBox. Then they can fetch results from the Web API service through the Fetch button. Once the Fetch button is clicked, all received blog posts are loaded into the Posts ListView. The user may then select an individual blog post and either update it via the Save button or delete it via the Delete button. A new blog post can be created by clearing a selected blog post in the List View through a ctrl+click.
Now it's time to tie everything together in the MainPage's code-behind. Open up the MainPage.xaml.cs file, then add a using statement for the Entities namespace:
using WebApiAttributeDemo.Entities;
Next, add three member variables to the MainPage class to store a collection of blog posts, the current blog post and the BlogServiceClient:
private ObservableCollection<BlogPost> _blogPosts;
private BlogPost _currentPost;
private BlogServiceClient _serviceClient;
In the OnNavigatedTo method, instantiate the _blogServiceClient and _currentPost objects and bind them to the Posts and CurrentPost XAML elements, respectively:
protected override void OnNavigatedTo(NavigationEventArgs e)
 {
     _serviceClient = new BlogServiceClient("http://localhost:49499/api/blog/");
     _currentPost = new BlogPost();
     Posts.DataContext = _blogPosts;
     CurrentPost.DataContext = _currentPost;
 }
(Note that you'll need to replace http://localhost:49499 with your Web API 2 service's running host and port number.)
Next, implement the click event handler for the save button via the Save_Click method. In the Save_Click method, first check to see if the _currentPost has an ID of 0. If its ID is 0, call the CreatePost method on the _serviceClient. Then get all the blogs and bind the Posts object to the received blogs from the Web service:
if (_currentPost.Id == 0)
{
    await _serviceClient.CreatePost(_currentPost);
    _blogPosts = await _serviceClient.GetAllBlogs();
    Posts.DataContext = _blogPosts;
}
If the _currentPost has a non-zero ID, call the UpdatePost method, passing in the _currentPost object:
else
{
    await _serviceClient.UpdatePost(_currentPost);
}
Last, set the SelectedIndex on the Posts element to -1 to unselect any selected blog posts within the Posts ListView:
Posts.SelectedIndex = -1;
Here's the completed Save_Click method:
private async void Save_Click(object sender, RoutedEventArgs e)
 {
     if (_currentPost.Id == 0)
     {
         await _serviceClient.CreatePost(_currentPost);
         _blogPosts = await _serviceClient.GetAllBlogs();
         Posts.DataContext = _blogPosts;
     }
     else
     {
         await _serviceClient.UpdatePost(_currentPost);
     }

     Posts.SelectedIndex = -1;
 }
Now, implement the handler for the Posts element's SelectionChanged event via the Posts_OnSelectionChanged event method. If an item's been selected, I assign it to the _currentPost object:
if (e.AddedItems.Count > 0)
 {
     _currentPost = e.AddedItems[0] as BlogPost;
 }
If an item's been unselected, I set the _currentPost to a new BlogPost to clear all input fields for the blog post:
else if (e.RemovedItems.Count > 0)
{
    _currentPost = new BlogPost();
}
The last step here is to set the DataContenxt of the CurrenPost element with the updated _currentPost object:
CurrentPost.DataContext = _currentPost;
The completed Posts_OnSelectionChanged implementation.
private void Posts_OnSelectionChanged(object sender, SelectionChangedEventArgs e)
{
    if (e.AddedItems.Count > 0)
    {
        _currentPost = e.AddedItems[0] as BlogPost;
    }
    else if (e.RemovedItems.Count > 0)
    {
        _currentPost = new BlogPost();
    }

    CurrentPost.DataContext = _currentPost;
}
The Fetch_Click method handles the Click event on the Fetch button. In the Fetch_Click method, the Posts ListView is bound to the filtered posts via the FilterePosts method on the _serviceClient filtered by the input on the Filter TextBox:
private async void Fetch_Click(object sender, RoutedEventArgs e)
{
    Posts.DataContext =  await _serviceClient.FilterPosts(Filter.Text);
}
Next, handle the Click event on the Delete button by calling the DeletePost method passing in the _currentPost object, then remove _currentPost from the _blogPosts ObservableCollection and reset the _currentPost to a new BlogPost to clear all of its content:
private async void Delete_Click(object sender, RoutedEventArgs e)
{
    await _serviceClient.DeletePost(_currentPost);
    _blogPosts.Remove(_currentPost);
    _currentPost = new BlogPost();
}
This is what the completed MainPage class implementation should look like:
using System.Collections.ObjectModel;
using Windows.UI.Xaml;
using Windows.UI.Xaml.Controls;
using Windows.UI.Xaml.Navigation;
using WebApiAttributeDemo.Entities;

// The Blank Page item template is documented at http://go.microsoft.com/fwlink/?LinkId=234238

namespace VSMWebApiClientDemo
{
    /// <summary>
    /// An empty page that can be used on its own or navigated to within a Frame.
    /// </summary>
    public sealed partial class MainPage : Page
    {
        private ObservableCollection<BlogPost> _blogPosts;
        private BlogPost _currentPost;
        private BlogServiceClient _serviceClient;

        public MainPage()
        {
            this.InitializeComponent();
        }

        /// <summary>
        /// Invoked when this page is about to be displayed in a Frame.
        /// </summary>
        /// <param name="e">Event data that describes how this page was reached.  The Parameter
        /// property is typically used to configure the page.</param>
        protected override void OnNavigatedTo(NavigationEventArgs e)
        {
            _serviceClient = new BlogServiceClient("http://localhost:49499/api/blog/");
            _currentPost = new BlogPost();
            Posts.DataContext = _blogPosts;
            CurrentPost.DataContext = _currentPost;
        }

        private async void Save_Click(object sender, RoutedEventArgs e)
        {
            if (_currentPost.Id == 0)
            {
                await _serviceClient.CreatePost(_currentPost);
                _blogPosts = await _serviceClient.GetAllBlogs();
                Posts.DataContext = _blogPosts;
            }
            else
            {
                await _serviceClient.UpdatePost(_currentPost);
            }

            Posts.SelectedIndex = -1;
        }

        private void Posts_OnSelectionChanged(object sender, SelectionChangedEventArgs e)
        {
            if (e.AddedItems.Count > 0)
            {
                _currentPost = e.AddedItems[0] as BlogPost;
            }
            else if (e.RemovedItems.Count > 0)
            {
                _currentPost = new BlogPost();
            }

            CurrentPost.DataContext = _currentPost;
        }

        private async void Fetch_Click(object sender, RoutedEventArgs e)
        {
            Posts.DataContext =  await _serviceClient.FilterPosts(Filter.Text);
        }

        private async void Delete_Click(object sender, RoutedEventArgs e)
        {
            await _serviceClient.DeletePost(_currentPost);
            _blogPosts.Remove(_currentPost);
            _currentPost = new BlogPost();
        }
    }
}
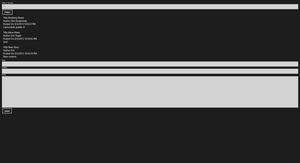
The application is now completed. You should be able to receive all blog posts by entering in a "*" filter and clicking the Fetch button, as seen in Figure 2.
 [Click on image for larger view.]
Figure 2. Fetching all blogs.
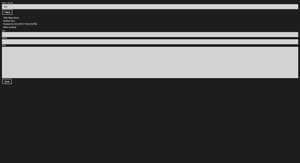
You can also fetch blog posts by author. Type the author's name into the Filter text, then click Fetch, as shown in Figure 3.
 [Click on image for larger view.]
Figure 3. Blogs, filtered by author.
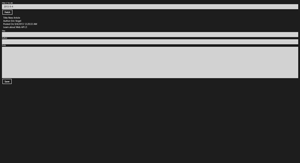
You can also filter blog posts by date. Enter a date into the Filter criteria, then click the Fetch button (Figure 4).
 [Click on image for larger view.]
Figure 4. Blogs, filtered by date.
With fewer than 100 lines of code, you were able to fully communicate with the Web API service from a Windows Store App. Through the expressiveness of the Web API 2 attributed routes, you also saw how simple it was to filter data through a simple URI. Additionally, the same Web API service can easily be consumed from a Web or mobile application through its RESTful API. Now, if only the Web API client could be generated from inspecting the Web API service.