C# Corner
Virtual Reality in the .NET Framework, Part 1
Eric Vogel covers the Oculus Rift VR headset and how to put it too good use in your .NET apps in Part 1 of this series.
More on this topic:
The promise of Virtual Reality (VR) for all has been made since the 90s. Back then VR was all the rage, and it appeared we'd all be hooked into virtual worlds in no time. The problem was that VR was too clunky and expensive for the everyday consumer. VR was used, but only in very specialized markets and academic research. Fast-forward to the present day and affordable VR is here through a successful KickStarter campaign by Oculus VR and its Oculus Rift headset.
The Oculus Rift is currently only available as a development kit with full head tracking for $299. The resolution is 1280x800, or about 640x800 pixels per eye. A consumer model is actively being worked on and will have at least 1080p resolution (1920x1080).
Being an avid gamer and VR enthusiast, I decided to pick one up in early July; I received my development kit in mid August. Since then I've been exploring the available games, tech demos, and development environments. The current development options are the native SDK in C++ with DirectX/OpenGL, Unity, UDK or one of the .NET C# wrappers.
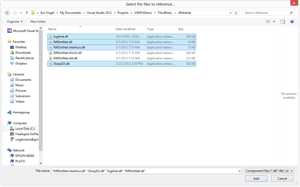
Today I'll be covering how to get setup with the RiftDotNet managed C# wrapper for the Oculus SDK. The sample application will display some basic device capabilities and the current orientation and acceleration sensor readings. To get started, create a new WPF application in Visual Studio 2012, then download the code sample. You'll need to add references the RiftDotNet.dll, RidtDotNet.Interface.dll, SharpDx.dll, and Log4Net.dll assemblies from the ThirdParty folder in the code download, as seen in Figure 1.
 [Click on image for larger view.]
Figure 1. Adding RiftDotNet references and dependencies.
The RiftDotNet.Win32.dll and RiftDotNet.x64.dll files are the 32-bit and 64-bit wrappers for the Occulus SDK.
Next, I add the UI for the app. Open up MainWindow.xaml and copy the root <Grid> element content:
<Window x:Class="VSMVrDemo.MainWindow"
        xmlns="http://schemas.microsoft.com/winfx/2006/xaml/presentation"
        xmlns:x="http://schemas.microsoft.com/winfx/2006/xaml"
        Title="MainWindow" Height="350" Width="525">
    <Grid>
        <StackPanel>
            <StackPanel Name="DeviceInfo">
                <TextBlock>Device Name</TextBlock>
                <TextBlock Name="DeviceName" Text="{Binding Manufacturer}"></TextBlock>
                <TextBlock>IPD</TextBlock>
                <TextBlock Name="Ipd" Text="{Binding InterpupillaryDistance}"></TextBlock>
                <TextBlock>Horizontal Resolution</TextBlock>
                <TextBlock Name="HResolution" Text="{Binding HResolution}"></TextBlock>
                <TextBlock>Vertical Resolution</TextBlock>
                <TextBlock Name="VResolution" Text="{Binding VResolution}"></TextBlock>
            </StackPanel>
            <StackPanel Name="OrientationInfo">
                <TextBlock>Orientation</TextBlock>
                <TextBlock Name="Orientation" Text="{Binding Orientation}"></TextBlock>
                <TextBlock>Acceleration</TextBlock>
                <TextBlock Name="Acceleration" Text="{Binding Acceleration}"></TextBlock>
            </StackPanel>
        </StackPanel>
    </Grid>
</Window>
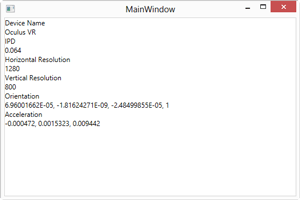
As you can see, the sample application displays the name of the device, inter-pupillary distance, resolution, orientation and acceleration of the Occulus Rift. The next step is to put the RidtDotNet library to good use to read the sensor data from the Rift.
I add private member variables of type IHMD and HMDManager that will store the active device and the device manager respectively. Then I create the HMDManager instance and retrieve the IHMD device through the RiftDotNet API:
_hmdManager = new HMDManager();
_hmd = _hmdManager.AttachedDevice;
Next, I check if the device was retrieved successfully; if it wasn't, I display a message box notifying the user to plug-in the VR headset and wait for the device to be attached:
if (_hmd == null)
 {
     MessageBox.Show("Please attach your VR headset.");
     _hmd = _hmdManager.WaitForAttachedDevice(null);
 }
Once the device has been attached, I get the basic device information and bind it to the DeviceInfo StackPanel:
DeviceInfo.DataContext = _hmd.Info;
Then I reset the device and bind it to the OrientationInfo StackPanel to display the initial orientation and acceleration readings:
_hmd.Reset();
OrientationInfo.DataContext = _hmd;
The next step is to construct and start a dispatch timer to update the orientation and acceleration readings every 16ms (roughly 60 times per second):
var dispatcherTimer = new System.Windows.Threading.DispatcherTimer();
dispatcherTimer.Tick += UpdateLoop;
dispatcherTimer.Interval = new TimeSpan(0, 0, 1);
dispatcherTimer.Start();
The UpdateLoop method updates the OrientationInfo data context to refresh its display:
private void UpdateLoop(object sender, EventArgs eventArg
{
    OrientationInfo.DataContext = null;
    OrientationInfo.DataContext = _hmd;
}
Here's the completed MainPage class implantation.
using System;
using System.Windows;
using RiftDotNet;

namespace VSMVrDemo
{
    /// <summary>
    /// Interaction logic for MainWindow.xaml
    /// </summary>
    public partial class MainWindow : Window
    {
        private readonly IHMD _hmd;
        private readonly HMDManager _hmdManager;

        public MainWindow()
        {
            InitializeComponent();

            _hmdManager = new HMDManager();
            _hmd = _hmdManager.AttachedDevice;
            if (_hmd == null)
            {
                MessageBox.Show("Please attach your VR headset.");
                _hmd = _hmdManager.WaitForAttachedDevice(null);
            }

            DeviceInfo.DataContext = _hmd.Info;
            _hmd.Reset();
            OrientationInfo.DataContext = _hmd;

            var dispatcherTimer = new System.Windows.Threading.DispatcherTimer();
            dispatcherTimer.Tick += UpdateLoop;
            dispatcherTimer.Interval = new TimeSpan(0, 0, 0, 0, 16);
            dispatcherTimer.Start();
        }

        private void UpdateLoop(object sender, EventArgs eventArgs)
        {
            OrientationInfo.DataContext = null;
            OrientationInfo.DataContext = _hmd;
        }
    }
}
Congratulations, you've just created your first Oculus Rift app in managed code (see Figure 2)!
 [Click on image for larger view.]
Figure 2. The completed application.
As you can see, it's very easy to detect and get the Oculus Rift set up with RiftDotNet. Stay tuned for Part 2, where I'll cover how to render an interactive stereoscopic 3D scene.
About the Author
Eric Vogel is a Senior Software Developer for Red Cedar Solutions Group in Okemos, Michigan. He is the president of the Greater Lansing User Group for .NET. Eric enjoys learning about software architecture and craftsmanship, and is always looking for ways to create more robust and testable applications. Contact him at [email protected].