In-Depth
6 Top Tips for Visual Studio 2013
Visual Studio 2013 has many new features; which ones are the most important? Here are the first six that promise to improve your productivity the greatest (more coming next month!)
- By Deborah Kurata
- 02/14/2014
More on This Topic:
Every new release of Visual Studio advertises that it increases developer productivity. But with Visual Studio 2013 you might just find that the marketing is true! Visual Studio 2013 comes with many new features that can really change the way you work.
This two-part series covers 13 tips for improving your productivity with Visual Studio 2013. Enjoy!
Tip #1: Upgrade to Visual Studio 2013 If you're currently using Visual Studio 2012 and have an MSDN subscription, there are no barriers to upgrading to Visual Studio 2013. Even if your team must remain on Visual Studio 2012, you can upgrade to Visual Studio 2013. That's because you can open, edit and save a Visual Studio 2012 project with Visual Studio 2013 without affecting others on the team using Visual Studio 2012. (This is also true of most Visual Studio 2010 SP1 projects. You can open, edit and save them with Visual Studio 2013. See the Visual Studio Documentation site for more project compatibility information.)
But you still need to support users of your application running Windows XP? No problem. Visual Studio 2013 can target the Microsoft .NET Framework 4 and the resulting applications can run on Windows XP. (In fact, Visual Studio 2013 can target back to .NET Framework 2.0.) As an example, for the past few years I've been working with a client building a desktop product. Because they can't control the end-user systems, we used Visual Studio 2013 targeting version 4 of the .NET Framework and have successfully deployed to Windows XP users.
Tip #2: Use Peek Definition Whether perusing or stepping through code, out of habit most developers use Go To Definition (F12) to quickly jump to a referenced property or method. Go To Definition is a great feature in that it helps you follow through the flow of an application by displaying the referenced code file in the Preview tab and taking you to the definition of the property or method. The downside of Go To Definition is that it takes you somewhere else.
For example, say there's a problem in a Customer class Retrieve method. You're focused on following the code in the Retrieve method and want to take a quick look at the referenced Invoice class Retrieve method. F12, Bang! Context switch! You're now looking at the Invoice Retrieve method. Drill down a little further and it's easy to lose your focus on the Retrieve method from which you started.
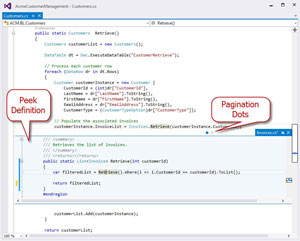
Peek Definition (Alt+F12) provides you the benefits of Go To Definition without actually taking you anywhere. It opens the code file and displays the referenced definition directly beneath the line on which you're focused, pushing your code lines down so it doesn't cover them up. And if you drill down again, you get a second page in the Peek Definition window containing that referenced definition. Each definition is accessible using the Pagination Dots as shown in Figure 1.
 [Click on image for larger view.]
Figure 1. The Peek Definition Window displays the referenced property or method.
[Click on image for larger view.]
Figure 1. The Peek Definition Window displays the referenced property or method.
Click on a Pagination Dot in the Peek Definition window to display each definition in your call stack. This makes it easy to navigate your related code without losing focus on the primary method. Staying focused on the problem at hand can indeed make you more productive.
Every time you think to press F12, press Alt+F12 instead. Peek the definition instead of traveling to it.
Tip #3: Make Your Scroll Bar Work Scroll bars have been in Windows since about Windows 95. Like a teenager, all this time they've just been lounging around. Well, it's time to put them to work!
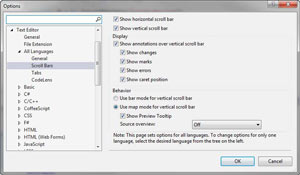
The first step is configuration. Right-click on the vertical scroll bar of a Text Editor window and select Scroll Bar Options. The Options dialog is displayed with Scroll Bars selected in the left tree as presented in Figure 2. (Or just select Tools | Options from the menu and type "Scroll bars" in the new Options dialog search box.)
 [Click on image for larger view.]
Figure 2. Configure your scroll bars to make them work for you.
[Click on image for larger view.]
Figure 2. Configure your scroll bars to make them work for you.
The Display options allow you to specify the annotations that appear in the scroll bar. The Visual Studio team has taken the thin vertical scroll bar and divided it into three thin columns as shown in Figure 3. The first column displays annotations indicating the changes you've made: yellow for unsaved changes, green for recently saved changes. The second column displays annotation marks for break points, find results and bookmarks. The third column displays warning and error annotations.
 [Click on image for larger view.]
Figure 3. Scroll bar annotations provide an overview of your code file.
[Click on image for larger view.]
Figure 3. Scroll bar annotations provide an overview of your code file.
Use the Options dialog to turn on or off the annotations you wish to display in the toolbar. You can also select to display a vertical line in the scroll bar showing your current caret position.
The Behavior options shown in Figure 2 define how your scroll bar should behave. Use Bar mode to select the standard scroll bar behavior. The scroll bar will then work as in prior versions of Visual Studio. Click above the current scroll location to page up, click below the current scroll location to page down.
But if you want your scroll bar to really work for you, select Map mode. When Map mode is on, clicking on the scroll bar takes you to the associated location in the code. You can click on an error icon in the scroll bar and move directly to the error. If the error is in a region, the region is automatically opened. Same thing happens if you click on a find result or a break point: you're immediately taken to the appropriate location in the code. This is much more efficient than just scrolling or paging up and down.
With Map mode, you can also select "Show Preview Tooltip." If this is checked, hovering over a point in the scroll bar shows you the code at that point. This is especially useful when using the scroll bar with find results. You can preview the find results before performing a replace, for example, just by hovering over the scroll bar.
The scroll bar can also show you a "mini-me" version of your entire code file. Use the Source overview option to select whether to view the source within the scroll bar and the desired width of the display. Personally, I find the source overview distracting and turn it off as you can see in Figure 2.
Try the scroll bar options for yourself and get the scroll bar working for you.
Tip #4: Try Out Navigate To Navigate To (Ctrl+Comma) was introduced in Visual Studio 2010 and is greatly enhanced in Visual Studio 2013. It's one of those features often labeled "undiscoverable" because there's no menu option, no toolbar option and no View Window option. Type it into Quick Launch and you won't see it. You just have to know it's there.
Navigate To allows you to perform fuzzy matches on any symbol (class, property, method and so on) or code file name (including a search of the full path name). For example, say you remember you have some method that calculates a discount. Was it CalculateDiscount? CalculateADiscount? DiscountCalculation? With Navigate To it doesn't matter. Type in "Calculate Discount" and it will find all files, classes, properties, methods or other symbols that contain both the word "Calculate" and the word "Discount" anywhere in the name.
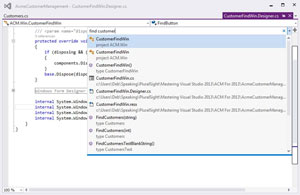
In the example shown in Figure 4, typing "find customer" into Navigate To found a project called CustomerFindWin and automatically opened its designer in the preview tab. It also found three files and three methods containing both "find" and "customer."
 [Click on image for larger view.]
Figure 4. Use Navigate To to quickly locate files, classes, properties, methods or other symbols in your code.
[Click on image for larger view.]
Figure 4. Use Navigate To to quickly locate files, classes, properties, methods or other symbols in your code.
If you want to locate symbols without searching full file paths and file names, prefix the search string with an at sign (@). For example, "@find customer" will only find occurrences of "find" and "customer" in your symbols. It won't find the three matching file names.
Use Navigate To (Ctrl+Comma) to quickly navigate to any file, class, property, method or other symbol in your code.
Tip #5: Keep Your Hands on the Keyboard Some developers prefer to learn the keyboard shortcuts for most operations in order to minimize the amount of time moving from keyboard to mouse and back again. If you're one of these developers, Visual Studio added a feature that can help you keep your hands on the keyboard for even more tasks.
In prior versions of Visual Studio, to drag and drop a line of code you had to either select it, cut it, move to where you want, and paste it or you had to grab the mouse, select the lines, and drag it to the new location. In Visual Studio 2013, you can now drag and drop code using the arrow keys. The trick is to hold down the Alt key.
To move lines with the keyboard:
- Move your cursor anywhere within the line. You don't have to select the entire line.
- Hold the Alt key and press the up or down arrow keys until the line is where you want it.
To move multiple lines with the keyboard:
- Select any portion of a set of lines. (Shift+Arrow Up/ArrowDown)
- Hold the Alt key and press the up or down arrow keys until the lines are where you want them.
The other new feature in Visual Studio 2013 that can save you some time typing is the automatic brace completion. Type an open parenthesis and Visual Studio will automatically add the closing parenthesis. Type an open brace or bracket and Visual Studio will automatically add the closing brace or bracket. Type a quote (single or double) and Visual Studio will automatically add the closing quote.
Press the Tab key to move past the automatically inserted character. If by habit you type the closing parenthesis/brace/bracket/quote, Visual Studio is smart enough to overwrite the automatic character with the character you type so that you don't end up with a duplicate.
Here are some examples:
- Typing: Retrieve( results in: Retrieve(<cursor here>)
- Typing: Retrieve(<tab> results in Retrieve()<cursor here>
- Typing: Retrieve() results in Retrieve()<cursor here>
If your fingers have great muscle memory, the automatic brace completion may take a bit of time to get used to. But once they do you can save some keystrokes and therefore some time.
Tip #6: Enjoy the New "Heads Up" Display Called CodeLens The No. 1 feature that has improved my productivity and changed the way I work is the new CodeLens. CodeLens provides a "heads up" display so you can see detailed information about a property or method directly above its signature. CodeLens is an awesome feature, but it isn't listed as the first tip in my list because it has one big drawback: it's only available in the Ultimate Edition of Visual Studio.
Click on the References indicator (or press ALT+2) above a property or method to open the CodeLens popup and view each line of code that calls that property or method. Hover over each reference to see a tooltip containing a snippet of the code. Double-click on a reference to open the reference in the Preview tab. Click the Dock Popup button in the upper right corner to dock the popup window with your other toolbox windows at the bottom of Visual Studio.
The CodeLens References feature provides a quick and easy way to see where a property or method is used and to optionally navigate to that code.
Click on the Test Status indicator above a property or method to view the automated code tests that call that property or method. From the CodeLens popup, you can run all or a selected test. Or you can double-click to open the test in the Preview tab.
Imagine this new workflow:
- Change some code in a method.
- Click the Test Status CodeLens indicator and re-run all tests for the method.
- Adjust the code as needed.
- Repeat until the tests pass.
Or this workflow if you're doing Test-Driven Development (TDD):
- Write a unit test and make it fail (Red).
vWrite the code until the test passes by any means necessary (Green) -- without leaving the code.
- Change the code to improve it as required (Refactor) while still ensuring that all tests pass -- without the need to leave the code!
No need to locate the associated tests. No need to open the Test Explorer. You can refactor and rerun your tests from the CodeLens popup until your tests pass, without leaving your code.
And if you have Team Foundation Server (TFS) 2013 installed, you get additional CodeLens indicators showing you the number of check-ins that included the method, the last persons to check in the method, and the linked TFS items such as bugs or work items.
So, yes, Visual Studio 2013 can indeed improve your productivity. Try it out and let me know what you think. Post your comments here and be sure to check back for 7 more tips in my next article.
About the Author
Deborah Kurata is an independent consultant who specializes in designing and developing successful Microsoft .NET applications and mentoring software developers. She has authored several technical books, speaks at conferences and has published several Pluralsight courses including Mastering Visual Studio 2013. For her work in support of software developers, she has been recognized with the Microsoft MVP award.