Code Focused
How to Refactor for Dependency Injection, Part 6: Binding by Convention
Explicitly setting all the bindings needed to compose your application -- that's a lot of work! See how to use convention over configuration to save time and make your composition easier to understand.
- By Ondrej Balas
- 10/28/2014
If you've been following this series on dependency injection (DI), you might have noticed that up until now I have explicitly configured the containers before using them to resolve dependencies. A lot of times this configuration ends up being fairly repetitive, and most developers hate repetition. The nice thing about conventions is that once they're configured, you don't have to adjust them as your application grows. In my examples I'll be using Ninject version 3.2 and an extension library named Ninject.Extensions.Conventions, both available through NuGet.
Simple Conventions
The first step toward conventions-based binding is to start with a simple automatic binding of each class to any interface it directly implements. This is the simplest kind of binding you can use that will still be useful in most applications. In this example, I have an IDataRepository interface and a DataRepository class that implements it like this:
public interface IDataRepository
{
}

public class DataRepository : IDataRepository
{
}
My goal is to make a request for an IDataRepository and get back an instance of DataRepository. To accomplish that with a conventions-based binding, I can use an overload of the kernel's Bind method that's provided in Ninject.Extensions.Conventions, like this:
var kernel = new StandardKernel();
kernel.Bind(convention => convention
  .FromThisAssembly()
  .SelectAllClasses()
  .BindSingleInterface());
var
This new overload allows me to access classes and interfaces in a way that's quite similar to LINQ. In the previous code I start by calling FromThisAssembly, which tells the kernel to only look within the current assembly. Then I call SelectAllClasses, which will select every class that isn't an abstract class. Finally, BindSingleInterface does two things: It first asserts that each selected class implements exactly one interface, then it binds each class to that interface.
My simple example works, but it will quickly begin to fall apart if left as is. BindSingleInterface will throw an exception if it runs across any classes that don't implement a single interface, even classes that implement no interface at all. Fortunately, there's a great deal of flexibility built in, allowing you to customize the extension as you see fit. Here's one option that's a slight improvement over the previous one:
kernel.Bind(convention => convention
  .FromThisAssembly()
  .SelectAllClasses()
  .InNamespaces("MyApp.Data")
  .BindSingleInterface());
Here, I add the InNamespaces filter to only select the classes that are in the MyApp.Data namespace. This allows me to keep the BindSingleInterface option, in case I do want to assert that each class in my MyApp.Data namespace implements a single interface. Another option is:
kernel.Bind(convention => convention
  .FromThisAssembly()
  .SelectAllClasses()
  .BindDefaultInterface());
The BindDefaultInterface option allows you to bind based on naming conventions. It will only automatically bind a class to its interface if the interface has the same name, preceded with an I. This means the IDataRepository interface will be bound to the DataRepository class, but it will not be bound to any other class, even if it implements IDataRepository. This option is useful if you have relatively simplistic bindings of one interface to one class, but it still lacks flexibility. An even better option is this one:
kernel.Bind(convention => convention
  .FromThisAssembly()
  .SelectAllClasses()
  .BindDefaultInterfaces());
The logic behind this option checks to see if the name of the interface (excluding the first character) exists within the name of each class. In the case of the IDataRepository interface, any class implementing it that has a name ending in DataRepository would be automatically bound. For example, you could have a FakeDataRepository and RealDataRepository that would both automatically be bound as implementations of IDataRepository. An even more useful thing than that is doing the binding conditionally based on in which mode the application is running.
I prefer to use fake versions of my data repositories while developing, so it's handy to be able to easily switch between fake and real data. Using a conventions-based approach, one way this can be done is like this:
kernel.Bind(convention => convention
  .FromThisAssembly()
  .SelectAllClasses()
  .StartingWith(useFakeData ? "Fake" : "Real")
  .BindDefaultInterfaces());
The StartingWith option only selects the classes that have names starting with the passed in string. This is as far as I usually tend to go with conventions before I supplement them with explicit bindings, but if you need even more control you can go even further:
kernel.Bind(convention => convention
  .FromThisAssembly()
  .SelectAllClasses()
  .Where(t => t.Name.StartsWith(
useFakeData ? "Fake" : "Real"))
.BindDefaultInterfaces());
The Where configuration option allows you to do any sort of checking on the Type of the object being bound, and return a Boolean for whether it should go through with the binding.
Plugins: Dynamically Loading Assemblies at Runtime
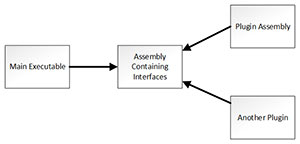
Now that I've gone through some of the more commonly used filtering and binding options available, it's time for the next step: plug-ins, which are little more than conventions-based bindings that look for implementations of an interface in other assemblies. When starting with this kind of architecture, you should first split the code out into multiple projects: the main executable, a project defining the interfaces that plug-ins will implement, and the plug-ins themselves. Figure 1 shows how that should look, with the lines representing the references between projects.
 [Click on image for larger view.]
Figure 1. A Typical Project Structure Used with Plug-in Architectures
[Click on image for larger view.]
Figure 1. A Typical Project Structure Used with Plug-in Architectures
The first thing you`ll notice is that the assembly containing interfaces (or abstractions) does not reference anything else. It's important for the seam to exist between the main executable and any plugins. The main executable also does not reference the plugins directly, and all of the binding happens at run time once those assemblies have been loaded in, a process called late binding. The code to do this is actually quite similar to the code above, but rather than looking within the current assembly Ninject is instructed to scan some other assemblies. There are a few configuration options here but here's the one I prefer to use:
kernel.Bind(convention => convention
  .FromAssembliesInPath(@"C:\somewhere\plugins\are\located\")
  .SelectAllClasses()
  .Where(t => t.Name.StartsWith(useFakeData ? "Fake" : "Real"))
  .BindDefaultInterfaces());
This code uses the FromAssembliesInPath configuration to give it a folder in which to scan for assemblies. I usually just set this to the plugins folder within the same folder the current executable is in, like this:
string pluginsPath = Path.Combine(Path.GetDirectoryName(new Uri(Assembly.GetExecutingAssembly().CodeBase).LocalPath), "plugins\\");
  if (!Directory.Exists(pluginsPath)) Directory.CreateDirectory(pluginsPath);
Benefits of Plug-in Architectures
There are numerous benefits to using plug-in architectures in your code. The use of plug-ins allows your team to easily split work across the natural boundaries that are formed. It can also make deployment much easier, because an update to a plug-in doesn't require the entire application to be re-deployed.
Another interesting benefit is that the plug-in developers don't need the source code for the system for which they're developing. This becomes especially interesting when you think about what a plug-in actually is: a piece of functionality external to a system that may be added to it by abiding by a contract pre-defined by that system. By that definition, every application you write is technically a plug-in. Even phone and desktop apps are plug-ins -- they abide by a contract that has been pre-defined by the OS of the device they target.
Another benefit is that new plug-ins can be made to extend a system far beyond what the original developers initially intended. The canonical example of this is our electrical system. You can plug things into that system today that didn't even exist when the system was invented. Cell phones, big-screen televisions, and even cars can plug into an electrical system that has existed long before many of those things were even thought possible.
Next Time, with MEF
In this article I showed you how to use the Ninject extension Ninject.Extensions.Conventions to implement a simple plug-in architecture. Next month I'll conclude this series by showing how you can do the same with the Microsoft Managed Extensibility Framework, and also how it's much different from the containers I've shown in the series thus far.
About the Author
Ondrej Balas owns UseTech Design, a Michigan development company focused on .NET and Microsoft technologies. Ondrej is a Microsoft MVP in Visual Studio and Development Technologies and an active contributor to the Michigan software development community. He works across many industries -- finance, healthcare, manufacturing, and logistics -- and has expertise with large data sets, algorithm design, distributed architecture, and software development practices.