Tips and Tricks
A Visual Studio Trick for Creating External Lists for SharePoint
Make Visual Studio do the hard work to simplify the creation of external lists that can be used to connect outside data to your SharePoint projects.
- By Malin De Silva
- 01/12/2015
SharePoint stores data in a list, which is an interface that displays and allows read and write operations to a SQL Server/Express database called a "Content Database". To facilitate this, SharePoint turns to the Business Connectivity Service to connect with data located outside of a SharePoint site. BCS in turn uses external content types to make this possible.
The beauty of external content types is that they are reusable. SharePoint Designer as well as Visual Studio can be used as development tools to import and export them through the SharePoint Central Administration site. SharePoint is able to get at that external data through the concept of an external list. Any collection of data from just about any source can be made accessible through external lists.
In this article I'll use Visual Studio to create an external content type and manually create an external list from it. It's just a simple example, and you can use the steps here as a guide to connect with any external data source and display data with a SharePoint list. With a little bit more effort, you will be able to enable Create, Update and Delete list item operations as well.
Here's a typical problem: I need to display the articles published in the Microsoft Official Blog showing the article title, link to the article and the published date in a SharePoint list. We'll grab the info from the Microsoft RSS feed at http://blogs.microsoft.com/feed/.
Rather than provide lots of code, I will create the external content type using Visual Studio, then deploy and show how to create a list manually. The list can be created using a feature receiver via C# code as well.
Apart from Visual Studio 2012 or 2013 and a fully functional SharePoint Server, you need to install Business Data Connectivity Service Application and activate the service.
Creating the Visual Studio Solution
To start, create a new project with the "SharePoint 2013 – Empty Project" template and name it "MSBlogReader." The solution should be a farm solution.
Right-click on the project in Solution Explorer and add a new "Business Data Connectivity Model (Farm Solution only)" in the Office/ SharePoint section of the Add New Item window, as shown in Figure 1. Name it "MSBlogReaderModel."
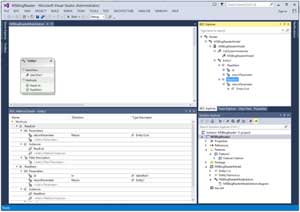
[Click on image for larger view.]
Figure 1. Creating the MSBlogReaderModel Window
Now you will see the new model added, along with two files named Entity1.cs and Entity1Service.cs. Also, if you double-click on the MSBlogReaderModel.bdcm file, an object with the name Entity1 will appear in the BDC Designer. Once you click on top of it you will see the BDC Method Details window at the bottom and the BDC Explorer window to the right of that. If these windows are not available, you can add them by going to View | Other Windows in Visual Studio.
Defining the BDC Entity
Now let's look at how to display the list columns. Every SharePoint list item has an ID, then a Title. Besides those two you also need two other columns: the link to the article and the published date. So the columns and the types of the list are as follows:
-
ID - int32
- Title - string
- LinkToArticle - string
- PublishedDate - string
Delete the "Entity1" object in the BDC Designer. Then drag and drop a new Entity from the toolbox. Rename the Entity title to "BlogArticle." Delete the existing Entity1Service.cs file and rename the EntityService.cs file to BlogArticleService.cs and Entity1.cs file to BlogArticle.cs in the Solution Explorer.
Replace the content in the BlogArticle class in the BlogArticle.cs (previously Entity1.cs) file with following properties:
public partial class BlogArticle
{
    public int ID { get; set; }
    public string Title { get; set; }
    public string LinkToArticle{ get; set; }
    public string PublishedDate { get; set; }
}
The components should appear as in Figure 2.
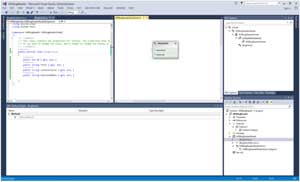
[Click on image for larger view.]
Figure 2. Defining the Four Entities for Our External List
Now go to the BlogArticle entity in the BDC Designer and right-click on the Identifiers section. Then click "Add New Identifier." Right-click on the newly added Identifier1 entity and go to its properties. Change the Name property to "ID" and ''Type Name" property to "System.Int3."
Select BlogArticle again in the BDC Designer and go to BDC Method Details window. Expand the dropdown and select "Create Finder Method." A new set of options should appear in the BDC Method Detail window. Again expand and this time select "Create Specific Finder Method."
You should now see two methods created in the BlogArticleService class named ReadList and ReadItem as in Figure 3.
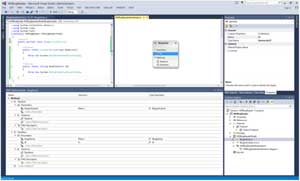
[Click on image for larger view.]
Figure 3. ReadList and ReadItem Methods Now Appear in the BlogArticleService Class
Now select the BlogArticle entity in the BDC Designer and go to the BDC Explorer window, as shown in Figure 4. Expand ReadList, the blogArticleList, and then BlogArticleList. You'll see BlogArticle as the end node. Right-click it and go to properties, then change the Type Name property from System.String to BlogArticle from the Current Project tab.
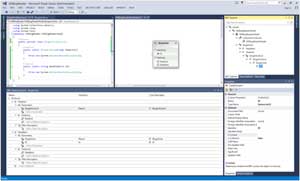
[Click on image for larger view.]
Figure 4. Changing BlogArticle's Properties
Go back to the BlogArticle end node, then right-click it and select "Add type Descriptor." Then go to properties and change Name property to ID and Type Name property to System.Int32. Finally, set the Identifier property to ID.
Follow the same steps and add the other Type Descriptors with the following Names and Type Descriptors (do not change the Identifier property):
-
Title to System. String
- LinkToArticle to System.String
- PublishedDate to System.String
Now, let's go to the ReadItem node in the BDC Explorer. Expand the blogArticle node and locate the BlogArticle end node. Go to the BlogArticle node in the ReadList node that we just modified, right-click and copy it. Now come back to the blogArticle node under the ReadItem node and paste the copied item. Click Yes in the Replacing Type Descriptor window to replace the earlier one.
Now select BlogArticleList node in the ReadList node and change the Type Name property to BlogArticle in the Current Project section. Now the BDC Explorer should look like Figure 5.
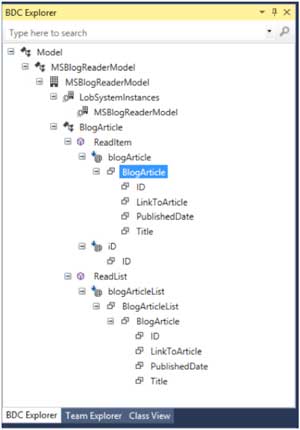
[Click on image for larger view.]
Figure 5. BDC Explorer with New Classes Added
These two methods can be used to display items in a list and display a single item when one is selected. You can also add Create, Update and Delete operations using the BDC Method Details window and customize them further through the BDC Explorer.
Now, let's configure the ReadList and ReadItem methods. First go to the References and add System.ServiceModel reference, then copy and paste following code in the BlogArticleService.cs file:
using System.Collections.Generic;
using System.Globalization;
using System.Linq;
using System.ServiceModel.Syndication;
using System.Xml;

namespace MSBlogReader.MSBlogReaderModel
{
    public partial class BlogArticleService
    {
        private const string FeedUrl = "http://blogs.microsoft.com/feed/";

        private const string DateDisplayFormat = "MM-dd-yyyy";

        private static List blogArticles = new List<BlogArticle>();

        public static IEnumerable ReadList()
        {
            XmlReader reader = XmlReader.Create(BlogArticleService.FeedUrl);
            SyndicationFeed feed = SyndicationFeed.Load(reader);
            reader.Close();

            blogArticles = new List<BlogArticle>();

            int id=0;
            foreach (SyndicationItem item in feed.Items)
            {
                BlogArticle currentArticle = new BlogArticle();
                currentArticle.ID = id;
                currentArticle.Title = item.Title.Text;
                currentArticle.LinkToArticle = item.Links[0].Uri.AbsoluteUri;
                currentArticle.PublishedDate = item.PublishDate.Date.ToString(BlogArticleService.DateDisplayFormat, CultureInfo.InvariantCulture);
                blogArticles.Add(currentArticle);
                id++;
            }

            return blogArticles;
        }

        public static BlogArticle ReadItem(int iD)
        {
            return blogArticles.Where(m => m.ID == iD).First();
        }
    }
}
This will replace the ReadList and ReadItem methods and add two references.
Here we've created a static list of BlogArticle objects to facilitate the ReadItem operation. I assign my own id so the identifier does not get duplicated. Then I use XML feed provided at http://blogs.microsoft.com/feed/ to iterate through the syndication items and populate the static BlogArticle object list.
That's it! Now that we've got the coding done, let's deploy. First, right-click the solution in the Solution Explorer and deploy the solution. Rename the feature name, as it will be better to identify it later if you need to, and then set the "Always Force Install" property to "True" if needed.
If you were to open the feature, you would see that it is defined at farm level and you'd be able to see the MSBlogReaderModel added as an item in the feature.
In case of a failed deployment, check that there is a Business Connectivity Service available as a service application and that the farm service relevant to Business Connectivity Service is started.
Set Permissions on External Content Type
Go to Business Connectivity Service Application by clicking on Central Administration | Application Management | Manage service applications | Business Data Connectivity Service Application (the name may change depending on what is given when creating the service application).
A new external content type should appear with the name "BlogArticle" as shown in Figure 6.
[Click on image for larger view.]
Figure 6. BlogArticle External Content Type Should Now Be Visible
Hover over the Name link and locate the down arrow appearing as you hover. Select "Set Permissions option" and the "Set Object Permissions" window will appear. Add the users who will need to access the external content type. Basically everyone should have "Execute' permission and at least one person should have "Set Permissions" permission. Click OK to save changes.
Create External List
Go to the Site Contents page of the site that needs the external list created. Select the "add an app" option, and then select the "External List" template from the ones listed. The "Adding External List" window will appear, as in Figure 7.
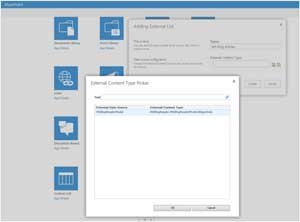
[Click on image for larger view.]
Figure 7. External Content Type Picker Window in SharePoint
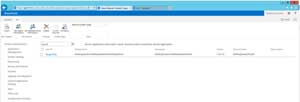
Give the List name as "MS Blog Articles" and click OK to select the newly created External Content Type. Click Create to create the list, with the results is shown in Figure 8.

[Click on image for larger view.]
Figure 8. Now, A List of Blog Articles Can Be Displayed on a SharePoint Site
Now I can display the information about Microsoft's latest blog posts in my site.
I showed an example using BCS to connect with an RSS feed, but you can use this tip to connect to any other source of data like databases, Web services, XML files and many more.
The BCS architecture has gone through lots of improvement since SharePoint 2010. With new features like remote event receivers, BCS makes it the ultimate choice for connecting to external data sources with SharePoint.
About the Author
Malin De Silva is a SharePoint Specialist at Exilesoft and has been involved in many custom development projects, intranets, search, and other projects using SharePoint, .NET, Java and PHP. Malin is a frequent contributor to many forums, including Sri Lanka .NET Forum and SharePoint Sri Lanka. Connect with him on LinkedIn or Facebook.