Cross Platform C#
A Simple Data Binding Trick for an iOS App
Display data to a user with Xamarin.iOS and this nifty class.
Applications and businesses live on data. Data is what makes a business a business, generates value for customers, and allows a company to generate income. Displaying data to a user is a common operation, especially in mobile. It might be immensely important for a salesperson to get the last bit of information before visiting a client or to display the location of a restaurant via a local consumer-oriented app. In this article, I'll look at the UITableViewController class that allows you to get at and display that data in an iOS app.
UITableViewController
The UITableViewController class is a UIViewController in iOS that's designed to display a UITableView within a full window. A UITableView is a UIView in iOS that provides a built-in mechanism to display data in a grid. The grid is made up of cells, and each cell represents a row of data. In this article, the example will use Xamarin.Mobile to get a list of contacts from a user's address book.
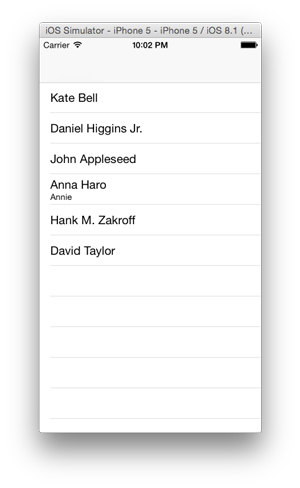
Figure 1 shows a list of contacts from the address book of the iOS simulator.
 [Click on image for larger view.]
Figure 1. Displaying Contacts in a UITableView
[Click on image for larger view.]
Figure 1. Displaying Contacts in a UITableView
The steps to populate the UITableView with data in this example are as follows:
- The class inherits from the UITableViewController. This provides the class to override the necessary methods. These methods include the ViewDidLoad, RowsInSection and GetCell methods.
- In the ViewDidLoad method, the code needs to access the address book. iOS doesn't allow a program to directly access a user's address book without permission. The application will request permission via the Xamarin.Mobile AddressBook class. The user will give permission to the application the first time the program attempts to get a list of contacts from the address book on the iPhone. Once permission is granted, subsequent calls to the address book via the same program will already have access to it and won't require the user to continually grant permission.
- The RowsInSection method will return the number of rows in a given section. In the iPhone simulator, there are only a few users, so merely placing all of the rows in a single section is fine.
- The GetCell method will return a cell to be displayed in the UITableView. Two items of note within the GetCell method are the DequeReusableCell and the UITableViewCellStyle. The DequeReusableCell method will get a cell if one already exists. The code checks to determine if a cell is returned. If no cell is returned, such as in an initial load situation, the GetCell method will instantiate a cell instance to be used. The UITableViewCellStyle enumeration allows an application to use one of the four built-in cell styles. If an application needs to use a custom cell, this will be the line of code that's changed to support the custom cell type.
Listing 1 shows the code.
Listing 1: The UITableViewController Class
public class DatabindController : UITableViewController
{
    List<Contact> people;
    string cellIdentifier = "cell";
    UIRefreshControl uirc;

    public DatabindController ()
    {
        people = new List<Contact>();
    }
  public override void ViewDidLoad ()
    {
        base.ViewDidLoad ();
        var book = new Xamarin.Contacts.AddressBook ();
        uirc = new UIRefreshControl();
        uirc.ValueChanged += (sender, e) => {
            people = (from b in book select b).ToList();
            this.TableView.ReloadData();
            uirc.EndRefreshing();
        };
        RefreshControl = uirc;

        book.RequestPermission().ContinueWith (t => {
            if (!t.Result) {
                Console.WriteLine ("Permission denied by user or manifest");
                return;
            }
            people = (from b in book select b).ToList();
            this.TableView.ReloadData();
        }, TaskScheduler.FromCurrentSynchronizationContext());
    }
    public override nint RowsInSection (UITableView tableview, nint section)
    {
        return people.Count;
    }

    public override UITableViewCell GetCell (UITableView tableView, NSIndexPath indexPath)
    {
        UITableViewCell cell = tableView.DequeueReusableCell (cellIdentifier);
        if (cell == null)
            cell = new UITableViewCell (UITableViewCellStyle.Subtitle, cellIdentifier);
        cell.TextLabel.Text = people[indexPath.Row].DisplayName;
        cell.DetailTextLabel.Text = people[indexPath.Row].Nickname;
        return cell;
    }
}
Pull To Refresh
One of the interesting features that comes from social media is the need to update a UITableView based on new data. Tweetie was the first application to implement this functionality. Pull to refresh was added in iOS 6. It's fairly simple to add this functionality:
- Create an instance of the UIRefreshControl.
- Handle the ValueChanged event. This event is fired once the pull to refresh is initiated by the user.
- Once the operation is finished, the refresh control's UI indicating that an update is occurring must be turned off. This is completed via the .EndRefreshing method call.
- The final step in this example is to assign the UIRefreshControl to the RefreshControl property of the UITableViewController:
uirc = new UIRefreshControl();
uirc.ValueChanged += (sender, e) => {
    people = (from b in book select b).ToList();
    this.TableView.ReloadData();
    uirc.EndRefreshing();
};
RefreshControl = uirc;
Cell Styles
There are four built-in cell styles in a UITableView. These cell styles are:
- Default: Supports a UIImageView and one UILabel that can be used to display text.
- Subtitle: Supports a UIImageView and two UILabels to display text to a label.
- Value1: Supports a UIImageView, a left-aligned UILabel and a right-aligned UILabel.
- Value2: Supports a right-aligned title and a left-aligned subtitle.
Indexes and Sections
What is a user to do when he's trying to find one particular record in a list of 50, 100 or 3,000 records? The UITableView has support for indexes and sections. An index is a list on the right-hand side of the screen that allows a user to quickly jump to a section. A section is a group of cells that are grouped together that have something in common. In this example, the index is the first letter of the display names from the address book. The sections are the contacts that are the first letter of the display name.
Note: I have 3,800 people in my iPhone address book. If I have ever met you, you are most likely in my phone. Trying to find a single person in 3,800 contacts is nearly hopeless without some help. Imagine trying to scroll through to someone whose name begins with a Z. Interestingly, no one in my personal address book has a last name that starts with X (sorry, Xavier).
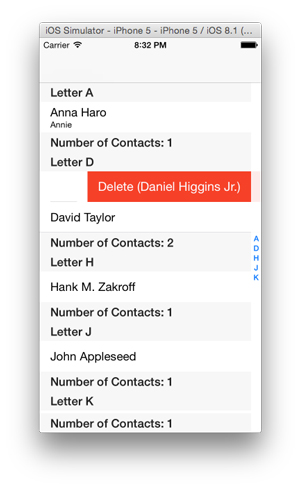
Figure 2 shows a list of contacts with the index and sections being displayed.
 [Click on image for larger view.]
Figure 2. Displaying List of Contacts with Index and Sections
[Click on image for larger view.]
Figure 2. Displaying List of Contacts with Index and Sections
The steps to add the index and the sections to the UITableView are:
- When the view is first loaded, a query is made to determine the first letter of the display names that are within the address book. This is not a requirement. However, it does allow for a slight improvement in the display of content by not displaying unused letters.
- The RowsInSection method is modified to determine the number of rows in a given section.
- The NumberOfSections method is created, and it will tell the UITableView the number of sections there are.
- The SectionIndexTitles method will return the values for the section items.
- The TitleForHeader and TitleForFooter methods will display the title and footer for a given section.
- Finally, the given GetCell method is modified to determine the specific cell that needs to be displayed. Previously, the .Row property of the NSIndexPath was used. When working with sections, it's important to use the .Section, as well as the .Row properties.
Listing 2 shows the code.
Listing 2: The UITableViewController Class, This Time with Indexes and Sections
public class DatabindController : UITableViewController
{
    List<Contact> people;
    string cellIdentifier = "cell";
    UIRefreshControl uirc;
    string[] letters = new string[] { "A", "B", "C", "D", "E", "F", "G", "H", "I",
        "J", "K", "L", "M", "N", "O", "P", "Q", "R", "S", "T", "U", "V", "W", "X", "Y", "Z" };
    Dictionary<string, string> indexedTableItems;
    string[] keys;
    public DatabindController ()
    {
        people = new List<Contact>();
        keys = new string[0];
    }

    public override void ViewDidLoad ()
    {
        base.ViewDidLoad ();
        var book = new Xamarin.Contacts.AddressBook ();
        uirc = new UIRefreshControl();
        uirc.ValueChanged += (sender, e) => {
            people = (from b in book select b).ToList();
            this.TableView.ReloadData();
            uirc.EndRefreshing();
        };
        RefreshControl = uirc;

        book.RequestPermission().ContinueWith (t => {
            if (!t.Result) {
                Console.WriteLine ("Permission denied by user or manifest");
                return;
            }
            people = (from b in book select b).ToList();
            indexedTableItems = new Dictionary<string, string>();
            foreach (var l in letters) {
                var ContactCount = (from p in people where p.DisplayName.ToUpper().StartsWith(l) select p).Count();
                if (ContactCount > 0 )
                {
                    indexedTableItems.Add(l, l);
                }
            }
            keys = indexedTableItems.Keys.ToArray ();
            this.TableView.ReloadData();
        }, TaskScheduler.FromCurrentSynchronizationContext());
    }
    public override nint RowsInSection (UITableView tableview, nint section)
    {
        var count = (from p in people where p.DisplayName.ToUpper().StartsWith(keys[section].ToUpper()) select p).Count();
        return count;
    }
    public override string[] SectionIndexTitles (UITableView tableView)
    {
        return keys;
    }
    public override nint NumberOfSections (UITableView tableView)
    {
        return keys.Length;
    }
    public override string TitleForHeader (UITableView tableView, nint section)
    {
        return String.Format("Letter {0}", keys[section]);
    }
    public override string TitleForFooter (UITableView tableView, nint section)
    {
        var count = (from p in people where p.DisplayName.ToUpper().StartsWith(keys[section].ToUpper()) select p).Count();
        return String.Format("Number of Contacts: {0}", count);
    }
    public override UITableViewCell GetCell (UITableView tableView, NSIndexPath indexPath)
    {
        UITableViewCell cell = tableView.DequeueReusableCell (cellIdentifier);
        if (cell == null)
            cell = new UITableViewCell (UITableViewCellStyle.Subtitle, cellIdentifier);
        var pe = (from p in people where p.DisplayName.ToUpper().StartsWith(keys[indexPath.Section]) select p).ToList()[indexPath.Row];

        cell.TextLabel.Text = pe.DisplayName;
        cell.DetailTextLabel.Text = pe.Nickname;
        return cell;
    }
}
Swiping To Delete a Record
The swipe to perform an operation is a common action. The steps to perform it entail three methods that must be overridden:
- CommitEditingStyle: When a user swipes to delete, this method is called, and the necessary code is run. There are two basic operations that are shown in this code. These are to remove the associated record from the UITableView, as well as to remove the associated record from the local list of data. If the program is working with remote data, this is the point where a user would call to remove the data from the remote data store.
- CanEditRow: This method determines whether a row can be edited in a UITableView. In this example, all rows can be edited. An NSIndexPath object is passed to the method. As a result, some rows can be deleted and some not, if the application so chooses.
- TitleForDeleteConfirmation: This method will return the text that will be displayed when the user swipes to delete.
Figure 3 shows the swipe to delete. When the user swipes to the left, an option is presented to delete the contact. Don't worry -- the contact won't actually be deleted from your address book in this example.
 [Click on image for larger view.]
Figure 3. The Swipe-To-Delete Action
[Click on image for larger view.]
Figure 3. The Swipe-To-Delete Action
Listing 3 shows the code.
Listing 3: The Class, Now with a Swipe to Delete
public override void CommitEditingStyle (UITableView tableView, UITableViewCellEditingStyle editingStyle, Foundation.NSIndexPath indexPath)
{
    switch (editingStyle) {
    case UITableViewCellEditingStyle.Delete:
        // remove the item from the underlying data source
        var pe = (from p in people where p.DisplayName.ToUpper().StartsWith(keys[indexPath.Section]) select p).ToList()[indexPath.Row];
        people.Remove(pe);
        // delete the row from the table
        tableView.DeleteRows (new NSIndexPath[] { indexPath }, UITableViewRowAnimation.Fade);
        // in this example, the person will return when the refresh control fires.
        break;
    case UITableViewCellEditingStyle.None:
        Console.WriteLine ("CommitEditingStyle:None called");
        break;
    }
}
public override bool CanEditRow (UITableView tableView, NSIndexPath indexPath)
{
    return true; // return false if you wish to disable editing for a specific indexPath or for all rows
}
public override string TitleForDeleteConfirmation (UITableView tableView, NSIndexPath indexPath)
{   // Optional - default text is 'Delete'
    // remove the item from the underlying data source
    var pe = (from p in people where p.DisplayName.ToUpper().StartsWith(keys[indexPath.Section]) select p).ToList()[indexPath.Row];

    return "Delete (" + pe.DisplayName + ")";
}
Other Features of the UITableView
The UITableView is a great control for displaying data. This article has only looked at a few of the features of the UITableView/UITableViewController. Some of the other features include:
- The UITableViewController is good for a full screen display of the UITableView. What happens when there's a need for displaying a UITableView in a portion of the screen? For this, you'd use the UITableView directly along with the UITableViewDataSource.
- Although this article looked at the built-in cells of the UITableView, it's entirely possible to use a custom cell to display data in another format.
- The UITableView supports a larger editing mode than just deleting data.
- Selecting a row and performing an operation based on the cell that's selected.
I'm planning to look at these features, as well as some others, in the near future.
Wrapping Up
In this article, I looked at the basics of the UITableViewController and tried to look at the most common features used in an application. These features include:
- Basic data binding that allows an application to display data to a user.
- Built-in cell types, which allow you to have some options in displaying data to users.
- Grouping data into sections and allowing for it to be displayed in somewhat smaller chunks. This can be helpful for the user to comprehend the data at which he's looking.
- Swiping to delete is easy to perform in a mobile environment and can help the user easily remove unnecessary data.
Happy data binding!