Cross Platform C#
Developing Your First Apple Watch App
Learn how to get started writing apps for your wrist!
- By Greg Shackles
- 06/02/2015
Apple's new wearable is finally making it out to users, which means now is the time to start building apps for it! First, let's take a look at the different pieces that make up a watch app.
- Watch App: While you might think that this is where most of your app logic will live, watch apps actually offload all real work to their parent apps. The watch app itself effectively contains just the user interface and not any of the code behind it.
- Parent App: This is the normal iOS app you're already familiar with, and what users will download from the app store. Even if your app is meant to only target the Apple Watch you still need a parent app that lives on the user's iOS device.
- Watch Extension: Similar to other extensions on iOS, a watch extension is used to connect the watch app with its parent app, and also contains the code that drives the watch app's user interface.
When defining your watch app's interface there are three interactions you can take advantage of:
- Normal: the main UI that users can interact with when the app is active
- Glances: a non-interactive view of the app that can give users important information quickly. Tapping on a glance will result in launching the full app
- Notifications: Watch apps leverage the normal iOS notification system by default, but apps can choose to provide a custom interface to use for displaying notifications
Only the normal interaction mode is required for a watch app, but you can choose to add customized glances and notifications to help enhance your user experience as appropriate. In this article I'll focus on just the normal mode.
Create a Basic App
With that background in place, let's go ahead and start writing a basic app. First, create a new iOS app project using the "Single View App (iPhone)" template and name it MyFirstWatchApp. Once that's created, add a new Watch App project to the solution as well named WatchApp. This will add both a watch app and watch extension to the solution, as described earlier.
Now we have all the projects we need, but there are a few hoops to jump through to make sure all the bundle identifiers are configured correctly.
Open the Info.plist file in the MyFirstWatchApp project, and update the app's identifier to com.visualstudiomagazine.MyFirstWatchApp. Next, open the watch app's Info.plist file, set the identifier to com.visualstudiomagazine.MyFirstWatchApp.watchkitapp, and set the companion app ID to com.visualstudiomagazine.MyFirstWatchApp. Now open the extension's Info.plist file, set the identifier to com.visualstudiomagazine.MyFirstWatchApp.watchkitextension, and set the WKApp bundle ID to com.visualstudiomagazine.MyFirstWatchApp.watchkitapp.
You can probably see the pattern here -- each identifier needs to share the same root identifier, and then use the predefined conventions for the app and extension identifiers. Finally, add a reference from MyFirstWatchApp to the extension project.
Now we can start creating the interface, so open up Interface.storyboard in the watch app project. You'll find three controllers defined in the storyboard by default, corresponding to the three interaction modes mentioned earlier.
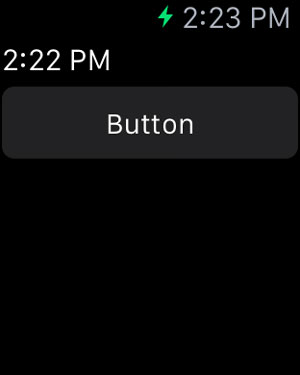
Open the toolbox and drag a label and a button into the interface controller's surface, naming them MyLabel and MyButton so they can be accessed from code. Double click on the button, which will add a new method named MyButton_Activated to the InterfaceController class to handle when that button is tapped. In this method I'll just update the label to display the current time:
partial void MyButton_Activated(WKInterfaceButton sender)
{
    MyLabel.SetText(DateTime.Now.ToShortTimeString());
}
It's also important to note that this InterfaceController class is located in the extension project, and not the app project itself where the storyboard lives. The same goes for the glance and notification controllers as well.
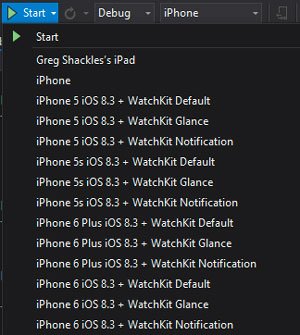
To run the app, simply set the extension project as your startup project and choose the start configuration you want to use (see Figure 1).
For each device simulator you'll find options for starting in default, glance, and notification modes. You can use these to launch the app in each of these modes depending on what you want to test. In this case I'll run on an iPhone 5S using the WatchKit Default mode.
Once the app loads it should look like Figure 2. If you don't see the watch simulator or want to switch sizes, you can find the watch devices in the Hardware | External Displays menu of the iOS simulator.
 [Click on image for larger view.]
Figure 1: Options for Starting a Watch App in Different Interaction Modes
[Click on image for larger view.]
Figure 1: Options for Starting a Watch App in Different Interaction Modes
 [Click on image for larger view.]
Figure 2: Running a Basic Watch App
[Click on image for larger view.]
Figure 2: Running a Basic Watch App
Interacting with the Parent App
Now that I have a basic app set up and running, I'll make it a little more interesting and bring the parent app into the mix in order to do some work. One of the UI controls available on the watch is a map, so I'll create a map that shows a pin for the user's current location. The watch app itself has no access to the location APIs, so I'll rely on the parent app to do that work and feed back to the watch app.
In order to request location access in iOS 8 an app needs to specify a reason to display to the user when requesting it. Open up MyFirstWatchApp's Info.plist file in the XML editor and add this code:
<key>NSLocationAlwaysUsageDescription</key>
<string>WatchKit awesomeness</string>
Next, update the AppDelegate class to request location updates, as shown in Listing 1.
Listing 1: AppDelegate Class Requests Location Updates
using System;
using System.Linq;
using CoreLocation;
using Foundation;
using UIKit;

namespace MyFirstWatchApp
{
    [Register("AppDelegate")]
    public partial class AppDelegate : UIApplicationDelegate
    {
        private CLLocationManager _locationManager;
        private CLLocationCoordinate2D _lastLocation;

        public override UIWindow Window { get; set; }

        public override bool FinishedLaunching(UIApplication application, NSDictionary launchOptions)
        {
            _locationManager = new CLLocationManager();
            _locationManager.AuthorizationChanged += (sender, args) =>
            {
                switch (args.Status)
                {
                    case CLAuthorizationStatus.AuthorizedAlways:
                        _locationManager.StartUpdatingLocation();
                        break;
                    case CLAuthorizationStatus.NotDetermined:
                        _locationManager.RequestAlwaysAuthorization();
                        break;
                }
            };
            _locationManager.LocationsUpdated += (sender, args) =>
                _lastLocation = args.Locations.First().Coordinate;

            return true;
        }
    }
}
When the app first launches it will request location access from the user, and keep a local cache of the last known location each time it receives an update. This should look pretty familiar if you've worked with CoreLocation before, since this is just standard iOS location access code.
When a WatchKit extension requests something of the parent app it will invoke a new method we can override in this AppDelegate class:
public override void HandleWatchKitExtensionRequest(UIApplication application, NSDictionary userInfo, Action<NSDictionary> reply)
{
    var longitude = new NSNumber(_lastLocation.Longitude);
    var latitude = new NSNumber(_lastLocation.Latitude);

    reply(new NSDictionary("longitude", longitude, "latitude", latitude));
}
The reply action is used to delivery a dictionary of results back to the extension, which in this case is the latitude and longitude of the last location received from the device.
Open up the storyboard file again, remove the label from the previous example, and replace it with a map named MyMap. In the InterfaceController class, replace the button's activated handler with:
partial void MyButton_Activated(WKInterfaceButton sender)
{
    OpenParentApplication(new NSDictionary(), (result, error) =>
    {
        var longitude = ((NSNumber)result["longitude"]).DoubleValue;
        var latitude = ((NSNumber)result["latitude"]).DoubleValue;
        var coordinate = new CLLocationCoordinate2D(latitude, longitude);

        MyMap.SetRegion(new MKCoordinateRegion(coordinate, new MKCoordinateSpan(0.25, 0.25)));
        MyMap.RemoveAllAnnotations();
        MyMap.AddAnnotation(coordinate, WKInterfaceMapPinColor.Red);
    });
}
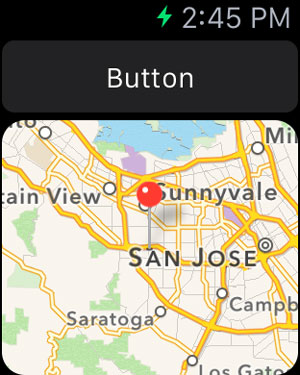
When the button is tapped it will make a call out to the parent application to request the location. Once a result comes back, it updates the center of the map and drops a pin at the coordinate it got.
It's important to note here that this implementation is a bit naïve in the interest of providing a simple example. It's possible for the user to run the watch app before ever having run the parent app, so if this were a real app it would need to be prepared for that, and prompt the user on the watch to launch the parent app on their phone in order to get things set up properly. For this example you'll also need to run the parent app first in order to trigger listening for location updates. You can simulate different locations in the iOS simulator via the Debug | Location menu. If everything is working correctly the app should look like Figure 3.
 [Click on image for larger view.]
Figure 3: Watch App Displaying Location Data from Parent App
[Click on image for larger view.]
Figure 3: Watch App Displaying Location Data from Parent App
Summary
In this example I only scratched the surface of what you can build with WatchKit. The most important thing to remember when creating wearable experiences is the manner in which your users will actually be interacting with these apps.
Programming for the Apple Watch is a much different model than programming for the phone, so a lot of thought should go into the right things to expose through a watch app, and the right way to expose them. When applied correctly, wearables open up an exciting new dimension for apps to be able to provide a complete experience for users.