Tips and Tricks
The Power of Command Pattern with SharePoint
Command pattern helps to encapsulate a request as an object and lets you parameterize clients with queues, all while supporting undoable operations. I'll explain how to use command pattern using an example in which we create a list in SharePoint with Visual Studio.
- By Malin De Silva
- 09/11/2015
Software design patterns are reusable solutions that have been used for years to solve many of the problems we encounter with the software architecture and its component design. Behavioral patterns is one such example, wherein communication patterns are identified between objects in an object-oriented design implementation. Command pattern is one such behavioral design pattern that wraps a request under and object as a command and pass it to the invoker object. We can think the way of handling this as a queue or a callback.
There are five components included in the command pattern implementation:
- Command: Interface for executing an action. Can be seen as an abstract class that includes a constructor takes an interface of the type Receiver as a parameter that sets it to a property. If it is an interface, it contains only the Execute method definition.
- ConcreteCommand: This class extends the Command abstract class or implements the interface and defines the logic for the Execute method by invoking operations on the Receiver.
- Client: This is the class responsible for creating and executing the Command object. It simply creates an object of the ConcreteCommand class and sets its receiver as appropriate.
- Invoker: The invoker is responsible for carrying out the action. Basically it uses the Command object to carry out the request.
- Receiver: Receiver contains the real operational logic that needs to be carried out on the data.
These components are connected to each other as shown in Figure 1.
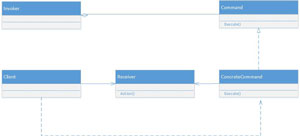 [Click on image for larger view.]
Figure 1: Five Components in The Command Pattern Implementation
[Click on image for larger view.]
Figure 1: Five Components in The Command Pattern Implementation
There are many scenarios where the command pattern can be applied within SharePoint. Imagine the number of operations we perform as in a queue that align with data and some application logic. One such scenario is the list creation.
Of course you can use the XML definitions for creating lists or use list templates and make copies of it for creating other similar lists. But they all have some restrictions that come at the expense of ease. So the good old way of creating lists is using the C# code for farm solutions. We normally use the feature-activated event of feature receivers in order to create these lists. It is unlikely that we need to delete the lists once they are created given the data will be stored there. But in case you need to, you can use feature-deactivating event to delete them.
We find multiple types of lists and libraries with different templates that are meant to store different types of data in different forms. Therefore list creation can be messy and can be hard to find if something goes wrong. Given we need to handle this in a proper and careful manner, we can find a way to perform the list creation in a more efficient manner with an implementation similar to Command Pattern.
List Creation During Feature Activation
As I mentioned earlier, we can use feature activation to create the SharePoint lists with the required templates. We can split the list creation process into three parts:
- Creating the lists
- Adding columns to the lists
- Creating list views or modifying the default view
The last two are optional depending on the type of list we create. For example, if we create a Document library, we may not need to add new columns to it if we are able to get the required task done with the available columns. Also it may not need to create any custom views for it. But if we are creating a custom list we will need to have additional columns and customized views.
Theoretically each of these commands needs to have its own concrete implementations and the Client component of the Command Pattern needs to perform each in a single queue. Here's an example:
- Create Custom List 1 - CustomListCreator
- Create Columns for Custom List 1 – CustomList1ColumnCreator
- Create or Modify Custom List 1 Views – CustomList1ViewCreator
- Create Assets Library 1 – AssetLibrary1Creator
- Create Document Library 1 – DocumentLibrary1Creator
- Create or Modify Document Library 1 Views – DocumentLibrary1ViewCreator
As you can see this does not align well or make it easier to get the work done. There is just one action associated with Asset Library 1 while others have many. Therefore we can perform the column creation and the list view creation inside the list creation by considering it is a subprocess of the main process.
Then the ColumnCreator and the ListViewCreators will be nested within the Execute method of the ListCreator.
Implementing the Command Pattern
To get started with Visual Studio, create a new Farm Solution with SharePoint 2013 – Empty Project Template named "CommandPattern".
It is interesting the way we write the implementation of the Command Pattern for the SharePoint list creation.
We will start with an interface named Creator. Add a new folder to the project named ListCreators (shown in Listing 1). This will have all the ConcreteCommand classes related to list creation. Then add a new class named ListCreator to that folder.
Listing 1: ListCreator Class
public abstract class ListCreator
    {
        public string ListName { get; set; }
        public string ListDescription { get; set; }
        public SPWeb Web { get; set; }
        public SPList List
        {
            get
            {
                if (_list == null)
                {
                    return this.Web.Lists.TryGetList(this.ListName);
                }
                else
                {
                    return _list;
                }
            }
        }

        private SPList _list;
        public abstract void Execute();
    }
This will work as the interface for our list creation. This is an abstract class which has the abstract method named "Execute" that will be overridden in concrete classes. Apart from that there are four properties that will be useful in the list creation. I have set a private field that will be useful, as we do not need to fill the heap with many SPList objects during our operations.
Now we will need to create a different concrete implementation for custom list creation that will be extended in each type of custom list and single implementations each for the other list templates such like document libraries.
Right click on the ListCreators folder and add a new class named DocumentLibraryCreator (shown in Listing 2) Extend the DocumentLibraryCreator class with the ListCreator abstract class and have a constructor that accepts parameters for Web, list name and list description. For the moment I am letting the Execute method have nothing inside its implementation.
Listing 2: DocumentLibraryCreator Class
public class DocumentLibraryCreator : ListCreator
    {
        public DocumentLibraryCreator(SPWeb web, string listName, string listDescription)
        {
            this.Web = web;
            this.ListName = listName;
            this.ListDescription = listDescription;
        }
        public override void Execute()
        {

        }
    }
Next up is creating the Receiver that will perform the actual action by interacting with the data.
Right-click on the project and add a new folder named Helper. I am considering this class as a helper class, given the purpose is helping in the list creation process. Add a new class named ListCreationHelper (shown in Listing 3) and add a static method name CreateList that accepts the Web object, list name, list description and the list template.
Listing 3: ListCreationHelper Class
public class ListCreationHelper
    {
        public static void CreateList(
            SPWeb web,
            string listName,
            string listDescription,
            SPListTemplateType templateType)
        {
            SPList list = web.Lists.TryGetList(listName);
            if (list == null)
            {
                web.Lists.Add(listName, listDescription, templateType);
                web.Update();
            }
        }
    }
Now I can call the CreateList method of the ListCreationHelper class within the Execute method of the DocumentLibraryCreator:
ListCreationHelper.CreateList(
                  this.Web,
                  this.ListName,
                  this.ListDescription,
                  SPListTemplateType.DocumentLibrary);
Now think about creating the list columns. For that also I will need to add a helper class that will be named as ColumnCreationHelper.
The list creation process was easier as we could define the list template and create the list accordingly. But the column creation process is different with a wider variety of options and levels of configuration.
For example, we can define whether it is required to contain values in a single line of text column while we need to define the choices of a choice field when we are creating a choice column. One option would be creating a separate class for each type of column creation helper. But that will end up having an unnecessary amount of classes. So the simplest smartest way to handle this is defining a static method for each type of column creation.
Create a new class named ColumnCreationHelper (Listing 4) and add static methods that will help create columns of type Single line of text and a Date and Time.
Listing 4: ColumnCreationHelper Class
public class ColumnCreationHelper
    {
        public static bool FieldExists(SPList list, string fieldName)
        {
            bool fieldExists = false;
            if (list.Fields.ContainsField(fieldName))
            {
                fieldExists = true;
            }
            return fieldExists;
        }
        public static void CreateTextField(SPList list, string fieldInternalName, string fieldDisplayName, bool isRequired)
        {
            if (!ColumnCreationHelper.FieldExists(list, fieldInternalName))
            {
                SPFieldText textField =
                    (SPFieldText)list.Fields.CreateNewField(SPFieldType.Text.ToString(), fieldInternalName);
                list.Fields.Add(textField);
                textField = (SPFieldText)list.Fields[fieldInternalName];
                textField.Title = fieldDisplayName;
                textField.Required = isRequired;
                textField.Update();
            }
        }
        public static void CreateDateTimeField(SPList list, string fieldInternalName, string fieldDisplayName, bool isRequired)
        {
            if (!ColumnCreationHelper.FieldExists(list, fieldInternalName))
            {
                SPFieldDateTime dateTimeField =
                    (SPFieldDateTime)list.Fields.CreateNewField(SPFieldType.DateTime.ToString(), fieldInternalName);
                list.Fields.Add(dateTimeField);
                dateTimeField = (SPFieldDateTime)list.Fields[fieldInternalName];
                dateTimeField.Title = fieldDisplayName;
                dateTimeField.Required = isRequired;
                dateTimeField.Update();
            }
        }
    }
Now this single class handles everything required for the Receiver class in each column creation. How about the concrete class creation for the columns? Given it will be easier to create different classes for the various ConcreteCommand mappings for each column we create, I am creating two classes TextColumnCreator and DateTimeColumnCreator within a folder named ColumnCreators that will be ConcreteCommand classes of the Command class ColumnCreator.
The ColumnCreator class will have the following properties along with the abstract method named Execute:
public abstract class ColumnCreator
    {
        public SPList List { get; set; }
        public string FieldInternalName { get; set; }
        public string FieldDisplayName { get; set; }
        public abstract void Execute();
    }
Then we'll extend the ColumnCreator abstract class for the TextColumnCreator class:
public class TextColumnCreator : ColumnCreator
    {
        public TextColumnCreator(SPList list, string fieldInternalName, string fieldDisplayName, bool required)
        {
            this.List = list;
            this.FieldInternalName = fieldInternalName;
            this.FieldDisplayName = fieldDisplayName;
            this.Required = required;
        }

        public override void Execute()
        {
            ColumnCreationHelper.CreateTextField(this.List, this.FieldInternalName, this.FieldDisplayName, this.Required);
        }
    }
Next extend the ColumnCreator abstract class for the DateTimeColumnCreator class:
public class DateTimeColumnCreator : ColumnCreator
    {
        public DateTimeColumnCreator(SPList list, string fieldInternalName, string fieldDisplayName, bool required)
        {
            this.List = list;
            this.FieldInternalName = fieldInternalName;
            this.FieldDisplayName = fieldDisplayName;
            this.Required = required;
        }

        public override void Execute()
        {
            ColumnCreationHelper.CreateDateTimeField(this.List, this.FieldInternalName, this.FieldDisplayName, this.Required);
        }
    }
So now we have the required components for creating two types of list columns as well as a Document Library. If you are to make a custom list, I would suggest inheriting the ListCreator class to create a CustomListCreator class and then create a ConcreteCommand class with the name of the list included in the prefix.
To keep this example simple, let me show how to add a text column. As I earlier mentioned, we won't have separate classes for column creation of separate lists. Instead I will add a text column immediately after the list is created in the DocumentLibraryCreator class. To do this, I will add the following lines of codes to create a single line of text field in the Execute method of the DocumentLibraryCreator class:
TextColumnCreator textColumnCreator = new TextColumnCreator(this.List, "FieldInternalName", "FieldDisplayName", false);
            textColumnCreator.Execute();
With this, we're done with everything required to create the list except for the command for creating the list. Look at we created the TextColumn in the above code. The DocumentLibraryCreator class acts as the Invoker for the column creation. We will have to perform a similar action to create the DocumentLibrary.
Right-click on the Features folder and add a new feature. Name the file DocumentLibraryCreationFeature and give a meaningful name to the display name. Then right-click on the feature and add an event receiver which will result in creating a feature receiver.
Now uncomment the FeatureActivated method and remove all other comments and methods in the class, then add the following code into the FeatureActivated event:
public override void FeatureActivated(SPFeatureReceiverProperties properties)
        {
            SPWeb currentWeb=properties.Feature.Parent as SPWeb;
            DocumentLibraryCreator documentLibraryCreator
                = new DocumentLibraryCreator(
                    currentWeb,
                    "DocumentLibraryName",
                    "DocumentLibraryDescription");
            documentLibraryCreator.Execute();
        }
Make sure the feature is scoped at Web so the currentWeb object is properly created. Now upon the feature activation this will create a document library with an extra field of type Single Line of Text.
In a similar fashion, you can make any type of a list and add any type of column into that list as you like. The View creation process is also similar. Make sure you create the helper classes and the view creator classes as needed and execute the code in the correct sequence.
Advantages of the Command Pattern Implementation
Here are some of the advantages of creating the lists using the command pattern implementation:
- Easy to create templates of list and execute them at any project level as all the views and columns that are common can be defined and called from a central place.
- Easy to modify a list or a view as the templates takes place.
- Changing the order of the execution is much easier considering they just need to create an object and call the execute method.
As you can see the ease of expansion and the friendly behavior for change adoption are among the very important and common advantages of this design pattern implementation. This way it makes list creation much easier than exporting the list templates and the manual processes. The code appears neat and easier to understand and you can modify the functionality at a given time.