Mobile Corner
Extending a Universal Windows Platform Media App
Both the MediaElement and Player Framework provide rich, on-screen elements for controlling media playback. Here's how to use a Universal Windows Platform app to use both the System Media Transport Controls and Cortana to provide an alternative, more integrated player experience.
- By Nick Randolph
- 10/19/2016
The Universal Windows Platform (UWP) makes it easy to build rich media-based apps leveraging either the built-in MediaElement, or the Player Framework supported by Microsoft. However, beyond defining what the visual appearance of the player is within the app, there are some additional ways that users can interact with a media app, taking advantage of voice and other hardware controls on the device. In this article I'll walk through working with the System Media Transport Controls (Media Controls) and controlling playback using voice commands via Cortana.
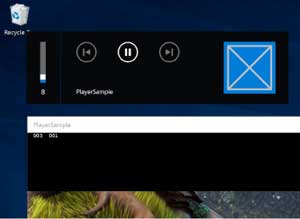
To begin with, I need a media app that uses either the MediaElement directly, or the Player Framework, to play video. In this case, I'm going to continue working with the PlayerSample I created in my previous article. If I run this application, allow the video to start and then press either the volume up or volume down button on my device, I'll see the Media Controls appear, as shown in Figure 1 (even if you don't have hardware volume buttons, if your keyboard has volume buttons, they should trigger the Media Controls to appear, too).
 [Click on image for larger view.]
Figure 1. Default System Media Transport Controls
[Click on image for larger view.]
Figure 1. Default System Media Transport Controls
As you can see, the out-of-the-box experience isn't great -- it shows the current volume, the application icon and name, and only the pause button is enabled (which switches to a play button if you pause the video).
The first thing I'm going to do is to update the text and image that appear within the Media Controls to reflect what's currently being played. To do this, I'm going to add an event handler to the MediaOpened event, which is one of the first events to be fired when a video is about to start playing:
<playerFramework:MediaPlayer Name="Player"
  Source="http://rdmedia.bbc.co.uk/dash/ondemand/bbb/2/client_manifest-common_init.mpd"
  AutoPlay="True"
  MediaOpened="MediaPlayer_OnMediaOpened"
  PosterSource="http://camendesign.com/code/video_for_everybody/poster.jpg"
  AreTransportControlsEnabled="False">
In the event handler I'll take a reference to the Media Controls and submit an update via the DisplayUpdater property (see Listing 1).
Listing 1: Updated DisplayUpdater Property
private async void MediaPlayer_OnMediaOpened(object sender, RoutedEventArgs e)
{
  var mediaControls = SystemMediaTransportControls.GetForCurrentView();
  var updater = mediaControls.DisplayUpdater;

  // This may not be auto-detected, and if not set, an error
  // will be raised if you attempt to set corresponding attributes
  // eg if setting video properties when Type not set to Video
  updater.Type = MediaPlaybackType.Video;

  updater.VideoProperties.Title = "Big Bunny";
  updater.VideoProperties.Subtitle = "Player sample";

  var storageFile =
    await Package.Current.InstalledLocation.GetFileAsync("assets\\artwork.png");
  updater.Thumbnail = RandomAccessStreamReference.CreateFromFile(storageFile);
  updater.Update();
}
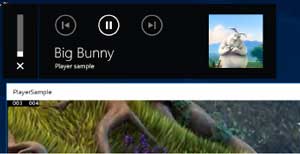
In this case the code is updating the Title, Subtitle and Thumbnail properties based on hardcoded strings and an image packaged with the application, resulting in styled Media Controls shown in Figure 2. For most applications this information will be dynamically determined based on the media being played. The Thumbnail can be created based on a remote URL, so it doesn't require you to first download the image before referencing it.
 [Click on image for larger view.]
Figure 2. Styled Media Controls
[Click on image for larger view.]
Figure 2. Styled Media Controls
Next, I'm going to extend the Media Controls to allow more interaction than just pausing and resuming playback. I'll start with the controls that are already visible on the desktop version of the Media Controls (that is, what's shown in Figure 1 and Figure 2). The Media Controls show next and previous buttons, but they're initially disabled. To make use of these, all I need to do is to enable them and add an event handler for the ButtonPressed event on the Media Controls, as shown in Listing 2.
Listing 2: Adding Event Handler for ButtonPressed in Media Controls
private SystemMediaTransportControls MediaControls { get; }
public MainPage()
{
  this.InitializeComponent();

  MediaControls = SystemMediaTransportControls.GetForCurrentView();

  MediaControls.IsNextEnabled = true;
  MediaControls.IsPreviousEnabled = true;

  MediaControls.ButtonPressed += MediaControls_ButtonPressed;
}

private async void MediaControls_ButtonPressed(
  SystemMediaTransportControls sender,
  SystemMediaTransportControlsButtonPressedEventArgs args)
{
  switch (args.Button)
  {
    case SystemMediaTransportControlsButton.Next:
      // Set player to show next video
      break;
    case SystemMediaTransportControlsButton.Previous:
      // Set player to show previous video
      break;
  }
}
One thing to remember when building UWP apps is that your application is capable of running on a massive range of device shapes and sizes, and in addition there are a wide range of auxiliary devices that can be connected -- either wired or unwired -- and used to control your app. This is particularly relevant to the Media Controls as they provide support for seeking (forward and back), as well as displaying current playback position via a timeline. Neither of these are supported in the current desktop layout, but for a complete UX across all devices it's a great idea to provide support.
Adding support for seeking is very similar to the next and previous buttons; I just need to enable the controls and then handle the corresponding button event. For example, Listing 3 handles the FastForward and Rewind button events by seeking forward or backward by 10 seconds.
Listing 3: Adding FastForward and Rewind Button Events
private SystemMediaTransportControls MediaControls { get; }
public MainPage()
{
  this.InitializeComponent();

  MediaControls = SystemMediaTransportControls.GetForCurrentView();

  MediaControls.IsNextEnabled = true;
  MediaControls.IsPreviousEnabled = true;

  MediaControls.IsFastForwardEnabled = true;
  MediaControls.IsRewindEnabled = true;

  MediaControls.ButtonPressed += MediaControls_ButtonPressed;
}

private async void MediaControls_ButtonPressed(
  SystemMediaTransportControls sender,
  SystemMediaTransportControlsButtonPressedEventArgs args)
{
  switch (args.Button)
  {
    case SystemMediaTransportControlsButton.FastForward:
      await Player.SeekAsync(TimeSpan.FromSeconds(10));
      break;
    case SystemMediaTransportControlsButton.Rewind:
      await Player.SeekAsync(TimeSpan.FromSeconds(-10));
      break;
    case SystemMediaTransportControlsButton.Next:
      // Set player to show next video
      break;
    case SystemMediaTransportControlsButton.Previous:
      // Set player to show previous video
      break;
  }
}
Displaying the current playback position via the timeline requires only a little bit more work. It's necessary to first set up the timeline using the UpdateTimelineProperties method on the Media Controls:
var mp = sender as MediaPlayer;
var timeline = new SystemMediaTransportControlsTimelineProperties
{
  StartTime = TimeSpan.FromSeconds(0),
  MinSeekTime = TimeSpan.FromSeconds(0),
  Position = TimeSpan.FromSeconds(0),
  MaxSeekTime = mp.NaturalDuration.TimeSpan,
  EndTime = mp.NaturalDuration.TimeSpan
};
MediaControls.UpdateTimelineProperties(timeline);
This only configures the timeline for a given point in time. In order for it to correctly show the playback position, it's necessary to keep it in sync with the player. This can be done by attaching an event handler to the PositionChanged event on the player:
<playerFramework:MediaPlayer Name="Player"
  Source="http://rdmedia.bbc.co.uk/dash/ondemand/bbb/2/client_manifest-common_init.mpd"
  AutoPlay="True"
  MediaOpened="MediaPlayer_OnMediaOpened"
  PositionChanged="MediaPlayer_OnPositionChanged"
  PosterSource="http://camendesign.com/code/video_for_everybody/poster.jpg"
  AreTransportControlsEnabled="False">
As the PositionChanged event can be triggered very frequently, it's a good idea to limit the frequency that the Media Controls are updated. Listing 4 ensures that the Media Controls aren't updated any more frequently than once a second.
Listing 4: Limiting Media Control Updates
private TimeSpan LastPosition { get; set; }
private void MediaPlayer_OnPositionChanged(object sender, RoutedPropertyChangedEventArgs<TimeSpan> e)
{
  var mp = sender as MediaPlayer;
  var newPosition = mp.Position;
  if (Math.Abs(LastPosition.Subtract(newPosition).TotalSeconds) < 1) return;
  var timeline = new SystemMediaTransportControlsTimelineProperties
  {
    Position = mp.Position,
  };
  LastPosition = newPosition;

  MediaControls.UpdateTimelineProperties(timeline);
}
At this point I've extended the PlayerSample app to take advantage of the Media Controls. Which features you want to make use of in your app is up to you, but the more features you can use, the richer the end-user experience will be across the range of supported devices.
Next, I'm going to add voice command support for controlling playback. There are two parts to this: adding and loading a voice-command file to define which commands Cortana should listen for, and adding support within the app for handling the commands and controlling the player.
First up, the voice command XML file that defines the commands for which Cortana will listen. In this case, Listing 5 shows the code for defining commands for play (or resume), pause, seek forward and seek backward, and saving this in a file called Voices.XML within the PlayerSample application.
Listing 5: Getting Cortana to Listen to Voice Commands
<?xml version="1.0" encoding="utf-8" ?>
<VoiceCommands xmlns="http://schemas.microsoft.com/voicecommands/1.2">
  <CommandSet xml:lang="en-us" Name="PlayerCommandset_en-us">
    <AppName> Player Sample </AppName>
    <Example> Play / Pause / Go forward / Go back </Example>

    <Command Name="pause">
      <Example> Pause </Example>
      <ListenFor> pause </ListenFor>
      <Feedback> Pausing </Feedback>
      <Navigate />
    </Command>
    <Command Name="play">
      <Example> Play </Example>
      <ListenFor> play </ListenFor>
      <ListenFor> resume </ListenFor>
      <Feedback> Resuming </Feedback>
      <Navigate />
    </Command>
    <Command Name="forward">
      <Example> Forward </Example>
      <ListenFor> [go] forward </ListenFor>
      <Feedback> Seeking forward... </Feedback>
      <Navigate />
    </Command>
    <Command Name="back">
      <Example> Back </Example>
      <ListenFor> [go] back </ListenFor>
      <Feedback> Seeking backward... </Feedback>
      <Navigate />
    </Command>
  </CommandSet>
</VoiceCommands>
Don't forget it's important to provide a CommandSet for each language and region you want to support. In this case I've just shown the U.S. English, but this may not be the culture set for your users, so again, the more cultures you support, the more Cortana will be used.
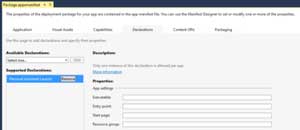
To register the PlayerSample application for Cortana, I need to add the Personal Assistant Launch declaration to the Package.appxmanifest file, as shown in Figure 3.
 [Click on image for larger view.]
Figure 3. Adding Declaration for Cortana
[Click on image for larger view.]
Figure 3. Adding Declaration for Cortana
Last, I need to install the Voices.XML file, thus making Cortana aware of the commands to which the PlayerSample application will respond. I've added the following code to the end of the OnLaunched method in App.xaml.cs:
var voices = await Package.Current.InstalledLocation.GetFileAsync(@"Voices.xml");
await VoiceCommandDefinitionManager.InstallCommandDefinitionsFromStorageFileAsync(voices);
There is no way to query whether the current set of voice commands installed for the app are the most recent, so it's easiest to override them each time the app is launched.
Each of the commands defined are set to launch the app in the foreground. Alternatively, if the app is already running, it will be activated. In either case, the OnActivated method in App.xaml.cs is invoked -- if this method doesn't already exist in your application, you might have to add it. In Listing 6, I've handled the voice command activation by passing the command name into a static method called Action on a class called PlayerControls that I've created. The command name is then interpreted and the corresponding event is raised.
Listing 6: Activating Voice Commands
protected override void OnActivated(IActivatedEventArgs args)
{
  base.OnActivated(args);
  if (args.Kind != ActivationKind.VoiceCommand) return;

  var commandArgs = args as VoiceCommandActivatedEventArgs;
  var destination = commandArgs?.Result?.RulePath[0];
  PlayerControls.Action(destination);
}
public static class PlayerControls
{
  public static event EventHandler Pause;
  public static event EventHandler Play;
  public static event EventHandler Forward;
  public static event EventHandler Backward;

  public static async void Action(string actionName)
  {
    await Task.Delay(1000);
    switch ((actionName + "").ToLower())
    {
      case "pause":
        Pause?.Invoke(null, EventArgs.Empty);
        break;
      case "play":
        Play?.Invoke(null, EventArgs.Empty);
        break;
      case "forward":
        Forward?.Invoke(null, EventArgs.Empty);
        break;
      case "back":
        Backward?.Invoke(null, EventArgs.Empty);
        break;
    }
  }
}
In the codebehind for the page containing the player (Listing 7), which for the PlayerSample app is just MainPage, I'm adding event handlers for each event on the static PlayerControls class I want the player to respond to; in this case all of them. I've also ensured that I clean up when the page is navigated away from by detaching the event handlers in the OnNavigatedFrom method.
Listing 7: Codebehind for the Player
protected override void OnNavigatedTo(NavigationEventArgs e)
{
  base.OnNavigatedTo(e);

  PlayerControls.Pause += PlayerControls_Pause;
  PlayerControls.Play += PlayerControls_Play;
  PlayerControls.Forward += PlayerControls_Forward;
  PlayerControls.Backward += PlayerControls_Backward;
}
protected override void OnNavigatedFrom(NavigationEventArgs e)
{
  PlayerControls.Pause -= PlayerControls_Pause;
  PlayerControls.Play -= PlayerControls_Play;
  PlayerControls.Forward -= PlayerControls_Forward;
  PlayerControls.Backward -= PlayerControls_Backward;
  base.OnNavigatedFrom(e);
}
private void PlayerControls_Pause(object sender, EventArgs e)
{
  Player.Pause();
}
private void PlayerControls_Play(object sender, EventArgs e)
{
  Player.Play();
}
private async void PlayerControls_Forward(object sender, EventArgs e)
{
  await Player.SeekAsync(Player.Position.Add(TimeSpan.FromSeconds(10)));
}
private async void PlayerControls_Backward(object sender, EventArgs e)
{
  await Player.SeekAsync(Player.Position.Add(TimeSpan.FromSeconds(-10)));
}
I can now run the app and control the player by invoking Cortana (for example, saying, "Hey Cortana") and then stating a command:
PlayerSample pause
PlayerSample go forward
PlayerSample resume
PlayerSample back
When the Cortana interface appears, you'll notice that the player is automatically paused. If you want playback to remain paused, you still need to give the pause command to Cortana. Also, you'll notice that there's a short delay in the PlayerControls handling of the commands, this is to allow for playback to resume (that is, after Cortana pauses playback while she listens to you) before issuing the command to the player.
In this article I've shown you how to connect Cortana voice commands to the player in order to provide hands-free control of the app. You can extend the list of supported commands to control other aspects of the player.