In-Depth
Build Web Apps Without All That JavaScript
You don't need to write tons of JavaScript code to create a JavaScript-friendly MVVM app. Let DotVVM can take over. Here's a basic tutorial for developing with it.
- By Tomáš Herceg
- 06/27/2017
DotVVM is a new open source Web framework that we developed at Riganti sro. In contrast to other popular frameworks, DotVVM is a client-side library and also a .NET library that helps with building MVVM Web apps without writing tons of JavaScript code. In most cases, you will only need to know C#, HTML and CSS.
DotVVM is available as a free extension for Visual Studio 2015 and Visual Studio 2017 that adds project templates and IntelliSense. It can be downloaded from the Visual Studio Marketplace or from the DotVVM Web site.
In this article, I’ll show how to create a new, multi-platform Web app targeting .NET Core using DotVVM.
(Editor's Note: Tomas Herceg is interviewed in an archived episode of the .NET Insight Podcast here. To listen to newer .NET Insight Podcast episodes, check out the Connection Strings blog on this site or go to Visual Studio Magazine's Soundcloud page.)
Let's Start Anew
When you install DotVVM for Visual Studio 2017, you can create a new DotVVM project by choosing from the following options:
- DotVVM Web Application (.NET Core) template creates a new project targeting .NET Core. This is used to create a multi-platform Web app with DotVVM.
- DotVVM Web Application (ASP.NET Core on .NET Framework) template creates a new project targeting .NET Framework 4.5.1, which uses the new ASP.NET Core libraries. This a popular combination because it allows you to use libraries that aren’t currently supported in .NET Core.
- DotVVM Web Application (OWIN on .NET Framework) template creates a classic Web application project that uses .NET Framework 4.5.1 and OWIN. You can use this method to integrate DotVVM into existing MVC or Web Forms apps.
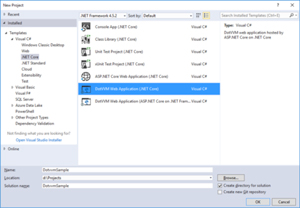
In this tutorial, I’ll use the first option (see Figure 1). If you have Visual Studio 2015, there is no DotVVM support for .NET Core; instead, you can use the OWIN project template. The code being used in this article will work in both versions.
 [Click on image for larger view.]
Figure 1. DotVVM Project Options
[Click on image for larger view.]
Figure 1. DotVVM Project Options
If you want to develop DotVVM apps on Linux or macOS, you can install the "dotnet new" template and create a DotVVM app from the command line.
When you confirm the dialog, a new DotVVM project is generated. You can find several files in the project (Figure 2):
- Program.cs is the main entry point of the application that’s present in all .NET Core Web apps. If you look inside this file, you’ll see that it configures Kestrel, the IIS integration, sets the content root directory and starts up the Web host.
- Startup.cs contains two methods, which are called when the application starts. The ConfigureServices method is used to register services into the IServiceCollection object. I call services.AddDotVVM here to register services required by DotVVM. The Configure method configures all ASP.NET middlewares. I need to call app.UseDotVVM<DotvvmStartup> to register DotVVM middleware that will process HTTP requests.
- DotvvmStartup.cs is a class that contains the configuration for DotVVM. You can find the ConfigureRoutes method with the following line that registers the default route:
config.RouteTable.Add("Default", "", "Views/default.dothtml");
 [Click on image for larger view.]
Figure 2. Files Generated by DotVMM
[Click on image for larger view.]
Figure 2. Files Generated by DotVMM
When the user visits the homepage, DotVVM will use the Views/default.dothtml page.
Additionally, the project contains the Views and ViewModels folders. The first one contains a file called default.dothtml, the latter one contains the DefaultViewModel.cs class. These two files together build a DotVVM Web page.
DotVVM uses the Model-View-ViewModel (MVVM) design pattern. The View is a file with the .dothtml extension. Basically, it’s an HTML file, with several syntax flavors: directives, server controls and data-binding expressions.
The ViewModel is a C# class with two purposes:
- It holds the state of the page: anything that can be changed in the page by the user. If you have a TextBox in a page, you need to store its value somewhere. In DotVVM, you just need to declare a public string property in the ViewModel class and bind it to the TextBox.
- The ViewModel handles all commands that can be invoked from the page; for example, by clicking a button. In DotVVM, you need to declare a public method for each command.
Building a To-Do List
To demonstrate the basic principles of DotVVM, I’ll create a simple to-do list application. The user will be able to add several tasks and mark them as completed.
First, I start with the ViewModel. I need to declare a class that will hold the information about a particular task. To keep it simple, I’ll just remember the text of the task (for example, "Go shopping") and date of completion, which is null for tasks that are not yet completed:
public class TaskData
{
  public string Text { get; set; }

  public DateTime? CompletedDate { get; set; }
}
Next, I’ll add a list of tasks in the DefaultViewModel class:
// Stores the list of tasks
public List<TaskData> Tasks { get; set; } = new List<TaskData>();
To allow the user to add a new task, we have to put two things in the ViewModel. I’ll have a TextBox and a Button in the page, so I’ll need to store the content of the TextBox in the ViewModel, and I’ll need to declare a method to be called when the button is clicked:
// Stores the text of a new task
public string NewTaskText { get; set; }

public void AddNewTask()
{
  Tasks.Add(new TaskData()
  {
    Text = NewTaskText
  });
  NewTaskText = string.Empty;
}
You can see that the AddNewTask method adds a new TaskData object to the collection and cleans the NewTaskText property so the user can add another task.
Now I’ll build up the View. If you look in the default.dothtml file, you can see it starts with the @viewModel directive. This directive tells DotVVM which class will be used as a ViewModel:
@viewModel DotvvmSample.ViewModels.DefaultViewModel, DotvvmSample
This directive is followed by the <html> element. Let’s add the following code inside the <body>:
<h1>Task List</h1>
<div>
  <dot:TextBox Text="{value: NewTaskText}" />
  <dot:Button Text="Add Task" Click="{command: AddNewTask()}" />
</div>
You can see some strange elements in the HTML code: <dot:TextBox> and <dot:Button>. These are called server controls. You can also see that the Text property of the TextBox control contains the data-binding expression {value: NewTaskText}. This represents a two-way binding between the property of the control and the property in the ViewModel.
DotVVM will transform server controls to actual HTML elements (<input type=text> and <input type=button>). Because DotVVM uses the popular Knockout library on the client side, the TextBox code will be transformed to something like this:
<input type="text" data-bind="value: NewTaskText" />
To make it work, DotVVM constructs a Knockout ViewModel from the JSON-serialized C# ViewModel.
In the TextBox control, the binding expression looks like this: {value: …}. It’s called value binding and it binds a control property to a property in the ViewModel.
Similarly, the Button control uses a command binding. This type of binding is used to call methods in the ViewModel.
Click="{command: NewTask()}"
This binding will be translated to a piece of JavaScript code that serializes the Knockout ViewModel and sends it to the server where the method is executed. The results and changes made to the ViewModel are then transferred back to the client and applied to the Knockout ViewModel in the page.
DotVVM allows you to customize which properties are transferred from the client to the server and back. In most cases, there’s no need to send a complete ViewModel. Additionally, you can use staticCommand binding, which transfers only specific properties and can "patch" the ViewModel on the client side with new values from the server. You can find more information in the DotVVM documentation.
To render a list of the tasks, the Repeater control is used. You can bind it to a collection of objects and it will repeat the content inside the repeater for each object in the collection. The data binding on the collection works in both ways, so if you add or remove any item from the collection, the page will be updated immediately:
<dot:Repeater DataSource="{value: Tasks}">

  <p class-completed="{value: CompletedDate != null}">
    {{value: Text}}
  </p>

</dot:Repeater>
To print the text directly in the page, you can use the value binding with double curly braces: {{value: Text}}.
You can also see the class-completed attribute, which is bound to the CompletedDate != null expression. The class-completed attribute with data binding tells DotVVM to add the completed CSS class to the element when the expression is true. Otherwise, the CSS class will not be added to the element. And, of course, any time when the value of the expression changes, the CSS class of the element gets updated immediately.
You could achieve the same behavior by using the following syntax:
class="{value: CompletedDate != null ? "completed" : ""}"
However, this kind of expressions is difficult to read, especially when you need to combine multiple CSS classes with different conditions.
You can now add the following CSS rule:
.completed {
  text-decoration: line-through;
}
To allow the tasks to be completed, let’s add the following function in the viewmodel:
public void CompleteTask(TaskData task)
{
  task.CompletedDate = DateTime.Now;
}
You can see that the CompleteTask method specifies one parameter. You can declare any number of parameters in the ViewModel commands.
Now let’s add the following button inside the Repeater:
<dot:LinkButton Text="Completed"
                Click="{command: _root.CompleteTask(_this)}"
                Visible="{value: CompletedDate == null}"/>
Because all bindings inside the Repeater control are evaluated in context of the specific Repeater item -- which is the TaskData object -- you need to use _root.CompleteTask to access the CompleteTask method. Remember that I have declared the method in the DefaultViewModel class, not in the TaskData class. The _root variable accesses the ViewModel of the page itself.
Note that I am passing _this as an argument in this method. The _this identifier represents the current binding context, which is the current Repeater item. In complex hierarchies of controls, you may also need the _parent variable, which accesses the parent "binding context."
We have also set the Visible property to a binding to make the button appear only for incomplete tasks. If Visible evaluates to false, DotVVM will hide the element by setting the display CSS property.
To display the CompletedDate, I can use the Literal control and specify the date format. DotVVM uses the same format string syntax as you know from .NET:
<dot:Literal Text="{value: CompletedDate}" FormatString="yyyy/MM/dd" />
You can download and try the full sample from the DotVVM GitHub page.
Wrapping Up
DotVVM comes with many built-in controls and a number of features. You can use basic form controls like CheckBox, ComboBox or RadioButton. There are also advanced controls like GridView or FileUpload included, along with the SpaContentPlaceHolder control, which will turn your Web application into a Single-Page App. You can use .NET validation attributes, RESX localization and action filters.
DotVVM supports both .NET Framework and .NET Core, and can be used in existing ASP.NET projects together with ASP.NET MVC or Web API.
And, finally, there are many features to come into DotVVM in the following months. One of the most requested scenarios is the integration with REST APIs. It will allow you to load parts of the ViewModel (for example, data in the GridView control) using the REST API and also make REST API calls instead of invoking methods on the ViewModel.
If you are interested in this way of building Web apps and have any thoughts, suggestions or questions, you can meet the DotVVM team on the Gitter chat.
About the Author
Tomáš Hercegg specializes in .NET and the Microsoft developer tools stack. He's the CEO and chief software architect at Riganti sro, a software development and consulting company based in the Czech Republic, which created the DotVVM open source Web app framework. Herceg is also a Microsoft MVP and Microsoft Regional Director.