Cross Platform C#
A Filtered View of Core Image
Playing around with Apple's Core Image imaging technology, using some simple C# code to perform facial recognition and apply filters to photos.
While professional photographers don’t like them, the simple fact is that the camera from practically every iteration of the iPhone has been comparable to what was available in prosumer DSLR cameras. The camera can be used to take pictures (duh), as well as to focus quickly (which is good for barcodes and QR codes). One of the great features of iOS is that it has the ability to take a picture and perform an operation on it, such as run a filter or perform facial detection. This is provided by the iOS Core Image Library.
Filters can be used for creating various effects on images. You might be thinking, "So what? I’ve been able to do that for quite some time with Instagram." Filters are just one part, but Core Image also can detect faces. With the automatic ability to detect faces in images, these images can be easily cut down to get facial information.
In this article, I’ll look at how to apply filters to images and to detect faces.
What Is Core Image?
Core Image is a library that provides image process and analysis technology in iOS and macOS. It’s designed to operate in near-real time for still images and video. It will work on images from Core Graphics, Core Video and the Image frameworks. Core Image provides a high-level API to perform some fairly low-level concepts. Developers aren’t required to know the specifics of OpenGL or Metal, how to use the GPU, or anything to do with threading. By using Core Image, applications can easily take advantage of multiple cores.
Working with Images
Working with images basically means working with filters. So, what’s a filter? In this situation, a filter is some software code that changes an image in some way. That can be the color, clarity or other significant change to an image. In iOS, there are approximately 50 filters. The example here will apply a sepia filter.
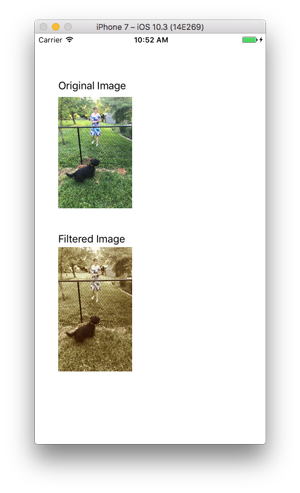
The code in Listing 1 shows the filter being applied to a picture of my wife and the dog looking at the new fence in my parents’ backyard (Figure 1 shows the beginning image and the final filtered image).. Once that picture is loaded, the filter is loaded, the filter’s properties are set, the filter acts on the image and the image is then displayed. In this example, the filter tends to age the image and looks like an old 1970s early-color print from a Kodak camera.
 [Click on image for larger view.]
Figure 1. Sepia Filter Applied to Image
Listing 1: Using Core Image To Display and Apply a Filter on an Image
[Click on image for larger view.]
Figure 1. Sepia Filter Applied to Image
Listing 1: Using Core Image To Display and Apply a Filter on an Image
var img = UIImage.FromBundle("Backyard.jpg");
OrigImageView.Image = img;
var ciImg = new CoreImage.CIImage(img);
var sepia = new CoreImage.CISepiaTone();
sepia.Image = ciImg;
sepia.Intensity = 0.8f;
CoreImage.CIImage output = sepia.OutputImage;
var context = CoreImage.CIContext.FromOptions(null);
var cgimage = context.CreateCGImage(output, output.Extent);
FilteredImageView.Image = new UIImage(cgimage);
Another filter that can be used is a blurring filter. This is a good filter if you want to provide emphasis or slightly blur up an image, like the image is actually farther away than it is. The code in Listing 2 shows how to perform this filter. Where the sepia filter had the parameter of Intensity to set, the CIDiscBlur filter has the Radius parameter that needs to be set. Its default value is 10.
Listing 2: Blurring Filter
var img = UIImage.FromBundle("Backyard.jpg");
OrigImageView.Image = img;
var ciImg = new CoreImage.CIImage(img);
var blur = new CoreImage.CIDiscBlur();
blur.Image = ciImg;
blur.Radius = 2.0f;
CoreImage.CIImage output = blur.OutputImage;
var context = CoreImage.CIContext.FromOptions(null);
var cgImage = context.CreateCGImage(output, output.Extent);
FilteredImageView.Image = new UIImage(cgImage);
Note: Unfortunately, it’s hard to show a blur on an iPhone screen, so there is no example to share.
Another filter that developers might want to look at is the VignetteEffect filter. This filter has several parameters to set, the Radius, the Intensity, and the Center. Listing 3 shows the code for using the VignetteEffect filter. Figure 2 shows the output of the VignetteEffect image filter.
 [Click on image for larger view.]
Figure 2. VignetteEffect Filter Applied to Image
Listing 3: Code for Setting a Vignette Filter on an Image
[Click on image for larger view.]
Figure 2. VignetteEffect Filter Applied to Image
Listing 3: Code for Setting a Vignette Filter on an Image
var img = UIImage.FromBundle("Backyard.jpg");
OrigImageView.Image = img;
var ciImg = new CoreImage.CIImage(img);
var vignette = new CoreImage.CIVignetteEffect();
vignette.Image = ciImg;
vignette.Center = new CoreImage.CIVector(new CoreGraphics.CGPoint(0.0f, 0.0f));
vignette.Radius = 30f;
vignette.Intensity = .5f;
var output = vignette.OutputImage;
var context = CoreImage.CIContext.FromOptions(null);
var cgimage = context.CreateCGImage(output, output.Extent);
FilteredImageView.Image = new UIImage(cgimage);
Facial Detection
Facial detection is another powerful feature in Core Image. Facial detection merely determines if there’s a face in the picture. Powerful facial recognition, where a program identifies a person, is a bit beyond this discussion. For the example, the program will look within an image to determine if there’s a face there. Here's the code:
var img = UIImage.FromBundle("WallyFace.jpg");
imgVFace.Image = img;
var context = CIContext.FromOptions(null);
var detector = CIDetector.CreateFaceDetector(context, true);
var ciImage = CIImage.FromCGImage(img.CGImage);
CIFeature[] features = detector.FeaturesInImage(ciImage);
In the example image, one image is in the starting image of a face (mine). The features object contains an array of the faces within the image, in this case one. Within the one element there’s information about the person’s face, such as:
- Bounds: Provides the boundaries of the face, which allows the face to be "cut out" from a picture programmatically.
- FaceAngle: Allows a program to determine the angle of the face. It’s helpful to determine if a person’s face is at an angle.
- HasLeftEyePosition, HasFaceAngle, HasMouthPosition, HasSmile, HasRightEyePosition, HasTackingFrameCount, HasTackingId, LeftEyeClosed, RightEyeClosed: These properties allow for an easy determination if Core Image was able to detect these properties.
- LeftEyePosition, MouthPosition, RightEyePosition: These properties are going to provide the location of these items within the image. Please note that it takes a lot more than eye and mouth locations to do facial recognition.
Other Features
Beyond the ability of Core Image to provide filters and facial detection, there are other features that that developers can take advantage of that should be mentioned:
- Developers can create custom filters that can be called within Core Image.
- While Core Image isn’t within Xamarin.Forms, it would be callable within a program on the iOS side of Xamarin.Forms.
Wrapping Up
Core Image is a great library that can easily allow programs to operate on images. Apple and Xamarin have both done a lot of work to make this complicated functionality easy enough to use and consumed by a program.
About the Author
Wallace (Wally) B. McClure has authored books on iPhone programming with Mono/Monotouch, Android programming with Mono for Android, application architecture, ADO.NET, SQL Server and AJAX. He's a Microsoft MVP, an ASPInsider and a partner at Scalable Development Inc. He maintains a blog, and can be followed on Twitter.