Mobile Corner
Getting Started with Augmented Reality in iOS 11
With the release of iOS 11 and ARKit, creating augmented reality experiences has never been easier. Here’s a hands-on look at how easy it is to get started.
- By Greg Shackles
- 12/07/2017
Over the last several years augmented reality (AR) has become a hot topic across all platforms and technology sectors. Apple's release of iOS 11 included a new framework called ARKit that aims to make it easy for developers to add AR experiences into their apps without a lot of hassle or ceremony. While it's still a little limited in its initial form, Apple was still able to create an approachable framework for incorporating AR into apps, even for developers without much (if any) 2-D or 3-D programming experience.
In this article, I won't dive deep into how ARKit works. Instead, I'll walk through creating an AR app from scratch to demonstrate how it fits together. Because I've always thought my household could use more minions (of the "Despicable Me" variety) hanging around, I'll create an app that allows me to place a 3-D minion anywhere I'd like just by tapping on a spot in my house from within the app.
To show just how easy it is to get started with ARKit, I'm going to begin with a completely empty app by using the Single View App iOS template in Visual Studio. This will create a new app with a storyboard containing a single empty view controller, and no other preconfigured scaffolding.
Getting Started
To use ARKit, the app needs to request access to use the device's camera. This can be done by adding an entry to the app's Info.plist file:
<key>NSCameraUsageDescription</key>
<string>To augment your reality</string>
With that configured, next I'll create an instance of ARSCNView, a type of view provided by ARKit that allows you to augment the camera's view with objects using SceneKit, and configure it to take up the entire viewport, as shown in Listing 1.
Listing 1: Adding an Augmented Reality Scene to the View
public partial class ViewController : UIViewController
{
  private ARSCNView sceneView;

  protected ViewController(IntPtr handle) : base(handle) { }

  public override void ViewDidLoad()
  {
    base.ViewDidLoad();

    sceneView = new ARSCNView
   {
     Frame = View.Frame,
DebugOptions = ARSCNDebugOptions.ShowFeaturePoints |
  ARSCNDebugOptions.ShowWorldOrigin,
  UserInteractionEnabled = true
};

View.AddSubview(sceneView);
  }
}
The interesting part to note here are the values supplied for DebugOptions. These are flags that you would leave off for production apps, but which can be very useful when writing your AR apps. By enabling these flags, ARKit will overlay the camera's view with an axis indicating the origin of the world's coordinate system, as well the set of feature points that ARKit has detected in the environment. Feature points are trackable points in the environment that can be used to anchor objects to that spot.
Now that the view is incorporated, next I'll need to start an AR session when the app becomes visible, as shown in Listing 2.
Listing 2: Starting the Augmented Reality Session
public override void ViewWillAppear(bool animated)
{
  base.ViewWillAppear(animated);

  var configuration = new ARWorldTrackingConfiguration
  {
    PlaneDetection = ARPlaneDetection.Horizontal,
    LightEstimationEnabled = true
  };

  sceneView.Session.Run(configuration, ARSessionRunOptions.ResetTracking |
    ARSessionRunOptions.RemoveExistingAnchors);
}

public override void ViewDidDisappear(bool animated)
{
  base.ViewDidDisappear(animated);

  sceneView.Session.Pause();
}
When the app becomes visible it runs a new session, telling ARKit to detect horizontal planes and to reset any existing tracking it had in place. When the view disappears -- such as when the app is put into the background -- the session is paused to avoid overusing the device's resources. As of right now ARKit only supports horizontal plane detection, but given that it's an enumeration in the API, it's safe to say that more plane detection modes will come in future versions.
Running the app now will look something like Figure 1, displaying the origin axis somewhere in the space, as well as a set of detected feature points. You can move the camera around and watch ARKit detect new feature points as you look at new areas of your environment.
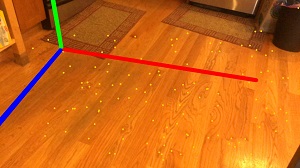 [Click on image for larger view.] Displaying the Origin and Feature Points of the Environment
Adding the First Minion
Now I've got an app that uses the camera to display an AR coordinate system, but that's not that compelling on its own. Next, I'll update the app to add a 3-D minion directly in front of the camera when the app starts up.
First things first: I need a model. As I mentioned earlier, ARKit allows you to use SceneKit objects as part of your AR experience. This means I can bring in any models or object types that are compatible with SceneKit and use them in my app. One common format for 3-D SceneKit models is the Collada format, whose files have an extension of .dae. Many popular modeling tools allow for exporting into this format, and there are also many resources online that provide free models you can try out in your app, which is what I've done here. You can find the minion model for this demo in the sample code for this article.
To add the Collada model to the app, create a folder named minion.scnassets, and underneath that place the minion.dae file. Set this file to have a build action of SceneKit Asset and it will be ready to use in the app.
Finally, update the ViewWillAppear method to place this model in front of the camera when the app gains focus:
sceneView.Scene = SCNScene.FromFile("minion.scnassets/minion");
var minion = sceneView.Scene.RootNode.FindChildNode("minion_one_eye", true);
minion.Position = new SCNVector3(0f, -5f, -9f);
minion.Scale = new SCNVector3(0.1f, 0.1f, 0.1f);
This creates a scene from the model, positions it in front of the camera and then scales it down to the size you want. That's all the code you need, so when you fire up the app it should look like Figure 2. If you pan the camera around, you'll see that the model is 3-D and exists within your environment.
 [Click on image for larger view.] Displaying a Minion Model Added into the Environment
Tap to Add Minions
One minion in front of the camera is a good start, but it's not enough. I want to be able to tap in different places in my house and add a new minion there. The minion should also stay in that spot, regardless of where I walk around the house after adding it.
Instead of loading the scene from the model every time I want to add a minion, I'll instead load the model once in ViewDidLoad and store it in a private field:
var modelScene = SCNScene.FromFile("minion.scnassets/minion");
_minion = modelScene.RootNode.FindChildNode("minion_one_eye", true);
Whenever a new minion needs to be created, it can simply be cloned from this one. Next, I'll override the TouchesBegan method on the view controller, as shown in Listing 3.
Listing 3: Detecting Touches in the Environment
public override void TouchesBegan(NSSet touches, UIEvent evt)
{
  base.TouchesBegan(touches, evt);

  if (!(touches.AnyObject is UITouch touch))
    return;

  var location = touch.LocationInView(sceneView);
  var hits = sceneView.HitTest(location, ARHitTestResultType.ExistingPlaneUsingExtent);

  if (hits == null)
    return;

  var plane = hits.FirstOrDefault(hit => hit.Anchor is ARPlaneAnchor);

  if (plane == null)
    return;

  var position = new SCNVector3(plane.WorldTransform.M14, plane.WorldTransform.M24,
    plane.WorldTransform.M34);

  var newMinion = _minion.Clone();
  newMinion.Position = position;
  newMinion.Scale = new SCNVector3(0.01f, 0.01f, 0.01f);

  sceneView.Scene.RootNode.Add(newMinion);
}
This might look like a lot, but there's not that much going on here. When a touch is detected, I check for whether it was within the scene, and then do a hit test to check if the touch hit a horizontal plane in the environment. If it did touch a plane, I extract the position of that plane, clone the minion, place it at that position, and then add that new minion to the scene.
Now, running the app won't show any minions right away, but if I start tapping on horizontal surfaces, the app will create and add minions to those spots (see Figure 3). As I walk around the environment those minions will stay anchored to the position I added them. How cool is that? All that took was a few lines of code and I've got a world filled with minions that I can walk around in.
 [Click on image for larger view.] An Army of Minions, Assembled by Tapping on Different Points in the Environment
Taking it a little further, because I've got access to the SceneKit APIs here, it's also extremely easy to add in things like animation and movement to these minions.
For example, to have the minions rotate horizontally indefinitely, it just takes one more line of code:
newMinion.RunAction(SCNAction.RepeatActionForever(SCNAction.RotateBy(0f, 5f, 0f, 10)));
Or maybe the minion should grow and shrink while it stands there:
newMinion.RunAction(SCNAction.RepeatActionForever(
  SCNAction.Sequence(new[] { SCNAction.ScaleBy(2f, 10), SCNAction.ScaleBy(0.5f, 10) })));
SceneKit exposes a variety of actions like this, which can be combined and composed in any way you'd like. In just a couple extra lines of code I've now got 3-D minions hanging out in my house that can move around.
Wrapping Up
This only scratches the surface of what's possible with ARKit, but hopefully it demonstrates how low the barrier truly is for getting started integrating AR into your apps. No longer do you need advanced experience with 3-D programming to write these kinds of apps; you just need an idea and a little bit of code and you're on your way.