The Data Science Lab
Introduction to Keras with TensorFlow
It's possible to create neural networks from raw code. But there are many code libraries you can use to speed up the process. These libraries include Microsoft CNTK, Google TensorFlow, Theano, PyTorch, scikit-learn and Caffe. Most neural network libraries are written in C++ for performance but have a Python API for convenience.
In this article I'll show you how to get started with the popular Keras library. Keras is a bit unusual because it's a high-level wrapper over TensorFlow. The idea is that TensorFlow works at a relatively low level and coding directly with TensorFlow is very challenging. Put another way, you write Keras code using Python. The Keras code calls into the TensorFlow library, which does all the work.
In Keras terminology, TensorFlow is the called backend engine. Interestingly, Keras has a modular design, and you can also use Theano or CNTK as backend engines. However, Keras is used most often with TensorFlow.
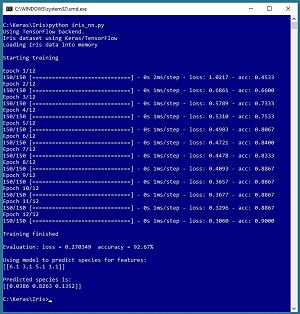
A good way to see where this article is headed is to take a look at the screenshot of a demo program in Figure 1. The demo program reads the famous Iris dataset into memory. The goal is to predict the species of an iris flower (setosa, versicolor or virginica) from four predictor values: sepal length, sepal width, petal length and petal width. A sepal is a leaf-like structure.
 [Click on image for larger view.]
Figure 1.The Iris Dataset Example Using Keras
[Click on image for larger view.]
Figure 1.The Iris Dataset Example Using Keras
The Iris dataset has 150 items. The demo program creates a neural network and then trains the network using 12 epochs (iterations). After training, the model is evaluated. The model has a loss of 0.2703 and the accuracy is 92.67 percent, which means the model correctly predicts the species of 139 of the 150 items.
The demo then uses the trained model to predict the species for a flower that has sepal and petal values (6.1, 3.1, 5.1, 1.1). The prediction is (0.0386, 0.8263, 0.1352), which maps to versicolor.
This article assumes you have intermediate or better programming skill with a C-family language but doesn't assume you know anything about Keras or TensorFlow. The complete demo code is presented in this article. The source code and the data file used by the demo are also available in the download that accompanies this article. All normal error checking has been removed to keep the main ideas as clear as possible.
Installing Keras
Installing Keras involves three main steps. First you install Python and several required auxiliary packages such as NumPy and SciPy, then you install TensorFlow, then you install Keras. Although it's possible to install Python and the packages required to run Keras separately, it's much better to install a Python distribution. I strongly recommend using the Anaconda distribution of Python, which has all the packages you need to run Keras with TensorFlow. In this article I address installation on a Windows 10 machine. Installation on Mac and Linux systems is similar.
Coordinating compatible versions of Python, auxiliary packages, TensorFlow and Keras is a significant challenge. Almost all the installation failures I've seen have been due to version incompatibilities. At the time I'm writing this article, I'm using Ananconda3 4.1.1 (which contains Python 3.5.2 and NumPy 1.11.1 and SciPy 0.17.1), TensorFlow 1.4.0 and Keras 2.1.4. These are all quite stable, but because TensorFlow and Keras are relatively new and under continuous development, by the time you read this article there will likely be newer versions available.
Before starting, I recommend you uninstall any existing Python installations you have on your machine, using the Windows Control Panel, Programs and Features. I also suggest creating a C:\Keras directory to hold installation files for TensorFlow and Keras.
To install the Anaconda distribution, go to https://repo.continuum.io/archive/ and look for file Anaconda3-4.1.1-Windows-x86_64.exe, which is a self-extracting executable. If you click on the link, you'll get a dialog with buttons to Run or Save. You can click on the Run button.
The Anaconda installer is very slick. You'll be presented with a set of eight installation wizard screens. You should accept all defaults and just click the Next button on each screen. The default settings will place Python and 400+ packages in the C:\Users\<user>\AppData\Local\Continuum\Anaconda3 directory.
To install the TensorFlow library, go to https://pypi.python.org/pypi/tensorflow/1.4.0/ and look for a file named tensorflow-1.4.0-cp35-cp35m-win_amd64.whl. This is a Python "wheel" file. You can think of a .whl file as somewhat similar to a Windows .msi file. If you click on the link, you'll get an option to Open or Save. Do a Save As and place the .whl file in your C:\Keras directory.
You install TensorFlow using the Python pip utility, which you get with the Anaconda distribution. Open a Windows command shell. From the shell enter the command:
C:\>pip install C:\Keras\tensorflow-1.4.0-cp35-cp35m-win_amd64.whl
Installation is quick. But there's a lot that can go wrong. If installation fails, read the error messages in the shell carefully. The problem will likely be a version compatibility issue.
Installing Keras is similar to installing TensorFlow. Go to https://pypi.python.org/pypi/Keras/2.1.4/ and look for file Keras-2.1.4-py2.py3-none-any.whl. Click on the link and save the file in the C:\Keras directory. From a shell enter the command:
C:\>pip install C:\Keras\Keras-2.1.4-py2.py3-none-any.whl
The Keras install is very quick. If you run into problems, you can uninstall Keras by issuing a "pip uninstall keras" command from a shell. Similarly, you can uninstall TensorFlow with "pip uninstall tensorflow."
To verify that Python, TensorFlow and Keras have been successfully installed, open a command shell and enter "python" to launch the Python interpreter. You'll see the ">>>" Python prompt. Then enter the following commands. (Note there are two consecutive underscore characters in the version commands.)
C:\>python
>>> import tensorflow as tf
>>> tf.__version__
'1.4.0'
>>> import keras as K
Using TensorFlow backend.
>>> K.__version__
'2.1.4'
>>> exit()
C:\>
If you see the responses above, then congratulations, you're ready to start writing machine learning code using Keras and TensorFlow.
Preparing the Iris Dataset
The raw Iris dataset can be found at https://archive.ics.uci.edu/ml/machine-learning-databases/iris/iris.data. The data looks like:
5.1,3.5,1.4,0.2,Iris-setosa
4.9,3.0,1.4,0.2,Iris-setosa
. . .
7.0,3.2,4.7,1.4,Iris-versicolor
6.4,3.2,4.5,1.5,Iris-versicolor
. . .
6.2,3.4,5.4,2.3,Iris-virginica
5.9,3.0,5.1,1.8,Iris-virginica
Copy-paste the 150 items into Notepad. The first four values on each line are sepal length, sepal width, petal length and petal width. The fifth item is the species. Neural networks only understand numbers so the species must be encoded. Replace all "Iris-setosa" with 1,0,0 and replace all "Iris-versicolor" with 0,1,0 and replace all "Iris-virginica" with 0,0,1. This is called 1-of-N encoding or sometimes one-hot encoding. The resulting contents should now be:
5.1,3.5,1.4,0.2,1,0,0
4.9,3.0,1.4,0.2,1,0,0
. . .
7.0,3.2,4.7,1.4,0,1,0
6.4,3.2,4.5,1.5,0,1,0
. . .
6.2,3.4,5.4,2.3,0,0,1
5.9,3.0,5.1,1.8,0,0,1
Save the file in any convenient directory as iris_data.txt or any reasonable name. When working with neural networks, I usually create a root folder for the problem, such as C:\Keras\Iris and then a subdirectory named Data to hold the data.
 [Click on image for larger view.]
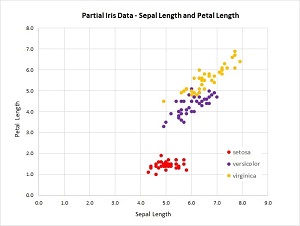
Figure 2. Partial Iris Data
[Click on image for larger view.]
Figure 2. Partial Iris Data
Because there are four predictor variables, it's not feasible to graph the dataset. But you can get a rough idea of the structure of the data by examining the graph in Figure 2.
The Demo Program
The demo program, with a few minor edits to save space, is presented in Listing 1. I indent two spaces rather than the usual four spaces to save space. Note that Python uses the "\" character for line continuation.
Listing 1: The Iris Dataset Demo Program
# iris_nn.py
# Iris classification Keras 2.1.4 TensorFlow 1.4.0

import numpy as np
import keras as K

import os
os.environ['TF_CPP_MIN_LOG_LEVEL']='2'

def main():
  print("Iris dataset using Keras/TensorFlow ")

  print("Loading Iris data into memory \n")
  data_file = ".\\Data\\iris_data.txt"
  train_x = np.loadtxt(data_file, usecols=[0,1,2,3],
    delimiter=",",  skiprows=0, dtype=np.float32)
  train_y = np.loadtxt(data_file, usecols=[4,5,6],
    delimiter=",", skiprows=0, dtype=np.float32)

  np.random.seed(4)
  model = K.models.Sequential()
  model.add(K.layers.Dense(units=7, input_dim=4,
    activation='tanh'))
  model.add(K.layers.Dense(units=3, activation='softmax'))
  model.compile(loss='categorical_crossentropy',
    optimizer='sgd', metrics=['accuracy'])

  print("Starting training \n")
  h = model.fit(train_x, train_y, batch_size=1,
    epochs=12, verbose=1)  # 1 = very chatty
  print("\nTraining finished \n")

  eval = model.evaluate(train_x, train_y, verbose=0)
  print("Evaluation: loss = %0.6f accuracy = %0.2f%% \n" \
    % (eval[0], eval[1]*100) )

  np.set_printoptions(precision=4)
  unknown = np.array([[6.1, 3.1, 5.1, 1.1]],
    dtype=np.float32)
  predicted = model.predict(unknown)
  print("Using model to predict species for features: ")
  print(unknown)
  print("\nPredicted species is: ")
  print(predicted)

if __name__=="__main__":
  main()
The first few lines of the program are:
# iris_nn.py
# Iris classification Keras 2.1.4 TensorFlow 1.4.0
import numpy as np
import keras as K
import os
os.environ['TF_CPP_MIN_LOG_LEVEL']='2'
Because Keras and TensorFlow are being developed so quickly, you should include a comment that indicates what versions were being used. Notice you must import Keras, but you don't import TensorFlow explicitly. Many programmers who are new to Python are surprised to learn that base Python does not support arrays. NumPy arrays are used by Keras and TensorFlow so you'll almost always import NumPy.
The demo program sets the minimum logging level to 2 only to prevent a notification message from TensorFlow that an optional enhanced performance version is available.
The demo program has all control logic in a single main() function. The data is loaded from file into memory:
def main():
  print("Iris dataset using Keras/TensorFlow ")
  print("Loading Iris data into memory \n")
  data_file = ".\\Data\\iris_data.txt"
  train_x = np.loadtxt(data_file, usecols=[0,1,2,3],
    delimiter=",",  skiprows=0, dtype=np.float32)
  train_y = np.loadtxt(data_file, usecols=[4,5,6],
    delimiter=",", skiprows=0, dtype=np.float32)
The demo uses all 150 items for training. An alternative is to split the data into a training file (typically 80 percent of the items) and a test file (the remaining 20 percent). After training the model you can evaluate the loss and accuracy of the model on the test data to verity that those metrics are similar to the ones obtained on the training data.
The loadtxt() function reads the predictor values and the encoded species values into NumPy array-of-arrays style matrices. Most neural network libraries, including Keras, use float32 data as the default data type because the precision gained by using 64-bit variables is not worth the performance penalty incurred.
Creating the Neural Network
The demo defines the neural network using these statements:
np.random.seed(4)
model = K.models.Sequential()
model.add(K.layers.Dense(units=7, input_dim=4,
  activation='tanh'))
model.add(K.layers.Dense(units=3, activation='softmax'))
model.compile(loss='categorical_crossentropy',
  optimizer='sgd', metrics=['accuracy'])
Setting the NumPy random seed ensures that results will be reproducible. The seed value, 4, was used only because it gave a representative demo run.
A Keras Sequential() model chains neural network layers together. The Dense() function creates a fully connected layer. The first layer is the hidden layer. It has input_dim = 4 because there are four predictor values. There are seven nodes in the layer. The number of hidden processing nodes is a free parameter and must be determined by trial and error. The hidden layer uses tanh (hyperbolic tangent) activation. Alternatives are sigmoid (logistic sigmoid) and ReLU (rectified linear units).
The second layer is the output layer. Because it's chained to the hidden layer, the number of inputs (seven) is inferred from the previous layer. The output layer has three nodes because species is 1-of-N encoded. When creating a neural network classifier, you use softmax activation except in very rare scenarios.
Loosely speaking, the compile() function translates the Keras statements into TensorFlow instructions. The categorical_crossentropy loss parameter tells TensorFlow how to calculate the error between computed output values and correct output values. The loss/error in turn is used to update the neural network weights and bias values.
The optimizer parameter indicates which algorithm to use during training. Keras supports seven different optimizers. The SGD (stochastic gradient descent) optimizer is the simplest. The metrics parameter is optional. Specifying 'accuracy' tells TensorFlow to compute the percentage of correct predictions. This is optional because training algorithms use loss/error to update weights and biases, not accuracy.
Training the Model
The model is trained using the not-very-well-named fit() function:
print("Starting training \n")
h = model.fit(train_x, train_y, batch_size=1,
epochs=12, verbose=1)
print("\nTraining finished \n")
The demo sets the batch_size parameter to one. This means that weights and biases are updated after reading and analyzing a single data item. This is sometimes called online training. If the batch size had been set to 150, all items would be analyzed before updates. This is called batch training. Using a value between 1 and 150 would be called mini-batch training.
The epochs parameter is the number of training iterations to use. The value used by the demo, 12, is artificially small only to keep the size of the output manageable for the screenshot in Figure 1. Using a value like 500 or 1,000 is more realistic. The fit() function returns a History object that is essentially a log of the loss and accuracy values after each epoch. The demo program captures the History but doesn't use it.
Evaluating and Using the Model
After training completes, the demo computes the final loss/error and accuracy metrics:
eval = model.evaluate(train_x, train_y, verbose=0)
print("Evaluation: loss = %0.6f accuracy = %0.2f%% \n" \
  % (eval[0], eval[1]*100) )
The evaluate() function returns the average loss computed on the 150 items. The categorical_crossentropy loss value is difficult to interpret directly. It's used mostly to compare the effectiveness of different models. Because the model was compiled with the option accuracy metric, the accuracy is also returned. Keras supports several additional metrics, and you can create custom metrics too.
The demo concludes by making a prediction:
unknown = np.array([[6.1, 3.1, 5.1, 1.1]],
  dtype=np.float32)
predicted = model.predict(unknown)
print(predicted)
Even though the demo makes a prediction for a single item, the four predictor values must be placed into an array-of-arrays matrix -- note the double square brackets. The computed output is (0.0386, 0.8263, 0.1352). You can interpret these three values as probabilities for setosa, versicolor and virginica respectively. Therefore, the prediction is versicolor. Alternatively, because the second value is the largest, the output maps to (0, 1, 0) which is the encoding for versicolor.
Wrapping Up
This article has just barely scratched the surface of the Keras library but should give you all the information you need to start experimenting. My two favorite neural network libraries are CNTK and Keras. CNTK works at a bit lower level of abstraction, so you have to write a bit more code than when using Keras, but you have greater control and flexibility. Keras works at a higher level of abstraction, so it's often quite a bit faster to get a neural network up and running than when using CNTK.