The Data Science Lab
Sentiment Analysis Using Keras
Suppose you have a collection of e-mail messages from users of your product or service. You don't have time to read every message so you want to programmatically determine if the tone of each message is positive ("great service") or negative ("you guys are terrible"). This is an example of sentiment analysis. In this article I show you how to get started with sentiment analysis using the Keras code library.
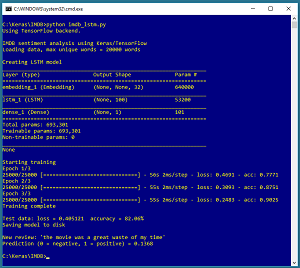
Take a look at the demo program in Figure 1. The demo uses the well-known IMDB movie review dataset. The dataset has a total of 50,000 reviews divided into a 25,000-item training set and a 25,000-item test set. Half of the reviews are positive and half are negative.
The demo program creates and trains an LSTM (long, short term memory) network. LSTMs are deep neural networks that are designed specifically for sequence input, such as sentences which are sequences of words. The model achieves 90.25 percent accuracy on the training data (22,563 correct and 2,437 wrong) and 82.06 percent accuracy on the test data.
After training, the model is used to classify a new, previously unseen tiny movie review of, "The movie was a great waste of my time." The prediction probability value is 0.1368 and because that value is less than 0.5, the model correctly predicts the review is negative.
 [Click on image for larger view.]
Figure 1. Sentiment Analysis on the IMDB Dataset Using Keras
[Click on image for larger view.]
Figure 1. Sentiment Analysis on the IMDB Dataset Using Keras
This article assumes you have intermediate or better programming skill with a C-family language and a basic familiarity with machine learning but doesn't assume you know anything about LSTM networks. All the demo code is presented in this article. The source code is also available in the download that accompanies this article. All normal error checking has been removed to keep the main ideas as clear as possible.
Installing Keras
Keras is a code library that provides a relatively easy-to-use Python language interface to the relatively difficult-to-use TensorFlow library. Installing Keras involves three main steps. First you install Python and several required auxiliary packages such as NumPy and SciPy. Then you install TensorFlow and Keras as add-on Python packages.
Although it's possible to install Python and the packages required to run Keras separately, it's much better to install a Python distribution, which is a collection containing the base Python interpreter and additional packages that are compatible with one another. For my demo, I installed the Anaconda3 4.1.1 distribution (which contains Python 3.5.2), TensorFlow 1.7.0 and Keras 2.1.5.
The Demo Program
The structure of demo program, with a few minor edits to save space, is presented in Listing 1. I indent with two spaces rather than the usual four spaces to save space. Note that Python uses the "\" character for line continuation. I used Notepad to edit my program. Most of my colleagues prefer a more sophisticated editor, but I like the clean simplicity of Notepad.
Listing 1: The Sentiment Analysis Demo Program Structure
# imdb_lstm.py
# LSTM for sentiment analysis on the IMDB dataset
# Anaconda3 4.1.1 (Python 3.5.2) Keras 2.1.5 TensorFlow 1.7.0

import numpy as np
import keras as K
import tensorflow as tf
import os
os.environ['TF_CPP_MIN_LOG_LEVEL']='2'

def main():
  # 0. get started
  print("IMDB sentiment analysis using Keras/TensorFlow")
  np.random.seed(1)
  tf.set_random_seed(1)

  # 1. load data into memory
  # 2. define and compile LSTM model
  # 3. train model
  # 4. evaluate model
  # 5. save model
  # 6. use model to make a prediction
if __name__=="__main__":
  main()
The demo program is named imdb_lstm.py and it starts by importing the NumPy, Keras, TensorFlow and OS packages. You don't need to explicitly import TensorFlow, but the demo program does so just to be able set the global TensorFlow random seed. The OS package is used just to suppress an annoying startup message.
Loading Data into Memory
Working with the raw IMDB data is difficult because it's structured as 50,000 individual text files where the sentiment (negative = 0, positive = 1) is part of each file name. However, the Keras library has a built-in sub-module named datasets that can import the IMDB training and test datasets:
# 1. load data
max_words = 20000
print("Loading data, max unique words = %d words\n" % max_words)
(train_x, train_y), (test_x, test_y) = \
  K.datasets.imdb.load_data(seed=1, num_words=max_words)
The load_data() function reads all 50,000 movie reviews into memory. The seed parameter controls the randomization for the order of the reviews. The num_words parameter sets a limit on how many distinct words are allowed.
Each movie review is preprocessed by converting words to all lower-case letters. All punctuation characters, except for the single-quote character, are removed. This retains important contraction words such as can't and don't.
Each word of a review is converted into a unique integer ID where 4 is used for the most frequent word in the training data ("the"), 5 is used for the second most common word ("and") and so on. A value of 0 is reserved for padding. A value of 1 is used to indicate the beginning of a sequence/sentence. Words that aren't among the most common 20,000 words are assigned a value of 2 and are called out-of-vocabulary (OOV) words. A value of 3 is reserved for custom usage.
After the reviews are encoded and loaded into memory, they receive additional processing:
max_review_len = 80
train_x = K.preprocessing.sequence.pad_sequences(train_x,
  truncating='pre', padding='pre', maxlen=max_review_len)
test_x = K.preprocessing.sequence.pad_sequences(test_x,
  truncating='pre', padding='pre', maxlen=max_review_len)
The pad_sequences() function performs two operations. First, movie reviews that have more than 80 words are truncated to exactly 80 words in length by removing excess words from the beginning of the review. You can remove excess words from the end of reviews by specifying truncating='post'. Second, any movie review that has fewer than 80 words is padded up to exactly 80 words by adding 0 values to the beginning of the review. You can pad at the end of reviews by specifying padding='post'.
Defining the LSTM Model
The demo program prepares the creation of an LSTM model with this code:
# 2. define model
print("Creating LSTM model")
e_init = K.initializers.RandomUniform(-0.01, 0.01, seed=1)
init = K.initializers.glorot_uniform(seed=1)
simple_adam = K.optimizers.Adam()
embed_vec_len = 32  # values per word
The e_init and init objects set up the way in which the LSTM weights and biases will be initialized. The demo program creates an Adam ("adaptive moment estimation") optimizer object. Adam is a very good general-purpose optimizer for many types of deep neural networks. Alternatives include RMSprop, Adagrad and Adadelta.
Although it is possible to feed integer-encoded sentences directly to an LSTM network, better results are obtained by converting each integer ID into a vector of real values. For example, the word "the" has index value 4 but will be converted to a vector like (0.1234, 0.5678, . . 0.3572). This is called a word embedding.
The idea is to construct vectors so that similar words, such as "man" and "male," have vectors that are numerically close. The length of the vector must be determined by trial and error. The demo uses size 32 but for most problems a vector size of 100 to 500 is more common.
The LSTM network is defined like so:
model = K.models.Sequential()
model.add(K.layers.embeddings.Embedding(input_dim=max_words,
  output_dim=embed_vec_len, embeddings_initializer=e_init,
  mask_zero=True))
model.add(K.layers.LSTM(units=100, kernel_initializer=init,
  dropout=0.2, recurrent_dropout=0.2))  # 100 memory
model.add(K.layers.Dense(units=1, kernel_initializer=init,
  activation='sigmoid'))
There are three main ways to create word embeddings for an LSTM network. One approach is to use an external tool such as Word2Vec to create the embeddings. A second approach is to use a set of pre-built embeddings such as GloVe ("global vectors for word representation"), which is constructed using the text of Wikipedia. The demo program uses the third approach, which is to create embeddings on the fly. These embeddings will be specific to the vocabulary of the problem scenario.
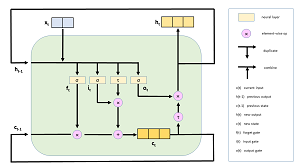
After specifying an Embedding() layer, the demo program sets up an LSTM() layer. LSTMs are fantastically complex software modules. You can get a rough idea of how LSTMs work by examining the diagram in Figure 2.
 [Click on image for larger view.]
Figure 2. A Simplified LSTM Cell
[Click on image for larger view.]
Figure 2. A Simplified LSTM Cell
The x(t) object is the input at time t, which is a word embedding. The output is h(t). Unlike regular neural networks, LSTMs have state, which allows them to handle sentences where the next word depends on the previous words. In the diagram, c(t) is the cell state at time t. Notice that the output, h(t), depends on the current input x(t) as well as the previous output h(t-1) and the cell state c(t). Remarkable!
The LSTM network has a final Dense() layer that crunches the output of the LSTM() layer down to a single numeric value between 0.0 and 1.0. An output value less than 0.5 maps to a classification of 0 which is a negative review, and an output greater than 0.5 maps to a positive (1) review. In situations where your sentiment analysis is multi-valued, you can use one-hot encoding such as negative = (1, 0, 0), neutral = (0, 1, 0), positive = (0, 0, 1).
After the LSTM network is defined, it is readied for use:
model.compile(loss='binary_crossentropy', optimizer=simple_adam,
  metrics=['acc'])
print(model.summary())
The summary() method displays the number of weights and biases that the model has, as shown in Figure 1. The demo has 693,301 weights and biases, where the majority (20,000 distinct words * 32 vectors per word = 640,000) of them are part of the embedding layer.
Training, Evaluating and Saving the LSTM Model
The LSTM sentiment analysis model is trained with these statements:
# 3. train model
bat_size = 32
max_epochs = 3
print("\nStarting training ")
model.fit(train_x, train_y, epochs=max_epochs,
  batch_size=bat_size, shuffle=True, verbose=1)
print("Training complete \n")
The batch size, 32, is a hyperparameter and a good value must be determined by trial and error. The demo program uses an artificially small number of training epochs, 3, to keep the size of the output display small. A more realistic value would be 10 to 100 epochs. The verbose=1 argument tells Keras to display loss/error and current model accuracy on every training epoch.
After training completes, the model is evaluated:
# 4. evaluate model
loss_acc = model.evaluate(test_x, test_y, verbose=0)
print("Test data: loss = %0.6f  accuracy = %0.2f%% " % \
  (loss_acc[0], loss_acc[1]*100))
The evaluate() method returns a list of values where the first value at index [0] is always the (required) loss function, which is binary cross entropy in this case. The remaining values in the list are optional metrics specified in the call to the compile() method, in this case, just the classification accuracy at index [1].
The trained model is saved using these statements:
# 5. save model
print("Saving model to disk \n")
mp = ".\\Models\\imdb_model.h5"
model.save(mp)
This code assumes there is a sub-directory named Models. Keras saves models in the hierarchical data format (HDF) version 5, which you can think of as somewhat similar to a binary XML. A saved model can be loaded from a different program using the keras.models.load() method.
Using the LSTM Model to Make a Prediction
The demo program prepares a new, previously unseen movie review:
# 6. use model
print("New review: \'the movie was a great waste of my time\'")
d = K.datasets.imdb.get_word_index()
review = "the movie was a great waste of my time"
Recall that the Keras format for movie reviews expects all lower-case letters, with all punctuation removed except the single-quote character. The get_word_index() function returns a Python dictionary object that was created from the 25,000-item training data. The dictionary is 1-base indexed and constructed by word frequency. For example, d["the"] = 1, d["and"] = 2.
Next, the words in the new review are converted to integer ID values:
words = review.split()
review = []
for word in words:
  if word not in d:
    review.append(2)
  else:
    review.append(d[word]+3)
Recall that words that are rare (not among the 20,000 most common) or aren't in the training data have a special ID value of 2. Also, each ID is offset by 3 to make room for special values 0, 1, 2 and 3.
The demo concludes by truncating/padding the review and computing the predicted sentiment:
review = K.preprocessing.sequence.pad_sequences([review],
  truncating='pre', padding='pre', maxlen=max_review_len)
prediction = model.predict(review)
print("Prediction (0 = negative, 1 = positive) = ", end="")
print("%0.4f" % prediction[0][0])
The predict() method returns a single value in an array-of-arrays object, so the prediction probability is located at indices [0][0].
Wrapping Up
Sentiment analysis is a very difficult problem. As recently as about two years ago, trying to create a custom sentiment analysis model wouldn't have been feasible unless you had a lot of developer resources, a lot of machine learning expertise and a lot of time. Instead, you'd likely have had to use a canned approach from a service such as Azure Cognitive Services text analytics. But now, even though sentiment analysis is a very challenging problem, the existence of neural network libraries like Keras with built-in LSTM functionality has made custom sentiment analysis feasible.
About the Author
Dr. James McCaffrey works for Microsoft Research in Redmond, Wash. He has worked on several Microsoft products including Azure and Bing. James can be reached at [email protected].