The Data Science Lab
How to Do Logistic Regression Using ML.NET
Microsoft Research's Dr. James McCaffrey show how to perform binary classification with logistic regression using the Microsoft ML.NET code library. The goal of binary classification is to predict a value that can be one of just two discrete possibilities, for example, predicting if a person is male or female
In this article I show you how to perform binary classification with logistic regression using the Microsoft ML.NET code library. The goal of binary classification is to predict a value that can be one of just two discrete possibilities, for example, predicting if a person is male or female. There are many machine learning techniques that can be used for a binary classification problem; one of the simplest is called logistic regression. And there are many ways to train a logistic regression model; one of the most common is called the L-BFGS algorithm.
 [Click on image for larger view.]
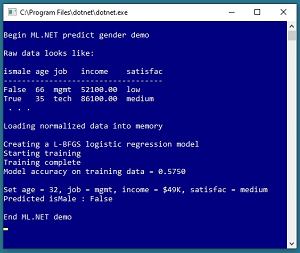
Figure 1. Predicting an Employee's Gender Using ML.NET
[Click on image for larger view.]
Figure 1. Predicting an Employee's Gender Using ML.NET
The best way to see where this article is headed is to take a look at the screenshot in Figure 1. The goal of the demo is to create a machine learning model that predicts the gender (isMale = true or isMale = false) of a person based on their age, job type (mgmt, tech, sale), annual income, and job satisfaction (low, medium, high).
Behind the scenes there is a 40-item set of raw training data that looks like:
isMale age job   income    satisfac
-----------------------------------
False  66  mgmt  52100.00  low
True   35  tech  86100.00  medium
 . . .
The demo program uses a normalized version of the data that looks like:
isMale age   job   income  satisfac
-----------------------------------
False  0.66  mgmt  0.5210  low
True   0.35  tech  0.8610  medium
 . . .
Age values are normalized by dividing by 100 and income values are divided by 100,000. Normalizing numeric data is not required but it prevents large values from overwhelming small values.
The demo program begins by loading the normalized training data into memory. Then the demo uses the ML.NET library to create and train a logistic regression binary classification model. The trained model scores 57.50 percent accuracy on the training data (23 out of 40 correct predictions). The demo concludes by making a prediction for a new, previously unseen person who is 32 years old, works in a management role, has an income of $49,000 per year, and whose job satisfaction is medium. The prediction for the person is isMale = false.
This article assumes you have intermediate or better C# skill and experience with Visual Studio but doesn't assume you know anything about the ML.NET library. The entire demo code is presented in this article, and it's also available in the accompanying file download.
Preparing Data for ML.NET
The contents of the 40-item normalized training dataset is shown in Listing 1. The file is tab-separated and is named employees_norm_train.tsv. The header line is not required but it makes the data a bit easier to understand. The variable to predict is in the first column in this example, but you can order columns however you wish.
Listing 1. Normalized Training Data
isMale age   job   income  satisfac
False  0.66  mgmt  0.5210  low
True   0.35  tech  0.8610  medium
False  0.24  tech  0.4410  high
True   0.43  sale  0.5170  medium
True   0.37  mgmt  0.8860  medium
True   0.30  sale  0.8790  low
False  0.40  mgmt  0.2020  medium
False  0.58  tech  0.2650  low
True   0.27  mgmt  0.8480  low
False  0.33  sale  0.5600  medium
True   0.59  tech  0.2330  high
True   0.52  sale  0.8700  high
False  0.41  mgmt  0.5170  medium
True   0.22  sale  0.3500  high
False  0.61  sale  0.2980  low
True   0.46  mgmt  0.6780  medium
True   0.59  mgmt  0.8430  low
False  0.28  tech  0.7730  high
True   0.46  sale  0.8930  medium
False  0.48  tech  0.2920  medium
False  0.28  mgmt  0.6690  medium
False  0.23  sale  0.8970  high
True   0.60  mgmt  0.6270  high
True   0.29  sale  0.7760  low
True   0.24  tech  0.8750  high
False  0.51  mgmt  0.4090  medium
True   0.22  sale  0.8910  low
True   0.19  tech  0.5380  low
False  0.25  sale  0.9000  high
True   0.44  tech  0.8980  medium
True   0.35  mgmt  0.5380  medium
True   0.29  sale  0.7610  low
False  0.25  mgmt  0.3450  medium
False  0.66  mgmt  0.2210  low
False  0.43  tech  0.7450  medium
True   0.42  sale  0.8520  medium
True   0.44  mgmt  0.6580  medium
False  0.42  sale  0.6970  medium
True   0.56  tech  0.3680  high
True   0.38  mgmt  0.2600  low
Notice that Boolean isMale value-to-predict is encoded as True or False. You can also use 0 for false and 1 for true if you wish.
Creating the Visual Studio Project
To create the demo program, I launched Visual Studio 2019. I used the community (free) edition but any variant of VS2019 will work. I clicked on the Create a New Project option and then selected the Console App (.NET Core) project template. I named the project PredictGender. After the template code loaded, I ran it by hitting the F5 key to verify basic functionality. Next, I right-clicked on file Program.cs in the VS Solution Explorer window and renamed it to the more descriptive PredictGenderProgram.cs and then in the editor window I renamed class Program to PredictGenderProgram to match the file name.
In order to use the ML.NET library in a C# project, you need to add the library as a package using the NuGet system. In the Solution Explorer window I right-clicked on the PredictGender project name and then selected the Manage NuGet Packages option. In the Browse tab, I entered ML.NET in the search box and then scrolled through the results until I found the Microsoft.ML package, and then I clicked on the Install button. I used version 1.3.1 but the code in this article should work with newer versions of ML.NET that may be available by the time you read this article.
Next, I created a subdirectory named Data in the project root directory and saved the training data file there.
The demo program, with some WriteLine statements removed and a few minor edits to save space, is presented in
Listing 2.
Listing 2. Demo Program Source Code
using System;
using Microsoft.ML;  // v1.3.1 via NuGet
using Microsoft.ML.Data;
using Microsoft.ML.Trainers;
namespace PredictGender
{
  class PredictGenderProgram
  {
    static void Main(string[] args)
    {
      Console.WriteLine("\nBegin ML.NET predict gender demo ");
      MLContext mlc = new MLContext(seed: 1);

      // 1. load data and create data pipeline
      Console.WriteLine("Loading normalized data into memory ");
      string trainDataPath =
        "..\\..\\..\\Data\\employees_norm_train.tsv";

      IDataView trainData =
        mlc.Data.LoadFromTextFile<ModelInput>
        (trainDataPath, '\t', hasHeader: true);

      var a = mlc.Transforms.Categorical.OneHotEncoding(new[]
        { new InputOutputColumnPair("job", "job") });
      var b = mlc.Transforms.Categorical.OneHotEncoding(new[]
        { new InputOutputColumnPair("satisfac", "satisfac") });
      var c = mlc.Transforms.Concatenate("Features", new[]
        { "age", "job", "income", "satisfac" });
      var dataPipe = a.Append(b).Append(c);

      // 2. train model
      Console.WriteLine("Creating a logistic regression model");
      var options =
        new LbfgsLogisticRegressionBinaryTrainer.Options()
      {
        LabelColumnName = "isMale",
        FeatureColumnName = "Features",
        MaximumNumberOfIterations = 100,
        OptimizationTolerance = 1e-8f
      };
      var trainer =
        mlc.BinaryClassification.Trainers.
        LbfgsLogisticRegression(options);
      var trainPipe = dataPipe.Append(trainer);
      Console.WriteLine("Starting training");
      ITransformer model = trainPipe.Fit(trainData);
      Console.WriteLine("Training complete");

      // 3. evaluate model
      IDataView predictions = model.Transform(trainData);
      var metrics = mlc.BinaryClassification.
        EvaluateNonCalibrated(predictions, "isMale", "Score");
      Console.Write("Model accuracy on training data = ");
      Console.WriteLine(metrics.Accuracy.ToString("F4"));

      // 4. use model
      ModelInput X = new ModelInput();
      X.Age = 0.32f; X.Job = "mgmt"; X.Income = 0.4900f;
      X.Satisfac = "medium";

      var pe = mlc.Model.CreatePredictionEngine<ModelInput,
        ModelOutput>(model);
      var Y = pe.Predict(X);
      Console.Write("Set age = 32, job = mgmt, income = $49K,");
      Console.WriteLine("satisfac = medium");
      Console.Write("Predicted isMale : ");
      Console.WriteLine(Y.PredictedLabel);

      Console.WriteLine("\nEnd ML.NET demo ");
      Console.ReadLine();
    } // Main
  } // Program

  class ModelInput
  {
    [ColumnName("isMale"), LoadColumn(0)]
    public bool IsMale { get; set; }

    [ColumnName("age"), LoadColumn(1)]
    public float Age { get; set; }

    [ColumnName("job"), LoadColumn(2)]
    public string Job { get; set; }

    [ColumnName("income"), LoadColumn(3)]
    public float Income { get; set; }

    [ColumnName("satisfac"), LoadColumn(4)]
    public string Satisfac { get; set; }
  }

  class ModelOutput
  {
    [ColumnName("predictedLabel")]
    public bool PredictedLabel { get; set; }

    [ColumnName("score")]
    public float Score { get; set; }
  }
} // ns
All the program logic is contained in the Main method and there are two auxiliary classes, ModelInput and ModelOutput. This simple structure is often a good approach when using the ML.NET library.
Defining Input and Output Classes
The ModelInput class has five fields, one for each column of the training data. For binary classification, the field to predict will be declared as type bool, numeric predictor fields will be declared as type float (not type double as you might expect), and categorical predictor fields will be declared as type string. The ColumnName attribute does not have to match the property name or the optional header string in the data file, but it's good practice to match these names, such as "isMale" for the column name and "IsMale" for the property name.
For binary classification, the ModelOutput class will usually have two fields. Unlike the input fields, the ColumnName attributes are optional for the output fields.
The training data is loaded into memory using the LoadFromTextFile method and the ModelInput definition. The ML.NET system uses an unusual approach to chain together modules into what's called a data pipeline. The OneHotEncoding method converts categorical predictor values, such as a job satisfaction of "medium," into a vector of values such as (0, 1, 0). Numeric values, such as age and income, do not need a transform.
Training and Evaluating the Model
The ML.NET library supports a wide range of binary classifiers. The demo uses the LbfgsLogisticRegression trainer. Other binary classifiers include SdcaLogisticRegression (logistic regression using a different optimization algorithm), LinearSvm (support vector machine), LightGbmBinary (gradient boosting machine), and FastForestBinary (decision tree). Different classifiers have different strengths and weaknesses and choosing one requires doing a bit of research plus some trial and error.
Each trainer has a set of applicable options. Some are required, such as the LabelColumName and FeatureColumnName, and some are optional because they have default values, such as MaximumNumberOfIterations and OptimizationTolerance. Tuning the trainer options can have a big impact on model accuracy.
After training, the demo program evaluates the trained model using the EvaluateNonCalibrated method. This method returns an object that holds various criteria such as basic accuracy (percentage correct predictions), F1 score (a combination of precision and recall), and confusion (counts of true positives, false positives, true negatives, and false negatives).
Using the Trained Model
The demo program sets up the input values for a prediction like so:
ModelInput X = new ModelInput();
X.Age = 0.32f;
X.Job = "mgmt";
X.Income = 0.4900f;
X.Satisfac = "medium";
Notice that because the model was trained using normalized data, the numeric input values should be normalized. The default numeric type in ML.NET is type float so the "f" suffix must be used for numeric literals.
The actual prediction is made using the Predict method of a PredictionEngine object. The Predict method returns a PredictedLabel, which is true or false, and a Score, which is a numeric value that is negative for a false prediction or positive for a true prediction.
About the Author
Dr. James McCaffrey directs the data science and research efforts at Quaetrix, a data analytics company located near Redmond, Washington. Before joining Quaetrix, James was a senior research engineer at Microsoft. James can be reached at [email protected].