C# Corner
ASP.NET Core Security, Part 2
Eric Vogel follows up on his previous post on getting started with ASP.NET Core security. Now that .NET Core 3.0 is out, he shows how to upgrade the code from Part 1 to ASP.NET Core 3.0, put pages behind login, create user roles, and use existing roles to restrict access to pages.
Welcome to Part 2 of the series. Today I'll show you how to upgrade the code from Part 1 to ASP.NET Core 3.0, put pages behind login, create user roles, and use existing roles to restrict access to pages. To get started, get the code from Part 1 in the download accompanying this article (click on the GET CODE DOWNLOAD button above).
Next I'm going to update the code to target the newly released ASP.NET Core 3.0. First load the project in Visual Studio and then edit the .csproj file and change it to Listing 1.
Listing 1: VSMAuthDemo.csproj
<Project Sdk="Microsoft.NET.Sdk.Web">
  <PropertyGroup>
    <TargetFramework>netcoreapp3.0</TargetFramework>
    <UserSecretsId>aspnet-VSMAuthDemo-4039A5C3-A95D-4407-9DE1-576C087AA80F</UserSecretsId>
  </PropertyGroup>
</Project>
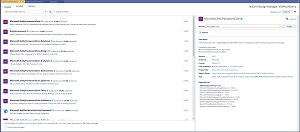
Next I update the solution to use the new Entity Framework Core 3.0 as seen in Figure 1.
 [Click on image for larger view.]
Figure 1. Entity Framework Core 3.0 NuGet Install
[Click on image for larger view.]
Figure 1. Entity Framework Core 3.0 NuGet Install
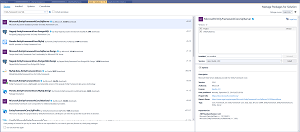
Next I need to install the ASP.NET Core Identity UI 3.0 NuGet package as seen in Figure 2.
 [Click on image for larger view.]
Figure 2. ASP.NET Core Identity UI 3.0 NuGet Install
[Click on image for larger view.]
Figure 2. ASP.NET Core Identity UI 3.0 NuGet Install
Next I update the ASP.NET Core Entity Framework Identity UI NuGet package to version 3.0 as seen in Figure 3.
 [Click on image for larger view.]
Figure 3. ASP.NET Core Identity Entity Framework Core NuGet Install
[Click on image for larger view.]
Figure 3. ASP.NET Core Identity Entity Framework Core NuGet Install
Lastly I install the EF Core SQL Server 3.0 NuGet package as seen in Figure 4.
 [Click on image for larger view.]
Figure 4. Entity Framework Core SQL Server NuGet Install
[Click on image for larger view.]
Figure 4. Entity Framework Core SQL Server NuGet Install
Next there are some changes that need to be made to the Startup.cs class. Open up the file and change the services.AddMvc() call to be:
services.AddMvc().SetCompatibilityVersion(CompatibilityVersion.Version_3_0).AddMvcOptions(x => x.EnableEndpointRouting = false);
Then change the app.UseMvc call to be:
app.UseMvcWithDefaultRoute();
Lastly remove the call to app.UseDatabaseErrorPage();. Your Startup.cs file should now match Listing 2.
Listing 2: Updated Startup.cs Class
using System;
using System.Collections.Generic;
using System.Linq;
using System.Threading.Tasks;
using Microsoft.AspNetCore.Builder;
using Microsoft.AspNetCore.Identity;
using Microsoft.AspNetCore.Hosting;
using Microsoft.AspNetCore.Http;
using Microsoft.AspNetCore.HttpsPolicy;
using Microsoft.AspNetCore.Mvc;
using Microsoft.EntityFrameworkCore;
using VSMAuthDemo.Data;
using Microsoft.Extensions.Configuration;
using Microsoft.Extensions.DependencyInjection;

namespace VSMAuthDemo
{
    public class Startup
    {
        public Startup(IConfiguration configuration)
        {
            Configuration = configuration;
        }

        public IConfiguration Configuration { get; }

        // This method gets called by the runtime. Use this method to add services to the container.
        public void ConfigureServices(IServiceCollection services)
        {
            services.Configure<CookiePolicyOptions>(options =>
            {
                // This lambda determines whether user consent for non-essential cookies is needed for a given request.
                options.CheckConsentNeeded = context => true;
                options.MinimumSameSitePolicy = SameSiteMode.None;
            });

            services.AddDbContext<ApplicationDbContext>(options =>
                options.UseSqlServer(
                    Configuration.GetConnectionString("DefaultConnection")));
            services.AddDefaultIdentity<IdentityUser>()
                .AddEntityFrameworkStores<ApplicationDbContext>();

            services.AddMvc().SetCompatibilityVersion(CompatibilityVersion.Version_3_0).AddMvcOptions(x => x.EnableEndpointRouting = false);
        }

        // This method gets called by the runtime. Use this method to configure the HTTP request pipeline.
        public void Configure(IApplicationBuilder app, IHostingEnvironment env)
        {
            if (env.IsDevelopment())
            {
                app.UseDeveloperExceptionPage();
            }
            else
            {
                app.UseExceptionHandler("/Home/Error");
                app.UseHsts();
            }

            app.UseHttpsRedirection();
            app.UseStaticFiles();
            app.UseCookiePolicy();

            app.UseAuthentication();
            app.UseMvcWithDefaultRoute();
        }
    }
}
You should now be able to build and run the application. Let's now go over how to create a role, add that role to a user, and update a controller action to check if the user has a given role. First I need to update the Startup.cs class to add support for roles. In the ConfigureServices method change the service.AddDefaultIdentity call to be:
services.AddDefaultIdentity<IdentityUser>()
                .AddRoles<IdentityRole>()
                .AddEntityFrameworkStores<ApplicationDbContext>();
Your ConfigureServices method should now look like Listing 3
Listing 3: Updated ConfigureServices Method
public void ConfigureServices(IServiceCollection services)
{
    services.Configure<CookiePolicyOptions>(options =>
    {
        // This lambda determines whether user consent for non-essential cookies is needed for a given request.
        options.CheckConsentNeeded = context => true;
        options.MinimumSameSitePolicy = SameSiteMode.None;
    });

    services.AddDbContext<ApplicationDbContext>(options =>
        options.UseSqlServer(
            Configuration.GetConnectionString("DefaultConnection")));
    services.AddDefaultIdentity<IdentityUser>()
        .AddRoles<IdentityRole>()
        .AddEntityFrameworkStores<ApplicationDbContext>();

    services.AddMvc().SetCompatibilityVersion(CompatibilityVersion.Version_3_0).AddMvcOptions(x => x.EnableEndpointRouting = false);
}
Next let's add a page that will simply add the logged in user to the Admin role. Open up the Home Controller class and update the constructor to take in injected user and role managers:
private readonly UserManager<IdentityUser> _userManager;
 private readonly RoleManager<IdentityRole> _roleManager;

 public HomeController(UserManager<IdentityUser> userManager, RoleManager<IdentityRole> roleManager)
 {
     _userManager = userManager;
     _roleManager = roleManager;
 }
Next I add the UserSetup Home Controller action that uses the Authorize attribute to prevent unauthenticated users from accessing it as seen in Listing 4.
Listing 4: UserSetup Controller Action
[Authorize]
public async Task<IActionResult> UserSetup()
{
    if (!await _roleManager.RoleExistsAsync("Admin"))
    {
        var role = new IdentityRole { Name = "Admin" };
        await _roleManager.CreateAsync(role);
    }

    // add role to user
    var user = await _userManager.GetUserAsync(HttpContext.User);
    if (!await _userManager.IsInRoleAsync(user, "Admin"))
    {
        await _userManager.AddToRoleAsync(user, "Admin");
    }

    return View();
}
The UserSetup controller action first checks if the "Admin" role exists and creates it if it doesn't. Then we get the logged in user and check if the user has the "Admin" role and adds the role if they don't. Then we redirect the user to the UserSetup view.
Next I add the UserSetup.cshtml Razor view to the Views/Home folder, with the markup from Listing 5.
Listing 5: UserSetup.cshtml Razor View
@{
    ViewBag.Title = "User Setup";
    Layout = "_Layout";
}

<h2>User Setup</h2>
<h3>Current user added to admin role!</h3>
Lastly I update the _Layout.cshtml Razor view to add a menu item for the User Setup page:
<div class="navbar-collapse collapse">
     <ul class="nav navbar-nav">
         <li><a asp-area="" asp-controller="Home" asp-action="Index">Home</a></li>
         <li><a asp-area="" asp-controller="Home" asp-action="About">About</a></li>
         <li><a asp-area="" asp-controller="Home" asp-action="Contact">Contact</a></li>
         <li><a asp-area="" asp-controller="Home" asp-action="UserSetup">User Setup</a></li>
     </ul>
     <partial name="_LoginPartial" />
 </div>
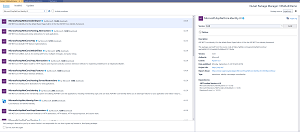
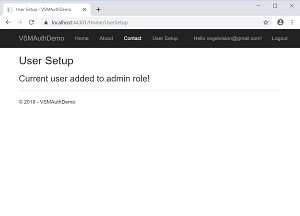
You should now be able to go to the User Setup page through the menu option and see Figure 5.
 [Click on image for larger view.]
Figure 5. Initial User Setup Page
[Click on image for larger view.]
Figure 5. Initial User Setup Page
Lastly let's update the UserSetup view to only allow a user with the "Admin" role to access it. To do this I simply set the Roles property on the Authorize attribute on the UserSetup Home Controller Action method:
[Authorize(Roles = "Admin")]
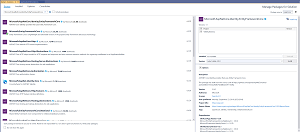
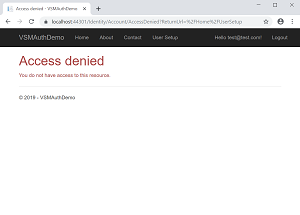
Now if you create a new user and try going to the User Setup page you should see the Access Denied message as seen in
Figure 6.
 [Click on image for larger view.]
Figure 6. User Setup page without Admin Role
[Click on image for larger view.]
Figure 6. User Setup page without Admin Role
In this article you've seen how to configure ASP.NET Core 3.0 for Entity Framework Identity UI, create a role, assign the role, and prevent access to a page for that role. Thank you for your time and as always if you have any questions about the article add a comment below.
About the Author
Eric Vogel is a Senior Software Developer for Red Cedar Solutions Group in Okemos, Michigan. He is the president of the Greater Lansing User Group for .NET. Eric enjoys learning about software architecture and craftsmanship, and is always looking for ways to create more robust and testable applications. Contact him at [email protected].