The Data Science Lab
How to Create a Machine Learning Decision Tree Classifier Using C#
After earlier explaining how to compute disorder and split data in his exploration of machine learning decision tree classifiers, resident data scientist Dr. James McCaffrey of Microsoft Research now shows how to use the splitting and disorder code to create a working decision tree classifier.
A decision tree classifier is a machine learning (ML) prediction system that generates rules such as "IF income < 28.0 AND education >= 14.0 THEN politicalParty = 2." Using a decision tree classifier from an ML library is often awkward because in most situations the classifier must be customized and library decision trees have many complex supporting functions. When I need a decision tree classifier, I always create one from scratch.
Implementing a decision tree classifier from scratch involves two main tasks. First, you must write functions related to repeatedly splitting your training data into smaller and smaller subsets based on the amount of disorder in the subsets. Second, you must write code that uses the splitting functions to create a tree data structure that computes a predicted class for a given input. In my previous Data Science Lab column, I explained how to compute disorder and split data. In this column I explain how to use the splitting and disorder code to create a working decision tree classifier.
A good way to see where this article is headed is to take a look at the screenshot of a demo program in Figure 1. The demo begins by setting up 30 data items that are a subset of the 150-item Fisher's Iris dataset. The goal is to predict the species (labelled 0, 1 or 2) of an iris flower based on sepal length and width, and petal length and width.
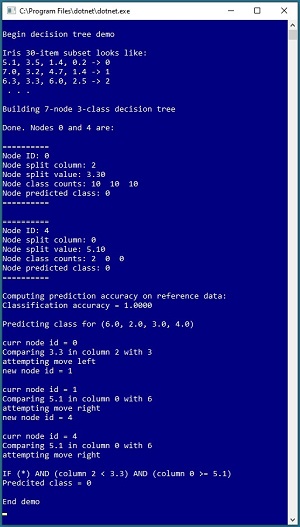 [Click on image for larger view.] Figure 1: A Decision Tree Classifier in Action
The demo program uses the 30 items to build a decision tree classifier that has seven nodes. Not too surprisingly, because there are only 30 training/reference data items, the decision tree achieves 100% accuracy when predicting the class of the 30 training items. The demo concludes by predicting the class/species of a new, previously unseen iris flower with sepal and petal values of (6.0, 2.0, 3.0, 4.0). The system walks down the decision tree and predicts that the class is 0, corresponding to the rule "IF (column 2 < 3.1) AND (column 0 >= 5.1) THEN class = 0."
This article assumes you have intermediate or better skill with C# and an understanding of how to use Gini impurity disorder to split a dataset into two subsets which have small average impurity. The code for the demo program shown in Figure 1 is a bit too long to present in its entirety in this article but the complete code is available in the accompanying file download.
Understanding the Data
The demo program uses 30 data items to create a decision tree classifier. The data looks like:
5.1, 3.5, 1.4, 0.2 -> 0
4.9, 3.0, 1.4, 0.2 -> 0
 . . .
7.0, 3.2, 4.7, 1.4 -> 1
 . . .
7.2, 3.6, 6.1, 2.5 -> 2
Each item has four predictor values: sepal length, sepal width, petal length, petal width. A sepal is a leaf-like structure. Each flower is one of three species: setosa (encoded as 0), versicolor (encoded as 1) and virginica (encoded as 2).
The first 10 data items are setosa, the next 10 are versicolor and the last 10 are virginica. When working with decision tree classifiers it's convenient to encode class labels as 0, 1, 2, and so on, as opposed to one-hot encoding that's often used for neural network classifiers.
Understanding the Decision Tree Structure
When creating a decision tree classifier, there is no standard format so you have many options for designing the tree data structure. The structure used in the demo program is illustrated in Figure 2. Each node in the demo decision tree classifier has six values defined in a Node class:
public class Node
{
  public int nodeID;
  public List<int> rows;
  public int splitCol;
  public double splitVal;
  public int[] classCounts;
  public int predictedClass;
}
The List<int> collection named rows holds the rows associated with a node. The splitCol and splitVal members store the column and value that determine where the source rows in the node should be split to give two subsets with a relatively small average Gini impurity. Small impurity means more homogeneity, which is better. The classCounts array holds the number of each of the classes associated with the source rows in the node. The predictedClass value is the prediction associated with the current node.
For the root node, the nodeID value is 0. The source rows are the rows of the entire 30-item dataset: (0, 1, 2, . . . 29). The splitCol is [2] and the splitVal is 3.3 which means that rows where the value in column [2] is strictly less than 3.3 are assigned to the left child of the root node, and rows where the value in column [2] are greater than or equal to 3.3 are assigned to the right child of the root node.
The classCounts for the root node are the numbers of each class associated with the source rows. Because all 30 rows are in the root node, and there are 10 of each of the three classes, the classCounts array holds [10, 10, 10]. The predictedClass for the root node is the class that corresponds to the highest classCounts value. Because all three class count values are the same, the predicted class is a tie among classes 0, 1 and 2. When ties occur, the demo classifier arbitrarily selects the first of the tied classes so the predicted class in this case is 0.
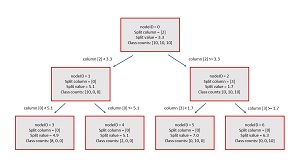 [Click on image for larger view.] Figure 2: Structure of the Demo Decision Tree
An important design decision is whether to implement your decision tree classifier using a recursive tree data structure or a list-based data structure. Almost all of the decision tree classifier library implementations I've seen use the recursion approach. But in my opinion, recursive tree classifiers are much, much more difficult to work with than list-based classifiers.
The demo program uses a List<Node> data structure to store nodes is a level-by-level order. Using this organization it's easy to determine the location of any child node or a parent node. If a node index is n, then the node itself is located at index [n] in the list.
The left child of n is located at index [2n + 1], and the right child is located at index [2n + 2]. If n is an odd number, the node is a left child and if n is even the node is a right child. If a node is a left child, its parent is located at index [(n - 1) / 2] and if the node is a right child its parent is at index [(n – 2) / 2]. Simple, easy, and efficient.
The Demo Program
To create the demo program, I launched Visual Studio 2019. I used the Community (free) edition but any relatively recent version of Visual Studio will work fine. From the main Visual Studio start window I selected the "Create a new project" option. Next, I selected C# from the Language dropdown control and Console from the Project Type dropdown, and then picked the "Console App (.NET Core)" item.
The code presented in this article will run as a .NET Core console application or as a .NET Framework application. Many of the newer Microsoft technologies, such as the ML.NET code library, specifically target .NET Core so it makes sense to develop most C# ML code in that environment.
I entered "DecisionTree" as the Project Name, specified C:\VSM on my local machine as the Location (you can use any convenient directory), and checked the "Place solution and project in the same directory" box.
After the template code loaded into Visual Studio, at the top of the editor window I removed all using statements to unneeded namespaces, leaving just the reference to the top-level System namespace. Then I added a reference to the Collections.Generic namespace because the demo code uses the List<int> collection type. The demo needs no other assemblies and uses no external code libraries.
In the Solution Explorer window, I renamed file Program.cs to the more descriptive DecisionTreeProgram.cs and then in the editor window I renamed class Program to class DecisionTreeProgram to match the file name. The structure of the demo program, with a few minor edits to save space, is shown in Listing 1.
Listing 1. Decision Tree Demo Program Structure
using System;
using System.Collections.Generic;
namespace DecisionTree
{
  class DecisionTreeProgram
  {
    static void Main(string[] args)
    {
      Console.WriteLine("Decision tree demo ");

      double[][] dataX = new double[30][];
      dataX[0] = new double[] { 5.1, 3.5, 1.4, 0.2 };
      dataX[1] = new double[] { 4.9, 3.0, 1.4, 0.2 };
      dataX[2] = new double[] { 4.7, 3.2, 1.3, 0.2 };
      dataX[3] = new double[] { 4.6, 3.1, 1.5, 0.2 };
      dataX[4] = new double[] { 5.0, 3.6, 1.4, 0.2 };
      dataX[5] = new double[] { 5.4, 3.9, 1.7, 0.4 };
      dataX[6] = new double[] { 4.6, 3.4, 1.4, 0.3 };
      dataX[7] = new double[] { 5.0, 3.4, 1.5, 0.2 };
      dataX[8] = new double[] { 4.4, 2.9, 1.4, 0.2 };
      dataX[9] = new double[] { 4.9, 3.1, 1.5, 0.1 };

      dataX[10] = new double[] { 7.0, 3.2, 4.7, 1.4 };
      dataX[11] = new double[] { 6.4, 3.2, 4.5, 1.5 };
      dataX[12] = new double[] { 6.9, 3.1, 4.9, 1.5 };
      dataX[13] = new double[] { 5.5, 2.3, 4.0, 1.3 };
      dataX[14] = new double[] { 6.5, 2.8, 4.6, 1.5 };
      dataX[15] = new double[] { 5.7, 2.8, 4.5, 1.3 };
      dataX[16] = new double[] { 6.3, 3.3, 4.7, 1.6 };
      dataX[17] = new double[] { 4.9, 2.4, 3.3, 1.0 };
      dataX[18] = new double[] { 6.6, 2.9, 4.6, 1.3 };
      dataX[19] = new double[] { 5.2, 2.7, 3.9, 1.4 };

      dataX[20] = new double[] { 6.3, 3.3, 6.0, 2.5 };
      dataX[21] = new double[] { 5.8, 2.7, 5.1, 1.9 };
      dataX[22] = new double[] { 7.1, 3.0, 5.9, 2.1 };
      dataX[23] = new double[] { 6.3, 2.9, 5.6, 1.8 };
      dataX[24] = new double[] { 6.5, 3.0, 5.8, 2.2 };
      dataX[25] = new double[] { 7.6, 3.0, 6.6, 2.1 };
      dataX[26] = new double[] { 4.9, 2.5, 4.5, 1.7 };
      dataX[27] = new double[] { 7.3, 2.9, 6.3, 1.8 };
      dataX[28] = new double[] { 6.7, 2.5, 5.8, 1.8 };
      dataX[29] = new double[] { 7.2, 3.6, 6.1, 2.5 };

      int[] dataY =
        new int[30] { 0, 0, 0, 0, 0, 0, 0, 0, 0, 0,
                      1, 1, 1, 1, 1, 1, 1, 1, 1, 1,
                      2, 2, 2, 2, 2, 2, 2, 2, 2, 2 };

      Console.WriteLine("Iris 30-item subset: ");
      Console.WriteLine("5.1, 3.5, 1.4, 0.2 -> 0");
      Console.WriteLine("7.0, 3.2, 4.7, 1.4 -> 1");
      Console.WriteLine("6.3, 3.3, 6.0, 2.5 -> 2");
      Console.WriteLine(" . . . ");

      Console.WriteLine("Build 7-node 3-class tree");
      DecisionTree dt = new DecisionTree(7, 3);
      dt.BuildTree(dataX, dataY);

      // Console.WriteLine("Tree is: ");
      // dt.Show();  // show all nodes in tree

      Console.WriteLine("Done. Nodes 0 and 4 are:");
      dt.ShowNode(0);
      dt.ShowNode(4);

      Console.WriteLine("Computing accuracy:");
      double acc = dt.Accuracy(dataX, dataY);
      Console.WriteLine("Classification accuracy = " +
        acc.ToString("F4"));

      double[] x = new double[] {6.0, 2.0, 3.0, 4.0};
      Console.Write("Predicting class for");
      Console.WriteLine(" (6.0, 2.0, 3.0, 4.0)");
      int predClass = dt.Predict(x, verbose: true);

      Console.WriteLine("End demo ");
      Console.ReadLine();
    } // Main
  } // Program class

  class DecisionTree
  {
    public int numNodes;
    public int numClasses;
    public List<Node> tree;

    public DecisionTree(int numNodes,
      int numClasses) { . . }

    public void BuildTree(double[][] dataX,
      int[] dataY) { . . }

    public void Show() { . . }

    public void ShowNode(int nodeID) { . . }

    public int Predict(double[] x,
      bool verbose) { . . }

    public double Accuracy(double[][] dataX,
      int[] dataY) { . . }

    private static SplitInfo GetSplitInfo(
      double[][] dataX, int[] dataY, List<int> rows,
      int numClasses) { . . }

    private static double Impurity(int[] dataY,
      List<int> rows, int numClasses) { . . }

    private static double MeanImpurity(int[] dataY,
      List<int> rows1, List<int> rows2,
      int numClasses) { . . }

    private static int[] ComputeClassCts(int[] dataY,
      List<int> rows, int numClasses) { . . }

    private static int ArgMax(int[] classCts) { . . }

    // ----------

    public class Node
    {
      public int nodeID;
      public List<int> rows;
      public int splitCol;
      public double splitVal;
      public int[] classCounts;
      public int predictedClass;
    }

    public class SplitInfo  // helper
    {
      public int splitCol;
      public double splitVal;
      public List<int> lessRows;
      public List<int> greaterRows;
    }

    // ----------

  } // DecisionTree class
} // ns
Although implementing a decision tree classifier is by no means trivial, the code is not as difficult to understand as it might first appear. All of the program logic is contained in the Main method. The decision tree classifier is encapsulated in a class named DecisionTree. The program uses a container class named SplitInfo to hold values related to splitting a node into a left child and a right child based on Gini impurity.
Class DecisionTree has six public methods. The constructor accepts the number of nodes to create and the number of classes in the data. Method BuildTree() uses the training/reference data to create a tree such as the one shown in Figure 2. Methods ShowNode() and Show() can be used to inspect a single node or all nodes in a decision tree.
Public method Predict() accepts an input vector of predictor values and computes a predicted class. Predict() has a parameter named verbose that controls how much information is shown as the method walks through the decision tree. Method Accuracy() accepts a matrix of predictor values and a vector of known correct class labels, and returns the percentage of correct predictions.
Class DecisionTree has five private helper methods. Method GetSplitInfo() accepts a List<int> of rows of reference data, and computes the split value, the column in which the split value is located, the rows where the value in the split column are less than the split value, and the rows where the value in the split column are greater than or equal to the split value.
Method GetSplitInfo() calls private helper MeanImpurity() to compute the average impurity of two subsets of data, and MeanImpurity() calls method Impurity() to compute the Gini impurity of a single subset of data. Helper method ComputeClassCts() is used by method BuildTree(), and helper method ArgMax() is used by method Accuracy().
The demo begins execution by setting up the training/reference data:
double[][] dataX = new double[30][];
dataX[0] = new double[] { 5.1, 3.5, 1.4, 0.2 };
dataX[1] = new double[] { 4.9, 3.0, 1.4, 0.2 };
 . . .
dataX[10] = new double[] { 7.0, 3.2, 4.7, 1.4 };
 . . .
dataX[29] = new double[] { 7.2, 3.6, 6.1, 2.5 };

int[] dataY =
  new int[30] { 0, 0, 0, 0, 0, 0, 0, 0, 0, 0,
                1, 1, 1, 1, 1, 1, 1, 1, 1, 1,
                2, 2, 2, 2, 2, 2, 2, 2, 2, 2 };
The demo program uses hard-coded data but in a non-demo scenario you'd read data into memory from a text file using helper functions along the lines of:
string fn = location of data file
double[][] dataX = MatLoad(fn, new int[] {0,1,2,3}, '\t');
int[] dataY = VecLoad(fn, 4, '\t');  // get col [4]
It's common to call the data used to build a decision tree "classifier training data" but this isn't quite conceptually accurate because the data isn't used to train a model; in a sense the data is part of a decision tree classifier. I sometimes call data used to create a decision tree "classifier reference data," but this isn't common terminology.
The decision tree classifier is created by these two statements:
DecisionTree dt = new DecisionTree(7, 3);
dt.BuildTree(dataX, dataY);
The constructor creates a tree with seven empty nodes except for the nodeID field. Method BuildTree() uses the training data to determine the source rows, split column, split value, class counts, and predicted class for each node. Some of the tree nodes may be empty, meaning they have no associated rows and therefore no associated class counts or meaningful predicted class. Method Predict() deals with empty nodes. A somewhat more complex design alternative is to avoid creating empty nodes in method BuildTree().
Part of the decision tree is displayed by these statements:
Console.WriteLine("Done. Nodes 0 and 4 are:");
dt.ShowNode(0);
dt.ShowNode(4);
Working with a decision tree classifier is usually an exploratory process and it's important to be able to inspect nodes so you can adjust the number of nodes in the tree. In most cases you'll want to display the entire tree like so:
Console.WriteLine("Entire tree is: ");
dt.Show();
The accuracy of the decision tree on its source training/reference data is computed and displayed by this code:
Console.WriteLine("Computing accuracy on ref data:");
double acc = dt.Accuracy(dataX, dataY);
Console.WriteLine("Classification accuracy = " +
  acc.ToString("F4"));
The classification accuracy of a decision tree on its training data isn't a very useful metric because if you make a tree large enough, you'll eventually achieve 100 percent accuracy. In a non-demo scenario, you'd set aside a test dataset and compute the accuracy on that dataset which will give you a rough estimate of the accuracy of the tree when presented with new data.
The demo program concludes by making a prediction:
double[] x = new double[] { 6.0, 2.0, 3.0, 4.0 };
Console.WriteLine("Predicting class for (6.0, 2.0, 3.0, 4.0)");
int predictedClass = dt.Predict(x, verbose: true);
If the verbose parameter of Predict() is set to true you will see the decision rule and final class counts that determine the predicted class. Notice that in this case you don't need to use the method's return value. If verbose is set to false, method Predict() will silently return just the predicted class.
Building the Tree
Expressed in pseudo-code, method BuildTree() is:
create empty List<node> list
  for int i = 0 to numNodes
    set list[i] nodeID to i

  prep root node by adding all rows to node

  for-each node in the tree
    get split values using node rows
    set node split column, split value
    set node class counts, predicted class

    add less-than rows to left child (if left exists)
    add greater-than-or-equal rows to right child (if it exists)
  end-for
The primary customization point for a decision tree classifier is to limit the number of nodes so that the tree doesn't get too specific. One approach for doing this is to add a check to prevent nodes that have very few class count values. Another approach is to remove selected nodes after the tree has been created. This is usually called pruning the tree. When using a list data structure instead of recursion for a decision tree, preventing sparse nodes and pruning sparse nodes is relatively easy.
Making a Prediction
When using external library decision tree classifiers, especially those that use recursion, it's often very difficult to determine the rule that generated a prediction. The demo decision tree avoids this issue by embedding the decision rule as a string into the computation of the predicted class.
The decision rule for the root node of a decision tree classifier is "if any value in any column of the item to predict is anything". The demo program indicates this condition using a shortcut string of "IF (*)". You might want to simply eliminate this dummy condition by setting an empty string.
Sometimes it's useful to perform a preliminary investigation by creating a decision tree with just one node (the root). The prediction accuracy of a minimal tree gives you a baseline comparison value. For example, suppose the 30-item demo data had 22 class 1 items, 4 class 0 items, and 4 class 2 items, the class counts of the root node would be [4, 22, 4]. The tree would predict class 1 for all items and the prediction accuracy would be 22 / 30 = 0.7333. Put another way, the prediction accuracy of a one-node decision tree classifier would be what you'd get by just guessing the most common class in the reference data. A good classifier will have a prediction accuracy that's better than its minimal one-node version.
Wrapping Up
Compared to other ML classification prediction systems, one of the main advantages of decision trees is that their predictions are relatively interpretable. Another advantage of decision trees is that they can work well even with very little training/reference data.
One of the main disadvantages of decision tree classifiers compared to other systems is that decision trees are highly sensitive to small changes in their reference data. Adding or removing just a few reference items can result in a much different tree. A simultaneous advantage and disadvantage of decision tree classifiers compared to many other ML prediction systems is that decision trees are highly customizable but customization is usually needed.
About the Author
Dr. James McCaffrey directs the data science and research efforts at Quaetrix, a data analytics company located near Redmond, Washington. Before joining Quaetrix, James was a senior research engineer at Microsoft. James can be reached at [email protected].