The Data Science Lab
Getting Started with PyTorch 1.5 on Windows
Dr. James McCaffrey of Microsoft Research uses a complete demo program, samples and screenshots to explains how to install the Python language and the PyTorch library on Windows, and how to create and run a minimal, but complete, neural network classifier.
Although it's possible to create a neural network using raw code, in most cases a better approach is to use a neural network code library. One of the most widely used neural code libraries is PyTorch. This article explains how to install the Python language and the PyTorch library on Windows, and how to create and run a minimal, but complete, neural network classifier.
A good way to see where this article is headed is to take a look at the screenshot of a demo program in Figure 1. The demo program uses PyTorch to create a neural network that predicts the species of an iris flower (setosa = 0, versicolor = 1, or virginica = 2) from four predictor values: sepal length, sepal width, petal length, and petal width. A sepal is a leaf-like structure.
The demo creates and trains a neural network model using just six items (the full source dataset has 150 items). The trained model is used to predict the species of a new, previously unseen iris flower with predictor values (5.8, 2.8, 4.5, 1.3). The output of the model is (0.0457 0.6775 0.2769). These values loosely represent the probability of each species. Because the output value at index [1] is the largest, the predicted species is 1 = versicolor.
In order to get the demo program to run on your machine, you must install PyTorch. PyTorch is not a standalone program; it's a Python language library. Therefore, you must install Python before installing PyTorch.
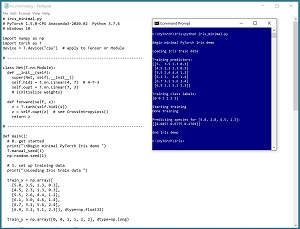 [Click on image for larger view.] Figure 1: A Minimal Neural Network Using PyTorch
This article assumes you have intermediate or better programming skill with a C-family language but doesn't assume you know anything about Python, PyTorch, or neural networks. The complete demo code is presented in this article. The source code is also available in the download that accompanies this article. All normal error checking has been removed to keep the main ideas as clear as possible.
Installing Python and PyTorch
Installing PyTorch involves two steps. First you install Python and several required auxiliary packages such as NumPy and SciPy, then you install PyTorch as an add-on package. Although it's possible to install Python and the packages required to run PyTorch separately, it's much better to install a Python distribution. I strongly recommend using the Anaconda distribution of Python which has all the packages you need to run PyTorch, plus many other useful packages. In this article I address installation on a Windows 10 machine. Installation on Mac and Linux systems is similar.
Coordinating compatible versions of Python, required auxiliary packages, and PyTorch is a significant challenge. At the time I'm writing this article, I'm using Ananconda3 2020.02 which contains Python 3.7. This distribution supports PyTorch 1.5. All of these systems are all quite stable but because PyTorch is relatively new and under continuous development, by the time you read this article there could be newer versions available.
To install Anaconda Python and PyTorch you must be connected to the internet and you should be logged in as a user that has administrator privileges. Before starting, I recommend you uninstall any existing Python systems you have on your machine, using the Windows Control Panel, Programs and Features. Many programs install Python and so there could be several different versions of Python on your machine. I also suggest creating a C:\PyTorch root directory to hold installation files and project (code and data) files.
To install the Anaconda distribution, do an internet search for "anaconda archive". I found the archive at https://repo.anaconda.com/archive but the URL could be different when you read this. Look for a file named Anaconda3-2002.02-Windows-x86_64.exe but be careful because it's very easy to select the wrong file. See Figure 2.
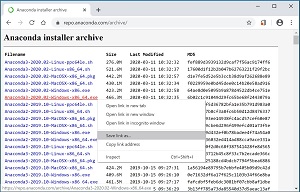 [Click on image for larger view.] Figure 2: The Anaconda Installer File
You can double-click on the self-extracting file to run the installer over the internet, or you can right-click on the link, download the .exe file to your local machine, and then execute the installer locally.
The Anaconda installer is very user-friendly. You'll be presented with a set of nine installation wizard screens. You can accept all defaults and just click the Next button on each screen, with one important exception. When you reach the screen that asks you if you want to add Python to your system PATH environment variable, the default is unchecked/no. I recommend checking/yes that option so you don't have to manually edit your system PATH environment variable.
The default settings will usually place the Python interpreter and 300+ compatible packages at either C:\Users<user>\Anaconda3 or at C:\Users\<user>\AppData\Local\ Continuum\Anaconda3 depending on whether you are logged on as a network user or a local user.
When the Anaconda Python installation completes, you should verify it. Launch a command shell, and then navigate to the root directory by entering a "cd \" command. Then type "python" (without the quotes) and hit <Enter>. You should see the Python interpreter ">>>" prompt preceded by version information of "Python 3.7.6." You might also see a warning related to activating a "conda environment" which you can ignore. If you see a version number other than 3.7.6, that usually means you have more than one Python installed on your machine and your system PATH variable is pointing to the wrong instance of Python. To exit the Python interpreter, type "exit()" without the quotes and hit <Enter>.
You shouldn't have too much trouble installing Anaconda Python. But to help you out, I posted a detailed step-by-step installation guide with screenshots of every step.
Installing PyTorch
There are several ways to install the PyTorch 1.5 add-on package. I recommend installing PyTorch using a local .whl (pronounced "wheel") file together with a program called pip. The pip program was installed for you as part of the Anaconda distribution. You can think of a Python .whl file as somewhat similar to a Windows .msi file.
There are different .whl files for working on a CPU and on a CUDA (Compute Unified Device Architecture) GPU. Among my colleagues, a common PyTorch development pattern is to initially design and create a neural network with PyTorch on a CPU desktop or laptop machine, and then when more processing power is needed for training, transfer the code to a GPU machine. If you are new to PyTorch programming, I strongly recommend that you start with CPU PyTorch. Note: The CPU version of PyTorch works only on a CPU, but the GPU version will work on either a GPU or a CPU.
In the world of Python programming .whl files tend to move around and they can sometimes be a bit difficult to find. Open a Web browser and do an internet search for "pytorch 1.5 .whl cpu windows." There are two places you are likely to find the PyTorch 1.5 CPU .whl file -- at pytorch.org and at pypi.org. At the time I wrote this article I found the .whl file at download.pytorch.org/whl/cpu/torch_stable.html. The file is named torch-1.5.0%2Bcpu-cp37-cp37m-win_amd64.whl. The "cp37" part of the file name tells you the file is PyTorch for Python 3.7 and the "amd64" tells you the file is for a 64-bit Windows machine. The unfortunate "%2B" is the "+" character.
I recommend downloading the .whl file to your local machine. I save all my Python .whl files in a directory named C:\PyTorch\Wheels\ but you can save the PyTorch .whl file in any convenient directory. After you've downloaded the .whl file to your machine, open a command shell and navigate to the directory holding the file. Then enter the command:
> pip install "torch-1.5.0+cpu-cp37-cp37m-win_amd64.whl"
with the quotes on the file name. Installing the PyTorch package is relatively quick, and you should see a success message. The PyTorch files will be placed in a subdirectory of the Anaconda install location you specified when installing Anaconda. For example, if you installed Anaconda at C:\Users\<user>\Anaconda3\ then the PyTorch files will be placed in the Lib\site-packages\torch\ subdirectory.
To verify that PyTorch has been installed correctly, launch a command shell and enter the command "python" to start the interactive Python interpreter. Then at the ">>>" Python prompt enter the commands:
>>> import torch as T
>>> T.__version__
Note that there are two consecutive underscore characters in the version command. The interpreter should respond with "1.5.0+cpu". You can exit the interpreter by entering the command "exit()."
To uninstall PyTorch, for example before installing a newer version, you can use the command "pip uninstall torch." Note: The PyTorch package is named "torch" rather than "pytorch" because PyTorch was developed from a C++ language library named Torch.
To uninstall Anaconda, you would use the Windows Control Panel | Programs and Features | Uninstall. Note that because any Python packages you install using the pip utility will be placed in a subdirectory of the Anaconda installation, uninstalling Anaconda will uninstall all Python packages managed by pip -- this might be what you want, but it might not.
Installing PyTorch can be very tricky. For example, if you go to the pytorch.org Web site, you'll see an interactive section of the home page that will give you an installation command that you can copy/paste and run from a shell. However, that approach doesn't give you any control over the installation process, and makes it difficult to uninstall and reinstall a specific version of PyTorch.
I recommend using the pip package manager program. An alternative that some of my colleagues use is the conda package manager. I recommend that you use one package manager or the other, and that you do not install some packages using pip and other packages using conda.
Note: Many PyTorch examples on the internet work with image data, such as the MNIST handwritten digits dataset. To work with images you’ll need the "torchvision" add-on package. You’ll likely find a .whl file for torchvision version 0.6 on the same Web page as the PyTorch .whl file. It’s named:
torchvision-0.6.0%2Bcpu-cp37-cp37m-win_amd64.whl
You can right-click on the .whl file and download it to your local machine, and then install with the command:
> pip install "torchvision-0.6.0%2Bcpu-cp37-cp37m-win_amd64.whl"
If you are new to PyTorch, I recommend that you don't install the torchvision package until you're ready to work with images.
Developing PyTorch Programs
There are dozens of Python development environments and ways to run a PyTorch program. Some common environments are Notepad with a command shell, IDLE, PyCharm, Visual Studio, and Visual Studio Code. My preferred approach is to use Notepad with a command shell as shown in Figure 1. Notepad has no learning curve and no hidden magic.
The code in Listing 1 is a minimal, but complete, working PyTorch program. Open Notepad and copy/paste the code. Save the file as iris_minimal.py in any convenient directory (being careful to use the All Files option so you don't get ".txt" appended to the file name). Open a command shell and navigate to the directory containing the program and execute it by typing the command "python iris_minimal.py" and hitting <Enter>.
Listing 1: A Minimal PyTorch Program
# iris_minimal.py
# PyTorch 1.5.0-CPU Anaconda3-2020.02 Python 3.7.6
# Windows 10

import numpy as np
import torch as T
device = T.device("cpu")  # to Tensor or Module

# -------------------------------------------------

class Net(T.nn.Module):
  def __init__(self):
    super(Net, self).__init__()
    self.hid1 = T.nn.Linear(4, 7)  # 4-7-3
    self.oupt = T.nn.Linear(7, 3)
    # (initialize weights)

  def forward(self, x):
    z = T.tanh(self.hid1(x))
    z = self.oupt(z)  # see CrossEntropyLoss()
    return z

# -------------------------------------------------

def main():
  # 0. get started
  print("\nBegin minimal PyTorch Iris demo ")
  T.manual_seed(1)
  np.random.seed(1)

  # 1. set up training data
  print("\nLoading Iris train data ")

  train_x = np.array([
    [5.0, 3.5, 1.3, 0.3],
    [4.5, 2.3, 1.3, 0.3],
    [5.5, 2.6, 4.4, 1.2],
    [6.1, 3.0, 4.6, 1.4],
    [6.7, 3.1, 5.6, 2.4],
    [6.9, 3.1, 5.1, 2.3]], dtype=np.float32)

  train_y = np.array([0, 0, 1, 1, 2, 2],
    dtype=np.long)

  print("\nTraining predictors:")
  print(train_x)
  print("\nTraining class labels: ")
  print(train_y)

  train_x = T.tensor(train_x,
    dtype=T.float32).to(device)
  train_y = T.tensor(train_y,
    dtype=T.long).to(device)

  # 2. create network
  net = Net().to(device)  # or Sequential()

  # 3. train model
  max_epochs = 100
  lrn_rate = 0.04
  loss_func = T.nn.CrossEntropyLoss()
  optimizer = T.optim.SGD(net.parameters(),
    lr=lrn_rate)

  print("\nStarting training ")
  net.train()
  indices = np.arange(6)
  for epoch in range(0, max_epochs):
    np.random.shuffle(indices)
    for i in indices:
      X = train_x[i].reshape(1,4)
      Y = train_y[i].reshape(1,)
      optimizer.zero_grad()
      oupt = net(X)
      loss_obj = loss_func(oupt, Y)
      loss_obj.backward()
      optimizer.step()
    # (monitor error)
  print("Done training ")

  # 4. (evaluate model accuracy)

  # 5. use model to make a prediction
  net.eval()
  print("\nPredicting for [5.8, 2.8, 4.5, 1.3]: ")
  unk = np.array([[5.8, 2.8, 4.5, 1.3]],
    dtype=np.float32)
  unk = T.tensor(unk, dtype=T.float32).to(device)
  logits = net(unk).to(device)
  probs = T.softmax(logits, dim=1)
  probs = probs.detach().numpy()  # nicer printing

  np.set_printoptions(precision=4)
  print(probs)

  # 6. (save model)

  print("\nEnd Iris demo")

if __name__ == "__main__":
  main()
If you have experience with the Visual Studio (VS) development tool, it has some advantages compared to using Notepad with a command shell. The VS editor gives you nice Python keyword coloring. VS gives you powerful debugging with break points and watch windows. And VS gives you IntelliSense features such as object inspection and auto-complete. See Figure 3.
 [Click on image for larger view.] Figure 3: A PyTorch Program in Visual Studio
However, VS has an extremely steep learning curve, VS updates occur continuously, and VS can sometimes modify your Python environment without asking permission. To use VS with Python and PyTorch, you must install the "Data Science and analytical applications" workload via the Visual Studio Installer
Defining a Neural Network
The demo program begins with:
# iris_minimal.py
# PyTorch 1.5.0-CPU Anaconda3-2020.02 Python 3.7.6
# Windows 10

import numpy as np
import torch as T
device = T.device("cpu")  # to Tensor or Module
Because PyTorch is relatively young, there are significant differences between different versions and so you should document what versions of Python and PyTorch you're using. The NumPy library is used by almost all non-trivial PyTorch programs and "np" is the standard alias. For reasons that aren't clear to me, most developers don't assign an alias to the torch library. I prefer to use an alias of "T."
The demo program imports the entire PyTorch library. Using this approach you must fully qualify each function, for example:
import torch as T
probs = T.nn.functional.softmax(logits, dim=1)
An alternative approach is to import and alias the modules you need, for example:
import torch as T
import torch.nn.functional as F
probs = F.softmax(logits, dim=1)
The demo sets up a global program scope object named device. This approach allows you to develop on a CPU and then easily switch to a GPU by using the statement device = T.device("cuda").
The demo defines a 4-7-3 tanh neural network like so:
class Net(T.nn.Module):
  def __init__(self):
    super(Net, self).__init__()
    self.hid1 = T.nn.Linear(4, 7)
    self.oupt = T.nn.Linear(7, 3)
    # (initialize weights)

  def forward(self, x):
    z = T.tanh(self.hid1(x))
    z = self.oupt(z)  # see CrossEntropyLoss()
    return z
Defining a neural network is a complex topic that will be fully explained in future articles. The demo program calls the definition with this statement:
net = Net().to(device)
An idea that can be very confusing to developers who are new to PyTorch is that it is possible to create a neural network without using a Module definition at all. This shortcut approach uses a Sequential object and would look like:
# no Net() Module definition
net = T.nn.Sequential(  # create on the fly
  . . .
).to(device)
The Sequential() approach is very limited compared to the Module approach and I don't recommend Sequential().
Setting Up Your Data
The demo program has all control logic in a main() function. The program begins with:
def main():
  # 0. get started
  print("\nBegin minimal PyTorch Iris demo ")
  T.manual_seed(1)
  np.random.seed(1)
It's usually a good idea to set the NumPy and PyTorch random number generator seed values to attempt to get reproducible results. However, in some scenarios it's impossible to guarantee reproducible results because of multi-threaded execution behind the scenes.
The demo program sets up six hard-coded training items:
# 1. set up training data
  print("\nLoading Iris train data ")
  train_x = np.array([
    [5.0, 3.5, 1.3, 0.3],
    [4.5, 2.3, 1.3, 0.3],
    [5.5, 2.6, 4.4, 1.2],
    [6.1, 3.0, 4.6, 1.4],
    [6.7, 3.1, 5.6, 2.4],
    [6.9, 3.1, 5.1, 2.3]], dtype=np.float32)
  train_y = np.array([0, 0, 1, 1, 2, 2],
    dtype=np.long)
The data is initially placed into NumPy arrays. In a non-demo scenario you'd read your data from a text file. The most common approach to do this is using the PyTorch Dataset and DataLoader objects. In a non-demo scenario you'd likely want to set up a set of test data to use to evaluate the accuracy of your model after it's been trained.
The training data is displayed, and then converted into PyTorch tensors:
  print("\nTraining predictors:")
  print(train_x)
  print("\nTraining class labels: ")
  print(train_y)

  train_x = T.tensor(train_x,
    dtype=T.float32).to(device)
  train_y = T.tensor(train_y,
    dtype=T.long).to(device)
Tensors are the fundamental objects in any PyTorch program. Working with tensors is difficult and mastering tensor concepts and syntax is a significant hurdle on the path to achieving PyTorch expertise.
The demo program creates and then trains the 4-7-3 tanh network:
  # 2. create network
  net = Net().to(device)

  # 3. train model
  max_epochs = 100
  lrn_rate = 0.04
  loss_func = T.nn.CrossEntropyLoss()
  optimizer = T.optim.SGD(net.parameters(),
    lr=lrn_rate)
  print("\nStarting training ")
  net.train()
  # training code goes here
  print("Done training ")
Training a neural network involves many ideas, including loss functions, epochs and batches, and optimizers. A statement that can be confusing is the "net.train()". This does not train the network as you might expect. Instead, it sets the network into training mode. The other possible mode is evaluation mode, which would be set by the statement "net.eval()". Explicitly setting the two modes is only necessary for sophisticated neural networks that use the dropout or batch normalization training techniques. However, in my opinion it's good practice to set the network mode even when it's not technically necessary to do so.
The demo program does not monitor error during training. This is essential in a non-demo scenario so that you know if training is working, and if so, when to stop training.
After training, the demo uses the model to make a prediction. In a non-demo scenario you'd usually want to evaluate the model's classification accuracy. Unlike model error, which can be obtained using built-in PyTorch loss functions, to compute model accuracy you must write a custom function.
The demo uses the trained model to predict the species of a new, previously unseen iris flower with these statements:
  # 5. use model to make a prediction
  net.eval()
  print("\nPredicting for [5.8, 2.8, 4.5, 1.3]: ")
  unk = np.array([[5.8, 2.8, 4.5, 1.3]],
    dtype=np.float32)
  unk = T.tensor(unk, dtype=T.float32).to(device)
  logits = net(unk).to(device)
  probs = T.softmax(logits, dim=1)
  probs = probs.detach().numpy()
  np.set_printoptions(precision=4)
  print(probs)

  print("\nEnd Iris demo")
if __name__ == "__main__":
  main()
The four predictor values are placed into a NumPy array, which is then used to create a PyTorch tensor. The raw output values, sometimes called logits, are converted into values that sum to 1.0 so that they can loosely be interpreted as probabilities.
The mysterious looking detach() method removes the probability-results from what is called the PyTorch computational graph. Technically it's not necessary to detach, but doing so avoids a warning message, and also points out the existence of computational graphs.
Wrapping Up
This article has just barely scratched the surface of the PyTorch library but should give you all the information you need to start experimenting. Based on my experience teaching PyTorch to my colleagues at my workplace, people tend to either underestimate or overestimate how difficult it is to learn PyTorch.
PyTorch can appear deceptively simple because it operates at a relatively high level of abstraction, which leads to short programs (in terms of lines of code). Those new to PyTorch can sometimes be overwhelmed by the sheer volume of new concepts associated with PyTorch. But, like any other technology, if you slowly but surely add new knowledge, one demo program at a time, you'll eventually obtain PyTorch expertise.