The Data Science Lab
Preparing MNIST Image Data Text Files
Dr. James McCaffrey of Microsoft Research demonstrates how to fetch and prepare MNIST data for image recognition machine learning problems.
Many machine learning problems fall into one of three categories: tabular data prediction (such as the Iris species problem), natural language processing (such as the IMDB movie review sentiment problem) and image recognition (such as the MNIST handwritten digits problem). This article explains how to fetch and prepare MNIST data.
The MNIST (Modified National Institute of Standards and Technology) data consists of 60,000 training images and 10,000 test images. Each image is a crude 28 x 28 (784 pixels) handwritten digit from "0" to "9." Each pixel value is a grayscale integer between 0 and 255.
Most popular neural network libraries, including PyTorch, scikit and Keras, have some form of built-in MNIST dataset designed to work with the library. But there are two problems with using a built-in dataset. First, data access becomes a magic black box and important information is hidden. Second, the built-in datasets use all 60,000 training and 10,000 test images and these are very awkward to work with because they're so large.
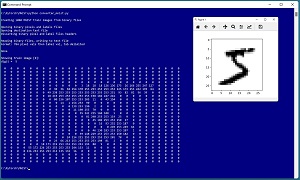 [Click on image for larger view.] Figure 1: Converting Source Binary MNIST Data to Text Files
A good way to see where this article is headed is to take a look at the screenshot of a Python language program in Figure 1. The source MNIST data files are stored in a proprietary binary format. The program loads the binary pixel and label training files into memory, converts the data to tab-delimited text and saves just the first 1,000 training images and their "0" to "9" labels. To verify the generated training file, the demo program reads the first training image into memory and displays that image, a "5" digit, in the shell and graphically.
This article assumes you have an intermediate or better familiarity with a C-family programming language, preferably Python, but doesn't assume you know anything about the MNIST dataset. The complete source code for the demo program is presented in this article, and the code is also available in the accompanying file download.
Getting the Source Data Files
The primary storage site for the binary MNIST data files is The MNIST Database of handwritten digits, but you can also find it at other locations using an internet search. There are links to four GNU zip compressed files:
  train-images-idx3-ubyte.gz
  train-labels-idx1-ubyte.gz
  t10k-images-idx3-ubyte.gz
  t10k-labels-idx1-ubyte.gz
The first two files hold the pixels values and the associated labels for the 60,000-item training data. The second two files are the 10,000-item test data. If you click on a link you can download the associated file. I suggest downloading to a directory named ZippedBinary. Unlike .zip compressed files, Windows cannot extract .gz files so you need to use an application. I recommend the 7-Zip utility. After installing 7-Zip you can open Windows File Explorer and then right-click on each .gz file and select the Extract Files option. I suggest extracting to a directory named UnzippedBinary and adding a .bin extension to the unzipped files.
Converting Binary Files to a Text File
The complete converter_minst.py data preparation program is presented in Listing 1. The program begins by importing two libraries:
import numpy as np
import matplotlib.pyplot as plt
The two libraries are used to display the data but aren't needed to convert from binary to text. The demo uses three program-defined functions: main(), convert() and display_from_file(). The main() function is:
def main():
  n_images = 1000
  print("Creating %d MNIST train images from binary files " % n_images)
  convert(".\\UnzippedBinary\\train-images.idx3-ubyte.bin",
          ".\\UnzippedBinary\\train-labels.idx1-ubyte.bin",
          "mnist_train_1000.txt", 1000)
  print("Showing train image [0]: ")
  img_file = ".\\mnist_train_1000.txt"
  display_from_file(img_file, idx=0)  # first image
The convert() function accepts the unzipped binary pixels file and the unzipped binary labels file, a destination text file and the number of images to convert.
Listing 1: Program to Convert Binary MNIST Data to Text
# converter_mnist.py

import numpy as np
import matplotlib.pyplot as plt

# convert MNIST binary to text file; combine pixels and labels
# target format:
# pixel_1 (tab) pixel_2 (tab) . . pixel_784 (tab) digit

# 1. manually download four zipped-binary files from
#    yann.lecun.com/exdb/mnist/
# 2. use 7-Zip to unzip files, add ".bin" extension
# 3. determine format you want and modify script

def convert(img_file, label_file, txt_file, n_images):
  print("\nOpening binary pixels and labels files ")
  lbl_f = open(label_file, "rb")   # labels (digits)
  img_f = open(img_file, "rb")     # pixel values
  print("Opening destination text file ")
  txt_f = open(txt_file, "w")      # output to write to

  print("Discarding binary pixel and label headers ")
  img_f.read(16)   # discard header info
  lbl_f.read(8)    # discard header info

  print("\nReading binary files, writing to text file ")
  print("Format: 784 pixels then labels, tab delimited ")
  for i in range(n_images):   # number requested
    lbl = ord(lbl_f.read(1))  # Unicode, one byte
    for j in range(784):  # get 784 pixel vals
      val = ord(img_f.read(1))
      txt_f.write(str(val) + "\t")
    txt_f.write(str(lbl) + "\n")
  img_f.close(); txt_f.close(); lbl_f.close()
  print("\nDone ")

def display_from_file(txt_file, idx):
  all_data = np.loadtxt(txt_file, delimiter="\t",
    usecols=range(0,785), dtype=np.int64)

  x_data = all_data[:,0:784]  # all rows, 784 cols
  y_data = all_data[:,784]    # all rows, last col

  label = y_data[idx]
  print("digit = ", str(label), "\n")

  pixels = x_data[idx]
  pixels = pixels.reshape((28,28))
  for i in range(28):
    for j in range(28):
      # print("%.2X" % pixels[i,j], end="")
      print("%3d" % pixels[i,j], end="")
      print(" ", end="")
    print("")

  plt.tight_layout()
  plt.imshow(pixels, cmap=plt.get_cmap('gray_r'))
  plt.show()

def main():
  n_images = 1000
  print("\nCreating %d MNIST train images from binary files " \
    % n_images)
  convert(".\\UnzippedBinary\\train-images.idx3-ubyte.bin",
          ".\\UnzippedBinary\\train-labels.idx1-ubyte.bin",
          "mnist_train_1000.txt", 1000)

  # n_images = 100
  # print("\nCreating %d MNIST test images from binary files " % \
      n_images)
  # convert(".\\UnzippedBinary\\t10k-images.idx3-ubyte.bin",
  #         ".\\UnzippedBinary\\t10k-labels.idx1-ubyte.bin",
  #         "mnist_test_100.txt", 100)

  print("\nShowing train image [0]: ")
  img_file = ".\\mnist_train_1000.txt"
  display_from_file(img_file, idx=0)  # first image

if __name__ == "__main__":
  main()
The organization of the source binary MNIST files is somewhat unusual. Storing features (the pixel predictor values) and labels (the digit to predict) in separate files, rather than together in one file, was common in the 1990s when computers had limited memory.
Converting Binary MNIST to Text
The convert() function begins by opening two source binary files for reading and one target text file for writing:
def convert(img_file, label_file, txt_file, n_images):
  lbl_f = open(label_file, "rb")   # labels (digits)
  img_f = open(img_file, "rb")     # pixel values
  txt_f = open(txt_file, "w")      # output file
The "rb" argument means "read-binary" and "w" means write (text file is default). Next, header information is consumed and discarded:
  img_f.read(16)   # discard header
  lbl_f.read(8)    # discard header
The read() method accepts the number of bytes to read. The pixels file has a 16-byte header and the labels file has an 8-byte header. The main processing loop is:
  for i in range(n_images):   # number images
    lbl = ord(lbl_f.read(1))  # get label
    for j in range(784):  # get 784 pixel values
      val = ord(img_f.read(1))
      txt_f.write(str(val) + "\t")
    txt_f.write(str(lbl) + "\n")
  img_f.close(); txt_f.close(); lbl_f.close()
Because each label value is "0" to "9" and the pixel values are between 0 and 255, each label and pixel value is stored as one byte. The Python ord() function converts a pixel stored as a byte into an integer. This loop is the main customization point. The demo output format is to write one image per line where the 784 pixel values come first and the label/digit is the last value on the line. The values are tab-delimited.
You should have no trouble modifying this code to create MNIST text data with any format. For example, you might want to use a comma character instead of a tab as a delimiter, or you might want to put the label/digit as the first value on each line followed by the 784 pixel values.
Displaying MNIST Data
After the MNIST data has been stored as a text file, it's useful to display it to verify the data has been converted and saved correctly. Program-defined function display_from_file() assumes MNIST data has been stored one image per line, tab-delimited, with pixels first then the label. The function definition begins:
def display_from_file(txt_file, idx):
  all_data = np.loadtxt(txt_file, delimiter="\t",
    usecols=range(0,785), dtype=np.int64)
  x_data = all_data[:,0:784]  # all rows, 784 cols
  y_data = all_data[:,784]    # all rows, last col
The numpy loadtxt() functions reads numeric values stored as text into a two-dimensional numpy array. The x_data array holds all the pixel values and the y_data array holds all the labels. Next, the specified pixels and label are extracted:
  label = y_data[idx]
  pixels = x_data[idx]
  pixels = pixels.reshape((28,28))
The 784 pixel values are reshaped into a 28 x 28 two-dimensional array in preparation for sending to the matplotlib library's imshow() function ("image show"). But first, the 784 pixel values are displayed to the command shell:
  for i in range(28):
    for j in range(28):
      print("%3d" % pixels[i,j], end="")
      print(" ", end="")
    print("")
And then the pixel values are displayed graphically:
  plt.tight_layout()
  plt.imshow(pixels, cmap=plt.get_cmap('gray_r'))
  plt.show()
The "gray_r" argument to the get_cmap() method means "reversed gray scale" where 0 values are displayed as white, 255 values are displayed as black and intermediate values are varying shades of gray.
Using MNIST Data in a PyTorch Program
After MNIST data has been saved as a text file, it's possible to code a PyTorch Dataset class to read the data and send to a DataLoader object for training. One possible Dataset implementation is presented in Listing 2. The Dataset assumes the MNIST data is in the format described in this article.
Listing 2: Using MNIST Data
import torch as T
device = T.device('cpu')

class MNIST_Dataset(T.utils.data.Dataset):
  # 784 tab-delim pixel values (0-255) then label (0-9)
  def __init__(self, src_file):
    all_xy = np.loadtxt(src_file, usecols=range(785),
      delimiter="\t", comments="#", dtype=np.float32)

    tmp_x = all_xy[:, 0:784]  # all rows, cols [0,783]
    tmp_x /= 255
    tmp_x = tmp_x.reshape(-1, 1, 28, 28)
    tmp_y = all_xy[:, 784]

    self.x_data = \
      T.tensor(tmp_x, dtype=T.float32).to(device)
    self.y_data = \
      T.tensor(tmp_y, dtype=T.int64).to(device)

  def __len__(self):
    return len(self.x_data)

  def __getitem__(self, idx):
    lbl = self.y_data[idx]  # no use labels
    pixels = self.x_data[idx]
    return (pixels, lbl)
With this Dataset definition, the MNIST data can be traversed with code like this:
train_ds = MNIST_Dataset(".\\mnist_train_1000.txt")
train_ldr = T.utils.data.DataLoader(train_ds,
  batch_size=2, shuffle=False)
for (batch_idx, batch) in enumerate(train_ldr):
  (X, y) = batch
  print(X)  # pixels
  print(y)  # label/digit
  # training code here
In a non-demo scenario you'd set the shuffle parameter to True instead of False.
Wrapping Up
The MNIST dataset is the "Hello World" of machine learning image recognition. Once you understand how to work with MNIST data, it's possible to create and train a convolutional neural network (CNN) to recognize handwritten digits. This will be the topic of the next Visual Studio Magazine Data Science Lab article.
The Fashion-MNIST dataset is closely related to MNIST data. Fashion-MNIST has 60,000 training and 10,000 test images where each image is a 28 x 28 grayscale representing one of 10 types of articles of clothing (dress, coat, shirt, etc.) Fashion-MNIST clothing mages are more difficult to classify than MNIST digit images.
The MNIST and Fashion-MNIST datasets are relatively simple because they use grayscale values (one channel). Working with color images (RGB - three channels) is more difficult. The Hello World of color images is the CIFAR-10 dataset. CIFAR-10 contains 50,000 training and 10,000 test 32 x 32 images with 10 classes: airplane, car, bird, cat, deer, dog, frog, horse, ship and truck.
About the Author
Dr. James McCaffrey works for Microsoft Research in Redmond, Wash. He has worked on several Microsoft products including Azure and Bing. James can be reached at [email protected].