Inside TFS
Coded UI Tests (Part 3): Data-Driven Testing
Mickey Gousset shows how to make Coded UI Tests data-driven in Visual Studio 2010.
In our
previous column, we have explored what coded UI Tests are, how they are created, examined the source code around them, and shown how to run them. In this column, we are going to look at how to increase the usefulness of the test by making it data-driven.
Making The Test Data-Driven
In Visual Studio Team System 2005 and 2008, you had the ability to make data-driven unit tests. Using a database, comma-delimited file, or XML file, you could push data into your unit test, making it much more effective. For example, instead of creating twenty different unit tests to test twenty different logins to a webpage, you could create one login unit test, and run it twenty times, each time passing in different values.
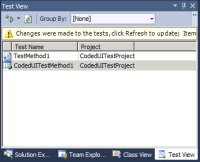
Turning a regular coded UI test into a data-driven coded UI test works on the same principle, and is created in a similar manner. In Visual Studio 2010, open the Test View window by select Test | Windows Test View (Figure 1).
[Click on image for larger view.] |
| Figure 1. Test View Window. |
Right-click on the CodedUITestMethod1 test and select Properties, to view the properties of the test (Figure 2).
To start making this a data-driven test, we have to first create a datasource for the test to draw from. On the Data Connection String property, click the ellipse button to start the New Test Data Source Wizard (Figure 3).
There are three options for creating a data source:
-
Database -- which allows you to connect to a database or Microsoft Excel spreadsheet
- CSV File -- which allows you to use a comma-delimited file
- XML File -- which allows you to use an XML file
For this example, we will use a comma delimited file. Figure 4 shows an example of the file we will be using. The first line of the file contains the column headers, followed by three lines of data.
In the wizard, select CSV File and click Next. Select the comma-delimited file that will be used as the data source. The data from the file is previewed in the wizard, as shown in Figure 5.
Click the Finish button. You may be prompted to add the file into the current project and mark it as a deployment item. Click Yes to this, as it stores the file with your project, and ensures the data file is deployed with the test.
The next step is to modify the coded UI test to use the values from the comma-delimited file. These modifications are made to the CodedUITestMethod1() method in the CodedUITest1.cs file. First, we need to override the two data values that will be used before the TypeValuesAndClickCreate() method is called. To override the first value entered, use the following line of code:
this.UIMap.TypeValuesAndClickCreateParams.UITestBoxFirstWordEditText =
	TestContext.DataRow["FirstValue"].ToString();
To access the data from the datasource, we need to use the TestContext object. We then access the current row using the DataRow parameter, and specify the column we want. This column value is used to overwrite the First Word textbox parameter. You use the same code changes to set the Second Word parameter, and the Results parameter. Figure 6 shows the final marked up code.
Before running the test, go back to the Properties window for the CodedUITestMethod1 test. There is a property named Data Access Method. By default it is set to sequential, which means it will start at the beginning of the file and read through it row by row, in order. If you would prefer the data to be read randomly from different lines of the file, and not in any particular order, you can change this value to Random from the drop down list box.
Let's run the test and see what happens. In the Test View window, right-click on the CodedUITestMethod1 test and select Run Selection. You will see the coded UI test gets executed three times, one for each row in the file. The tests should all pass. You can double-click the test results to drill down into the results for each individual row that was tested.
With the test linked to the comma-delimited file, any time you want to change the test parameters, or add more tests, all that is needed is to change this file appropriately. This helps increase the overall usefulness and effectiveness of the test.
In our next and final column (for now) on coded UI testing, we will look at some tips and tricks to keep in mind when creating a coded UI test to make your tests better.
About the Author
Mickey Gousset spends his days as a principal consultant for Infront Consulting Group. Gousset is lead author of "Professional Application Lifecycle Management with Visual Studio 2012" (Wrox, 2012) and frequents the speaker circuit singing the praises of ALM and DevOps. He also blogs at ALM Rocks!. Gousset is one of the original Team System/ALM MVPs and has held the award since 2005.