Mobile Corner
Build Consistent WP7 User Interfaces Using Resources
Nick Randolph walks through how to create and consume resources within your Windows Phone 7 application.
- By Nick Randolph
- 05/23/2011
Building a great user experience for your Windows Phone 7 application can be difficult and requires both graphical design skills and an understanding of how users will use your application. Quite often awesome ideas don't succeed because the application is either unusable or has been poorly designed. In an ideal world you would have a designer who can work with you throughout the development process. In most instances, this is unfortunately not the case.
One aspect of user interface design is the element of consistency. If you inspect the built-in applications on a Windows Phone 7 device they all have a very consistent look and feel. When you're designing your application you should not only be looking for consistency within your application, you should also look for it to be consistent with the other applications on the device.
Rather than you having to guess at font size, weights, colors and styling for various controls, Microsoft has released a set of resources that you can access from within your application that will allow you to reuse elements of the built-in look and feel. There are also Windows Phone 7-specific controls, such as the panorama and pivot that you can use as a starting point for your application design.
In this article we're going to look at how you can create and consume resources within your application. In this example we'll change the foreground color of a TextBlock element. In Expression Blend, add a TextBlock to your page; make sure it is selected and then change the Foreground property. In Figure 1 you can see that we've selected a rather obnoxious shade of green (#FF00FF10).
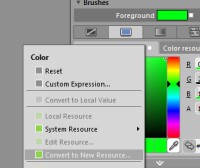
[Click on image for larger view.] |
| Figure 1. |
Above the color selector you can see a white square. When you click this square you will see the drop-down menu displayed in Figure 1, which includes an option to "Convert to New Resource." Selecting this option will prompt you to give the resource a name and specify where to define the resource, as shown in Figure 2.
Resources can be defined in a number of places within your application, depending on where they will be used. The options presented in the dialog in Figure 2 are for the resource to be defined across the entire Application, or on This document. If you select Application, the resource will be added to the Application.Resources element in the App.xaml file, and will be available to any control on any page within your Windows Phone 7 application. Alternatively if you select This document, you are given the option to either create the resource within the PhoneApplicationPage or the TextBlock elements. Selecting the PhoneApplicationPage will define the resource within the PhoneApplicationPage.Resources element on the page, and the resource will be available to any control within the current page.
In this case we're going to select the TextBlock option, which will define the resource in the TextBlock.Resources element, making it available only to this TextBlock. The XAML that is generated for this resource within the TextBlock is as follows.
<TextBlock HorizontalAlignment="Left" Margin="95,110,0,0" TextWrapping="Wrap" Text="TextBlock" VerticalAlignment="Top">
    <TextBlock.Resources>
        <Color x:Key="TextBlockColorBrush">#FF00FF10</Color>
    </TextBlock.Resources>
    <TextBlock.Foreground>
        <SolidColorBrush Color="{StaticResource TextBlockColorBrush}"/>
    </TextBlock.Foreground>
</TextBlock>
If you look at the Resources window in Expression Blend, you should now see that there is a TextBlockColorBrush appearing within the TextBlock node. This is shown in Figure 3.
If you change your mind and you want to be able to reuse the TextBlockColorBrush resource across other elements within the page, to make the page more consistent, you can simply drag the TextBlockColorBrush node onto the PhoneApplicationPage node. If you look at the XAML for the page, this resource is now defined within the PhoneApplicationPage.Resources element.
<phone:PhoneApplicationPage.Resources>
	<Color x:Key="TextBlockColorBrush">#FF00FF10</Color>
</phone:PhoneApplicationPage.Resources>
If you look at the XAML for the TextBlockColorBrush, it defines a Color resource. When this resource is used to set the TextBlock.Foreground property, a new SolidColorBrush is created. If we were to reuse this resource across a number of different controls, a new SolidColorBrush would be created for each control. Since brushes can be reused and created as resources themselves, this is clearly not optimal. Adding a second resource to the XAML we get the following two resources.
<phone:PhoneApplicationPage.Resources>
	<Color x:Key="TextBlockColor">#FF00FF10</Color>
	<SolidColorBrush x:Key="TextBlockColorBrush" Color="{StaticResource TextBlockColor}"/>
</phone:PhoneApplicationPage.Resources>
Then we can update the Foreground color for the TextBlock by selecting the TextBlockColorBrush from the Brush Resources tab on the Properties window, as shown in Figure 4.
You just saw how easily you can create and apply resources within your Windows Phone 7 application. By defining your own resources and reusing them throughout your application, you can achieve a consistent user experience. Join us next time as we look at the built-in resources and how you can use them to style your application to be consistent with our Windows Phone 7 applications.
About the Author
Nick Randolph runs Built to Roam, a consulting company that specializes in training, mentoring and assisting other companies build mobile applications. With a heritage in rich client applications for both the desktop and a variety of mobile platforms, Nick currently presents, writes and educates on the Windows Phone platform.