In-Depth
Tear-Off ToolStrips in Windows Forms
Starting with Microsoft Office, users have been able to double-click or drag a toolbar and have it become a floating window that can be moved or docked to the side of the application window. Here's how to implement a basic version of this behavior in C# Windows Forms applications.
- By Brian C. Hart
- 08/01/2011
We've seen the functionality before -- first in Microsoft Office, and then refined in Visual Studio 2005 -- of docking and floating toolbars in an application. So-called tear-off toolbars allow the user to drag a toolbar off the dock and, if the user releases the toolbar inside the client area of the main window, turn it into a floating window. Likewise, if a floating toolbar is dragged within the dock area on the side of a window, the toolbar snaps to the dock upon release of the mouse. Double-clicking also toggles this toolbar behavior. Here's how to implement a basic version of this functionality in C# Windows Forms applications.
For this article, the version of Visual Studio you utilize really doesn't matter, as the technique is the same across all versions of the Microsoft .NET Framework. Windows Forms ToolStrips really haven't evolved much since the .NET Framework 2.0. For compatibility reasons, I'm developing this solution in Visual Studio 2005, so that the provided sample code will work in Visual Studio 2005, 2008 and 2010.
I wanted to enable tear-off toolbar functionality as part of a recent Windows Forms project in a commercial-grade application, and I began exploring my options. I didn't want to have to use a bulky -- and possibly costly -- controls library when what I was looking for were ways to optimize cost by rolling my own. The result was an exploration of Windows Forms and how they work with ToolStrips, ToolStripPanels and ToolStripContainers.
I start this article by first explaining how to derive from ToolStrip and ToolStripPanel in order to yield two new controls that provide the essential functionality. Then I go step by step to build a small sample application having docking/floating and tear-off toolstrips. Finally, I will go "under the hood" to explore why the functionality works.
To start, we need a custom ToolStrip that behaves like we want, and a custom ToolStripPanel to use on our form in combination with our custom ToolStrip. The custom ToolStripPanel provides the essential "other half" of the functionality that completes the behavior implementation. This article makes reference to specific code and other resources, which have been provided for download.
The AdvancedToolStrip Library
My approach was to try and roll all the tear-off and docking and floating functionality into a special library containing only the custom ToolStrip- and ToolStripPanel-derived classes. Then you just drop the library project into the solution you want to use your toolstrips in, and drop the toolstrips and toolstrip panels onto the form in the Designer, and away you go. No code to add to the form -- no fuss, no muss.
To start, open up a new instance of Visual Studio 2005, click the New Project button, click Visual C# and then click Class Library. I named this library AdvancedToolStrip. Press the ENTER key on your keyboard in order to create the project. When the new project is created, Visual Studio creates and adds a class and its associated file (Class1.cs) to the project. Delete the Class1.cs file.
Once the new library is created, right-click the icon for the AdvancedToolStrip project, and click Add Reference. Use the .NET tab to add references for the .NET Framework 2.0 versions of the following libraries (if you're using Visual Studio 2008 or 2010, you'll need to add/update the existing references to suit your version):
- System.Drawing
- System.Design
- System.Windows.Forms
The classes you're going to put into your new library are:
- FloatingForm: a Windows Form that is used to hold a floating toolstrip
- DockingHostToolStripPanel: a custom ToolStripPanel that knows about the special ToolStrips and implements behavior needed for the interface to work properly
- TearOffToolStrip: a class derived from ToolStrip that implements the UI functionality requirements
Let's look at the steps necessary to create each of these classes.
Custom ToolStrip: TearOffToolStrip
Users expect a commercial application to have toolstrips that they can either have docked to the sides of the application window or floating. Let's take a look at how TearOffToolStrip implements this basic behavior, by implementing a member function called MakeFloating. If the toolstrip is docked, the user can make the toolstrip floating by double-clicking somewhere in a blank area of the toolstrip.
Let's go down the line and unpack what the MakeFloating function is doing. First, the toolstrip saves a reference in its parentPanel field of the ToolStripPanel on which it's currently docked. This is crucial, as you'll see later. The panel reference is to the custom ToolStripPanel class, DockingHostToolStripPanel. That's right -- to implement docking and floating, it's not just the toolstrip that goes to and from docking or floating, but the toolstrip panels anchored to the sides of the main window are involved, as well.
The next key piece of implementing floating is to use a special form to actually hold the floating toolstrip. A floating toolstrip is really implemented by a small Windows Form which has a fixed or sizeable tool window border style, and which hosts the toolstrip as its sole control. The template for the FloatingForm, as I call it, is illustrated in Figure 1, shown in the Designer.
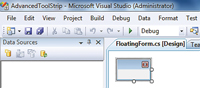
[Click on image for larger view.] |
| Figure 1. The FloatingForm template. |
The MakeFloating function wraps up by removing the toolstrip from the Controls collection of the parent ToolStripPanel, creates a new FloatingForm, adds itself to the FloatingForm Controls collection, and resizes and repositions the form to both correspond to the size of the toolstrip and to lie at the coordinates of where the mouse pointer is, with an offset of 25 pixels in the vertical. The Text property of the FloatingForm -- which will appear on the floating toolstrip titlebar -- is set using the Text property of the toolstrip. So this means that when you put ToolStrips down on a form in your application, you'll want to "name" them by filling in something for their Text properties, like "Standard," "Debug" or "Build," for example.
Figure 2 illustrates what a sample toolstrip looks like after this floating functionality has been activated.
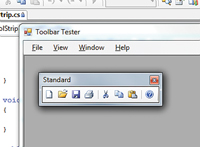
[Click on image for larger view.] |
| Figure 2. A sample floating toolstrip. |
You're not done yet; now you have to implement how to get the toolstrip back to docking if the user double-clicks, say, the titlebar of the FloatingForm. First, you need to give the ToolStrip a method for you to call to tell the ToolStrip to dock itself back to the side of the main form. This method is called DockTo, and you have it accept a single parameter, panel, of type DockingHostToolStripPanel.
Let's go over what this method does. First, check to see if the toolstrip is already docked. If so, you don't have anything to do, and you can return. Next, you need to know where to dock to. This is one of the four DockingHostToolStripPanels that you'd place on the edges of the main form window. The panel to which to dock is specified as an argument to the method. If NULL is specified or if you're already a child of a ToolStripPanel class, then you're also left with nothing else to do. Otherwise, if IsFloating is TRUE, then you can access the containing FloatingForm via this.Parent. First you hide the FloatingForm, and then you remove the toolstrip from the Controls collection of the FloatingForm, and add the toolstrip to the Controls collection of the destination ToolStripPanel. Finally, you call Close on the FloatingForm to get rid of it.
How do you know when to call DockTo? Notice the last couple of lines of the MakeFloating method in the sample code, and how you hook up handlers to two events of the FloatingForm: MouseCaptureChanged and DockingRequested. DockingRequested isn't a standard Windows Forms event; it's a custom event added to the FloatingForm class via a delegate. See the FloatingForm.cs file in the code download for more on the syntax used to implement this.
How do you make sure the DockingRequested event gets fired? Double-clicking on the titlebar of the FloatingForm corresponds, in Win32 programming terms, to double-clicking on the non-client area of the form. Any Win32 programmer will tell you that performing this action causes Windows to raise a message, the WM_NCLBUTTONDBLCLK message. To handle this message, you override the Windows Forms implementation of WndProc in our class. The default implementation fires the DockingRequested event and then hands control to the base class implmentation. The FloatingForm class in its entirety simply implements the WM_NCLBUTTONDBLCLK handler.
Remember, you added a handler for this event on the part of the TearOffToolStrip class in its MakeFloating method. To actually handle this event, you simply note which ToolStripPanel you saved a reference to when you were inside MakeFloating -- or, if no reference exists, you pick the top ToolStripPanel by default. Then you call the TearOffToolStrip.DockTo method to make the toolstrip dock to the main window again.
Remember, the TearOffToolStrip needs to keep track of references to the top, left, bottom and right ToolStripPanels. You also need to add to the form in order to make the functionality work. To make things easier, the topToolStripPanel field is set by a browseable property. For every TearOffToolStrip you drop on the form, you must tell it, explicitly, which are the top, bottom, left and right ToolStripPanels on your form.
Let's look at the fields and properties of the TearOffToolStrip class, which are an essential part of the functionality implementation. Basically, you just blank out the panel references and initialize all Boolean values to FALSE, and run the designer logic by calling the InitializeComponent method. The topToolStripPanel, bottomToolStripPanel, leftToolStripPanel and rightToolStripPanel fields are set by properties in the Designer when you've dropped a TearOffToolStrip component on the form (see Figure 3).
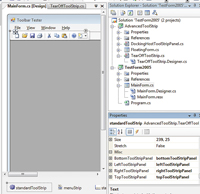
[Click on image for larger view.] |
| Figure 3. The various ToolStripPanel items appear in the Designer Properties window. |
Implement Tear-Off Functionality
I've browsed a number of blogs and their solutions to the tear-off toolstrip problem, but they're quite elaborate. I want to keep things simple and make heavy use of the event-driven functionality found in the .NET Framework libraries.
There's more functionality you need to add in TearOffToolStrip. To start, handle the MouseCaptureChanged event of FloatingForm. Give the event handler the name of FloatingForm_Dropped because the MouseCaptureChanged event is frequently fired when you've been dragging a form to move it, and then you release the mouse button. So, in essence, you've "dropped" the form. The event handler is hooked up in the TearOffToolStrip constructor, as can be seen in the TearOffToolStrip.cs file.
We're going backward, but to start the implementation of tear-off functionality, I thought it would be instructive to start with the "snap-to" functionality; that is, if you drag a floating ToolStrip and release the mouse button within the "area" of a ToolStripPanel on the side of the form, the ToolStrip snaps to the ToolStripPanel and re-docks to the panel. So we simply route this to a call to our own OnMouseCaptureChanged override.
Let's go through and unpack the implementation of OnMouseCaptureChanged. First, call the base ToolStrip class. Then, if the disableMouseCapture field of the class is set to TRUE, set it to FALSE and return. This prevents the toolstrip tear-off and snap-to functionality from manifesting in the Designer. To make doubly sure, you also stop if the DesignMode property is TRUE. It turns out just testing DesignMode is not sufficient to prevent some of the functionality from appearing in the Designer; that's why the disableMouseCapture field is also present. You'll see more about that field later. As a final bit of error handling, double-check and make sure that the DockingHostToolStripPanel references you hold are all non-NULL.
Now, check to see if the MousePosition is within any of the DockingHostToolStripPanels. If this is not the case, then OnMouseCaptureChanged must've been called just when the user released the mouse after dragging a (formerly) docked TearOffToolStrip off of its docking panel and into the client area of the form. In this first case, you call the MakeFloating function to turn the ToolStrip into a floating window. On the other hand, if at least one of the four DockingHostToolStripPanels contains the MousePosition, then go ahead and call the DockTo function, passing whichever panel the mouse was released in.
According to the documentation, MousePosition is a property of the System.Windows.Forms.Control class. It's a Point object, and it contains the coordinates of the mouse cursor relative to the upper-left corner of the screen. You'll notice there's extensive use of the IsPointWithinMe function, which is a member of DockingHostToolStripPanel. It returns TRUE if the MousePosition passed is within the bounds of the panel.
This is a perfect segue into the DockingHostToolStripPanel class, which provides the underlying ToolStripPanel behaviors that are essential in order to implement tear-off toolstrips.
Custom ToolStripPanel: DockingHostToolStripPanel
As you might have guessed, the DockingHostToolStripPanel class is derived from ToolStripPanel. You can peruse the entire code listing, which is extensively commented, in the DockingHostToolStripPanel.cs file, which is itself contained in the sample code.
I'll go through the DockingHostToolStripPanel code and unpack the core functionality. Let's start by looking at the fields declared by the class. The dockingRectangle field holds a reference to the default rectangle for receiving a floating ToolStrip. This rectangle is updated every time the main window is moved or resized, or as ToolStrips are added to or removed from the control. The defaultToolStripInferiorDimension field holds the smaller of either the width or height of a given ToolStrip (more on this field later). Finally, the dockedToolStrips field holds a List<ToolStrip>, which manages a list of all the ToolStrips currently docked to this panel. Each of these fields has its own property to encapsulate it. I'll explore each property in detail, starting with the DockingRectangle.
For a floating TearOffToolStrip to snap to a DockingHostToolStripPanel, the user must drag the ToolStrip such that the mouse cursor is within the area specified by the DockingHostToolStripPanel's DockingRect- angle property. When a DockingHostToolStripPanel contains no docked ToolStrips, its height/width is zero, depending on the panel's orientation. Hence the need for a DockingRectangle property to provide the "effective" rectangle of a panel, which is identical to the Control.ClientRectangle property.
The exception is if a panel contains no toolstrips. DefaultToolStripInferiorDimen- sion property stores the width or height (the smaller of the two) of the panel when one toolstrip is docked.
The DefaultToolStripInferiorDimension property, which is both read and write, gets or sets a reference to the default smaller dimension for ToolStrips hosted by this panel.
This dimension is the height of a horizontally oriented ToolStrip or the width of a vertically oriented ToolStrip. You also maintain a list of the docked ToolStrips that currently reside in this panel, so let's look at that property next. The DockedToolStrips property gets a reference to the list of docked ToolStrips maintained by this panel dynamically. You could just utilize Control.Controls, the collection that each control maintains of its children, but that collection in principle can contain anything. You must ensure you also hold a list of just ToolStrips, so utilize the List<ToolStrip> class, and this property provides access to this list.
Next, I'll highlight the important pieces of the DockingHostToolStripPanel implementation: its constructor -- a context menu to hide and show the toolstrips that are docked on this panel -- and the tear-off functionality supporting function, IsPointWithinMe. First, let's start with the constructor.
DockingHostToolStripPanel Constructor
If you unpack what the DockingHostToolStripPanel constructor does, first you set the DefaultToolStripInferiorDimension to its default value of 25, initialize the list of docked ToolStrips, and null out the Form reference. Then you execute the Designer-supplied code through calling the InitializeComponent function. Finally, you set up a new context menu for this panel, and handle its Opening event.
In many commercial-grade apps, the docking area for the toolstrips commonly provides a right-click context menu listing the names of the toolstrips present on the dock, letting the user quickly hide and show them. You'll also provide such a menu. Its items will all toggle their respective ToolStrips visibility, and you update the list of items every time a change is made to the list of docked ToolStrips.
The handler for the ContextMenuStrip.Opening event just calls the function InitializeToolStripContextMenu. As you can plainly see, this function merely clears out the items in the context menu, and then proceeds to iterate over the list of ToolStrips that are currently docked to this panel, adding a new menu item for each. It adds the corresponding ToolStrip object reference to the ToolStripMenuItem.Tag property, and adds a Click event handler called ToolStrip_Toggle to do the job of actually hiding and showing the corresponding ToolStrip. The Checked property of the menu is also set, according to the value of the ToolStrip's Visible property. Take a look at the implementation of ToolStrip_Toggle, the Click event handler for each menu item, in the sample code.
Finally, you add overrides for the Control.OnControlAdded and Control.OnControlRemoved event handler functions. As you can see from the sample code, in both these handlers you catch the control being added or removed if it's of type ToolStrip, and if it is, you alter its GripStyle as appropriate -- because a toolstrip being removed so it can be displayed in a floating window, for example, shouldn't show a gripper whilst it's in the floating window, by design. You also add or remove it to or from the list of docked ToolStrips contained in the List<ToolStrip> field, dockedToolStrips, in the class definition. Finally, refresh the items displayed in the context menu of toolstrips.
Now let's look at the docking rectangle and how that's refreshed and implemented so as to support the tear-off functionality. First, you must handle the OnMove, OnResize, OnSizeChanged and OnLocationChanged events of this panel. Each of these overrides merely calls InitializeDockingReceptionRectangle. The InitializeDockingReceptionRectangle function refreshes the DockingRectangle property to contain the outline of the area available to floating ToolStrips. The docking rectangle is based off of the parameters that Control.ClientRectangle has when one ToolStrip is docked to the panel. It first initializes the DockingRectangle property with the Control.ClientRectangle value. Then, if the panel is oriented horizontally, it sets the Height property to the value of the DefaultToolStripInferiorDimension property set discussed earlier.
Finally, you implement the final function responsible for providing tear-off support: IsPointWithinMe assesses whether the given Point is, in fact, within the DockingRectangle of this panel. If the user drops a floating ToolStrip within the bounds of the DockingRectangle, the IsPointWithinMe function detects if this is so and calls the ToolStrip DockTo function. You also use IsPointWithinMe to determine if the user has dragged a docked toolstrip "off the dock," so you can call its MakeFloating function. For more on this functionality, consult the DockingHostToolStripPanel.cs file in the code download.
Points of Interest
I've shown how you can get professional functionality out of your ToolStrip controls -- functionality users have come to expect from commercial-grade GUI applications: docking and floating toolstrips. I've shown you that docking and floating toolstrips:
- Depend on a special FloatingForm window to contain the floating toolstrip
- Work by moving the ToolStrip control back and forth from the Controls collection of its containing ToolStripPanel and the Controls collection of the FloatingForm
- Implement special events and handle the left mouse button double-click in the form's non-client area
- Use special functions, handlers and "docking rectangles" in order to tell whether the user has dragged a docked ToolStrip "off the dock" or whether the user has let go of a floating ToolStrip "within" the docking area, so it should again snap to the edge of the main window.
The sample code contains a Class Library project called AdvancedToolStrip, which you can utilize by adding the project to a Windows Forms project. Then add one DockingHostToolStripPanel to each side of the form, and add TearOffToolStrips to the panels as needed. Make sure to set each TearOffToolStrip's TopToolStripPanel, LeftToolStripPanel, RightToolStripPanel and BottomToolStripPanel properties to refer to the DockingHostToolStripPanels you've placed on the edges of your form. Now you can include tear-off toolstrips in your app!