C# Corner
Enabling User-Updated Live Tiles in Windows 8
This tutorial demonstrates how to give users more power with the ability to customize live tiles in Metro style apps.
In my last article, I explained how to send push notifications to a Windows 8 Metro Application.Today I'll explain how to enable users to customize the primary application live tile. By allowing the user to be able to update live tile, you'll be able to create a more personable experience for them.
The Windows Run Time (WinRT) provides an API to allow you to easily update the image or text of the primary live tile for your application. The Windows.UI.Notifications namespace contains a TileTeamplateType that has properties for each of the available live tile templates. MSDN has a full list of available tile templates.
The Notifications namespace also contains the TileUpdateManager, which can be used to retrieve the raw XML for a specific TileTemplateType. For example, to get the XML for the TileWideSmallImageAndText03 template you would run the following code.
  XmlDocument  tileContent = TileUpdateManager.GetTemplateContent
 (TileTemplateType.  TileWideSmallImageAndText03);
Here's the full XML for the TileWideSmallImageAndText03 template:
<tile>
  <visual lang="en-US">
    <binding template="TileWideSmallImageAndText03">
      <image id="1" src="image1.png"/>
      <text id="1">Text Field 1</text>
    </binding>
  </visual>
</tile>
Once you have the XML for a tile template you can then add the necessary text and or images for the tile through use of the retrieved XmlDocument. For example, to set the first text element of a tile, you would retrieve the "text" element, append a text node and set its value:
  XmlNodeList  textElement = tileContent.GetElementsByTagName("text");
  textElement.AppendChild(tileXml.CreateTextNode("Hello"));
Similarly, set the image for the tile you would retrieve the image element and set its "src" attribute value to the full image source path:
  XmlNodeList images =  tileContent.GetElementsByTagName("image");
  XmlElement imageElement = (XmlElement)images.Item(0);
  imageElement.SetAttribute("src",  "ms-appx:///Assets/Badge.png";
Once the XML's fully defined for the live tile, you can push the notification to Windows 8. First you have to create a TileNotification object using the XmlDocument for the live tile:
TileNotification tileNotification = new TileNotification(tileContent);
Next, use the TileUpdateManager to create a TileUpdater object that can be used to push the live tile update:
  TileUpdater updater =  TileUpdateManager.CreateTileUpdaterForApplication();

  updater.Update(tileNotification);
To see how to update live tiles in a Metro style application, first open up the Visual Studio 2012 beta and create a new blank Metro style app, as shown in Figure 1.
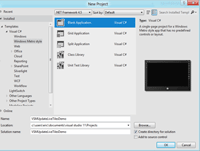
[Click on image for larger view.] |
| Figure 1. Creating the sample application project. |
Next, add a new Metro C# class library to the project, as shown in
Figure 2.
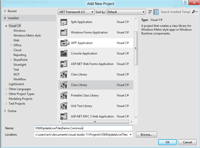
[Click on image for larger view.] |
| Figure 2. Adding the Common class library. |
The Common class library will contain the LiveTile class, which will be the work horse of the application. Now add a new class to the project and name it LiveTile. I created the LiveTile to encapsulate all the logic needed to create and push a live tile notification. It contains properties for a wide tile template, a square tile template, one tile text, and one tile image source.
The constructor sets wide and square tile template properties. The SetTextAndImage private method uses the set Text and ImageSource string properties to set the text and image source for the given wide and square tile templates. The public Update method creates the wide and square XmlDocuments, sets their text and image source properties and calls the TileUpdateManager to push the notification to Windows. See Listing 1 for the full LiveTile class source. I chose to set both a wide and square tile template to allow the user to switch between the default square live tile and a wide live tile.
Now to add the necessary markup for the application's UI. The UI will be minimal, as this is a demo. There's an application header, followed by a pair of textblock/textbox pairs for setting the tile text and image source properties, respectively.
Finally, there's an Update button, which will invoke the Update method on the bound LiveTile object to the view. Open up BlankPage.xaml and update your XAML to match Listing 2.
Next, update the BlankPage class page controller to bind a LiveTile object instance to the UI. Declare a LiveTile private field member and construct it in the BlankPage class constructor. Then set the DataContext of the StackPanel to the LiveTile member object.
Finally, wire up the Click event handler for the Update button and invoke the Update method on the bound LiveTile object. Feel free to experiment with different live tile templates for your needs when constructing the LiveTile object. See Listing 3 for the full BlankPage controller source code.
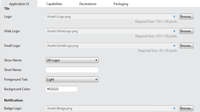
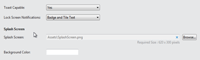
Next, set the Wide badge image for the application as well as enable push notifications for the application. Open up Package.appxmanifest from Solution Explorer. Refer to Figures 3 and 4 for guidance in setting the proper configuration. values.
[Click on image for larger view.] |
| Figure 3. Package.appxmanifest application UI, part 1. |
[Click on image for larger view.] |
| Figure 4. Package.appxmanifest application UI, part 2. |
You should now be able to run the finished application and update the application's live tile, as shown in Figure 5.
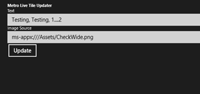
[Click on image for larger view.] |
| Figure 5. The finished application. |
Initially, you should see a square live tile with two states. The first state (Figure 6) will display a green check mark, and the second state will display the set text.

| Figure 6. A square live tile. | |
To change the tile to a wide tile, simply right-click on it and click on the Larger button, as shown in Figure 7.

[Click on image for larger view.] |
| Figure 7. Changing to a wide live tile. |
Now you should see the appropriate wide live tile, as shown in Figure 8.

[Click on image for larger view.] |
| Figure 8. A wide live tile. |
As you can see, live tiles open up a new window of opportunity for you as a developer to create a more personalized feel to your application. Stay tuned for the next iteration of the series, in which I'll cover how to use lock screen notifications and secondary live tiles. As always, the full source code for all samples is available via the code download link on the page.
About the Author
Eric Vogel is a Senior Software Developer for Red Cedar Solutions Group in Okemos, Michigan. He is the president of the Greater Lansing User Group for .NET. Eric enjoys learning about software architecture and craftsmanship, and is always looking for ways to create more robust and testable applications. Contact him at [email protected].