C# Corner
SignalR Revisited
Eric Vogel covers the recent changes to the SignalR persistent connection API.
More on this topic:
Back in January, I covered how to use the SignalR Persistent Connection API to create a chat application. Since then, SignalR has been promoted from release candidate 1 to release version 1.1.2. With the minor version change come many API changes that have broken my old code. Today I'll cover how to implement the same chat application using the updated API.
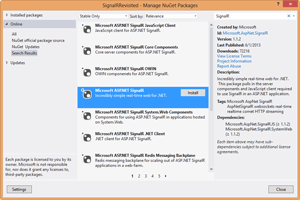
To get started, create a new ASP .NET MVC 4 Internet Application within Visual Studio 2012. Then install the Microsoft ASP.NET SignalR NuGet package, as seen in Figure 1.
 [Click on image for larger view.]
Figure 1. Installing the SignalR NuGet package.
[Click on image for larger view.]
Figure 1. Installing the SignalR NuGet package.
Next, create a Chat directory within the project, then a new class named ChatData. The ChatData class contains two string properties, named Name and Message:
namespace SignalRRevisited.Chat
{
    public class ChatData
    {
        public string Name { get; set; }
        public string Message { get; set; }

        public ChatData()
        {
        }

        public ChatData(string name, string message)
        {
            Name = name;
            Message = message;
        }
    }
}
Now it's time to implement the ChatConnection class, which uses the updated SignalR persistent connection API. Start out by adding the following using statements to the ChatConnection class:
using System.Threading.Tasks;
using Microsoft.AspNet.SignalR;
using Newtonsoft.Json;
Next, subclass the PersistentConnection class:
public class ChatConnection : PersistentConnection
Then I add the _clients member variable that maps the user's name to their connectionId:
private readonly Dictionary<string, string> _clients = new Dictionary<string, string>();
Next I override the OnConnected method, which used to be named OnConnectedAsync. In the method I add the user's connectionId to the _clients Dictionary and broadcast a message notifying everyone that a new user has joined the chat room:
protected override Task OnConnected(IRequest request, string connectionId)
 {
     _clients.Add(connectionId, string.Empty);
     ChatData chatData = new ChatData("Server", "A new user has joined the room.");
     return Connection.Broadcast(chatData);
 }
Now, I override the OnReceived method, which used to be named OnReceivedAsync. In the method I deserialize the chat message sent from the client, set the user's name in the _clients Dictionary, then broadcast the user's message:
protected override Task OnReceived(IRequest request, string connectionId, string data)
{
    ChatData chatData = JsonConvert.DeserializeObject<ChatData>(data);
    _clients[connectionId] = chatData.Name;
    return Connection.Broadcast(chatData);
}
Next I override the OnDisconnected method, which used to be named OnDisconnectedAync. The method broadcasts that the user's left, and removes their username from the _clients Dictionary. Here's the ChatConnection class:
using System.Collections.Generic;
using System.Threading.Tasks;
using Microsoft.AspNet.SignalR;
using Newtonsoft.Json;

namespace SignalRRevisited.Chat
{
    public class ChatConnection : PersistentConnection
    {
        private readonly Dictionary<string, string> _clients = new Dictionary<string, string>();

        protected override Task OnConnected(IRequest request, string connectionId)
        {
            _clients.Add(connectionId, string.Empty);
            ChatData chatData = new ChatData("Server", "A new user has joined the room.");
            return Connection.Broadcast(chatData);
        }

        protected override Task OnReceived(IRequest request, string connectionId, string data)
        {
            ChatData chatData = JsonConvert.DeserializeObject<ChatData>(data);
            _clients[connectionId] = chatData.Name;
            return Connection.Broadcast(chatData);
        }

        protected override Task OnDisconnected(IRequest request, string connectionId)
        {
            string name = _clients[connectionId];
            ChatData chatData = new ChatData("Server", string.Format("{0} has left the room.", name));
            _clients.Remove(connectionId);
            return Connection.Broadcast(chatData);
        }
    }
}
Now it's time to implement the client-side JavaScript for the chat application. Create a new JavaScript class file named ChatR.js within the Scripts folder. The client-side SignalR Persistent Connection API used for the chat application has not changed since the previous article. Copy the JavaScript below into ChatR.js (see the original article for more on the code).
$(function () {
    var myConnection = $.connection("/chat");

    myConnection.received(function (data) {
        $("#messages").append("<li>" + data.Name + ': ' + data.Message + "</li>");
    });

    myConnection.error(function (error) {
        console.warn(error);
    });

    myConnection.start()
        .promise()
        .done(function () {
            $("#send").click(function () {
                var myName = $("#Name").val();
                var myMessage = $("#Message").val();
                myConnection.send(JSON.stringify({ name: myName, message: myMessage }));
            })
        });
});
Now it's time to implement the ChatR view. Create a new Razor view named ChatR within the Views\Home directory. The view for the chat application is very simple: it has a textbox for the user's name, a textbox for a message and button to send the message. Below the send button the messages are appended to an unordered list element. In addition, I've moved the rendering of the jquerysignalr bundle to the view itself instead of the shared layout Razor view:
@{
    ViewBag.Title = "Chat";
}

<h2>Chat</h2>

@using (Html.BeginForm()) {
    @Html.EditorForModel();

<input id="send" value="send" type="button" />
<ul id="messages" style="list-style:none;"></ul>
}

@section Scripts
{
     @Scripts.Render("~/bundles/jquerysignalr")
     <script src="~/Scripts/ChatR.js"></script>
}
Next, I add a ChatR action to the HomeController class:
public ActionResult ChatR()
{
    var vm = new Chat.ChatData();
    return View(vm);
}
Here's the completed HomeController class implementation:
using System.Web.Mvc;

namespace SignalRRevisited.Controllers
{
    public class HomeController : Controller
    {
        public ActionResult Index()
        {
            return View();
        }

        public ActionResult ChatR()
        {
            var vm = new Chat.ChatData();
            return View(vm);
        }
    }
}
The last two steps are to add the jquerysignalr bundle and the needed route for the ChatR controller action. Open up the BundleConfig class and add the jquerysignalr bundle to the bottom of the class:
bundles.Add(new ScriptBundle("~/bundles/jquerysignalr").Include(
        "~/Scripts/json2.js",
        "~/Scripts/jquery-signalR-{version}.js"));
Your BundleConfig class should now look like this:
using System.Web.Optimization;

namespace SignalRRevisited
{
    public class BundleConfig
    {
        // For more information on Bundling, visit http://go.microsoft.com/fwlink/?LinkId=254725
        public static void RegisterBundles(BundleCollection bundles)
        {
            bundles.Add(new ScriptBundle("~/bundles/jquery").Include(
                        "~/Scripts/jquery-{version}.js"));

            bundles.Add(new ScriptBundle("~/bundles/jqueryui").Include(
                        "~/Scripts/jquery-ui-{version}.js"));

            bundles.Add(new ScriptBundle("~/bundles/jqueryval").Include(
                        "~/Scripts/jquery.unobtrusive*",
                        "~/Scripts/jquery.validate*"));

            // Use the development version of Modernizr to develop with and learn from. Then, when you're
            // ready for production, use the build tool at http://modernizr.com to pick only the tests you need.
            bundles.Add(new ScriptBundle("~/bundles/modernizr").Include(
                        "~/Scripts/modernizr-*"));

            bundles.Add(new StyleBundle("~/Content/css").Include("~/Content/site.css"));

            bundles.Add(new StyleBundle("~/Content/themes/base/css").Include(
                        "~/Content/themes/base/jquery.ui.core.css",
                        "~/Content/themes/base/jquery.ui.resizable.css",
                        "~/Content/themes/base/jquery.ui.selectable.css",
                        "~/Content/themes/base/jquery.ui.accordion.css",
                        "~/Content/themes/base/jquery.ui.autocomplete.css",
                        "~/Content/themes/base/jquery.ui.button.css",
                        "~/Content/themes/base/jquery.ui.dialog.css",
                        "~/Content/themes/base/jquery.ui.slider.css",
                        "~/Content/themes/base/jquery.ui.tabs.css",
                        "~/Content/themes/base/jquery.ui.datepicker.css",
                        "~/Content/themes/base/jquery.ui.progressbar.css",
                        "~/Content/themes/base/jquery.ui.theme.css"));

            bundles.Add(new ScriptBundle("~/bundles/jquerysignalr").Include(
                   "~/Sciprts/json2.js",
                   "~/Scripts/jquery.signalR-{version}.js"));
        }
    }
}
Now it's time to add the routing information for the chat application. Open up the RouteConfig class and add the following route:
RouteTable.Routes.MapConnection<Chat.ChatConnection>("chat", "/chat");
Finally, set the default controller action to ChatR:
routes.MapRoute(
                name: "Default",
                url: "{controller}/{action}/{id}",
                defaults: new { controller = "Home", action = "ChatR", id = UrlParameter.Optional }
Here's the completed RouteConfig class:
using System.Web.Mvc;
using System.Web.Routing;

namespace SignalRRevisited.App_Start
{
    public class RouteConfig
    {
        public static void RegisterRoutes(RouteCollection routes)
        {
            RouteTable.Routes.MapConnection<Chat.ChatConnection>("chat", "/chat");
            routes.IgnoreRoute("{resource}.axd/{*pathInfo}");

            routes.MapRoute(
                name: "Default",
                url: "{controller}/{action}/{id}",
                defaults: new { controller = "Home", action = "ChatR", id = UrlParameter.Optional }
            );
        }
    }
}
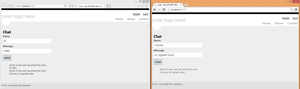
The SignalR Chat application is now finished, and you should be able to send chat messages across multiple browser windows, as seen in Figure 2.
 [Click on image for larger view.]
Figure 2. The completed SignalR chat application.
[Click on image for larger view.]
Figure 2. The completed SignalR chat application.
That's a rundown of some of the changes in the SignalR Persistent Connection API from the release candidate to the full release version. The main changes are the omission of the Async suffix to the base PersistentConnection class methods. In addition, the route configuration no longer needs a wildcard.
About the Author
Eric Vogel is a Senior Software Developer for Red Cedar Solutions Group in Okemos, Michigan. He is the president of the Greater Lansing User Group for .NET. Eric enjoys learning about software architecture and craftsmanship, and is always looking for ways to create more robust and testable applications. Contact him at [email protected].