In-Depth
Windows 8 Contracts and Extensions: Search
Don't re-invent the wheel when building your Windows 8 apps. Instead, save coding time by using (and customizing) the Search contract to add this critical piece of functionality.
- By Tony Champion
- 08/07/2013
As a Windows Store app developer, knowing the ins and outs of the contracts and extensions in Windows 8 is paramount.
Contracts and extensions play a major role in Windows Store app development. Not only do they provide out-of-the-box support for many of the common operations needed within an app, but in many cases they're the only way to interact with Windows, other apps or the device itself. Often, the first thing that comes to mind when you think of contracts and extensions is the charm bar. Within the charm bar, the Search contract tends to be the logical starting point. This article will explore the Search contract and demonstrate how to effectively integrate it into your Windows Store apps.
Search in a Windows Store App
The ability to search is a common feature in many apps. It's a good bet that if your app includes any sizable amounts of data, the user is going to want the ability to search through it. Fortunately, most search implementations have the same two requirements: the ability to enter a search term and a way to display the results. Windows 8 provides a unified approach for apps to surface this functionality to their users.
The most obvious advantage of using the Search contract is the ability to reuse the code that has already been written for you. This includes things like an interface for entering a search query, a way of storing previous searches and exposing suggested queries. In addition, the Search contract exposes several customization points that can be used to provide a more targeted approach for your users.
One of the five Microsoft design language principles is "win as one." While the principle covers a lot of territory, one aspect of it is to use familiar features. If a user is familiar with searching other Windows Store apps by using the Search charm, and therefore the Search contract, the user will already be familiar with how to search your app if you implement the same contract. This eases the learning curve for a user when he first opens your app, and it will go a long way toward improving customer retention.
Adding the Search Contract to Your App
There are three things that your app must have in order to successfully implement the Search contract. First is the addition of a search declaration in the app's appxmanifest. This can be accomplished by adding a search declaration in the Declarations tab of the appxmanifest designer. The declaration can also be directly added to the XML in the appxmanifest by adding an Extension node to the Extensions collection in the Application node:
<Application Id="App" Executable="$targetnametoken$.exe" EntryPoint="VSMSearchSample.App">
  <VisualElements DisplayName="VSMSearchSample" Logo="Assets\search150.png"
                  SmallLogo="Assets\SmallLogo.png" Description="VSMSearchSample"
                  ForegroundText="light" BackgroundColor="#0072c6">
    <DefaultTile ShowName="allLogos" />
    <SplashScreen Image="Assets\searchSplash.png" />
  </VisualElements>
  <Extensions>
    <Extension Category="windows.search" />
  </Extensions>
</Application>
The next step is to enable your app to handle being activated by the Search contract. When a user enters search criteria in the search screen, your app is launched within the search results window. Your app will be notified when the app is being launched from a search query. When building a XAML-based Windows Store app, this is done by calling the OnSearchActivated method within the App class. To successfully be notified when the app's being activated by search, add an override to the default method as shown in Listing 1.
Listing 1. Implementation of OnSearchActivated.
protected override void OnSearchActivated(SearchActivatedEventArgs args)
{
  Frame rootFrame = Window.Current.Content as Frame;

  // Do not repeat app initialization when the Window already has content,
  // just ensure that the window is active.
  if (rootFrame == null)
  {
    // Create a Frame to act as the navigation context and
    // navigate to the first page.
    rootFrame = new Frame();

    // Place the frame in the current Window.
    Window.Current.Content = rootFrame;
  }

  if (!rootFrame.Navigate(typeof(SearchPage), args.QueryText))
  {
    throw new Exception("Failed to create initial page");
  }

  // Ensure the current window is active.
  Window.Current.Activate();
}
The OnSearchActivated method receives a single parameter, SearchActivatedEventArgs, which contains information about the activation and the query. The query text entered by the user is passed in the QueryText property.
The final thing to add is the UI showing the results. In a XAML app, this is typically a Page to which the app will navigate to help preserve the navigation stack. Once these three things have been added to your app, you can successfully implement the search contract.
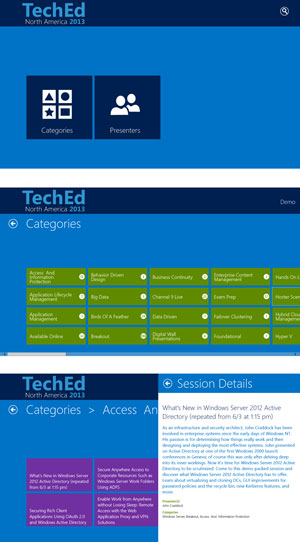
The solution available to download with this article is a demo app that allows the user to explore a subset of sessions available at TechEd North America 2013. As seen in Figure 1, the user can drill down to the session details from navigating through the categories or the presenters. In an app like this, search is an obvious benefit. I added a basic search page by implementing these three requirements; it's shown in Figure 2.
 [Click on image for larger view.]
Figure 1. Drill down to session details by navigating through categories or presenters.
[Click on image for larger view.]
Figure 1. Drill down to session details by navigating through categories or presenters.
 [Click on image for larger view.]
Figure 2. A basic search page.
[Click on image for larger view.]
Figure 2. A basic search page.
Adding Search from Visual Studio
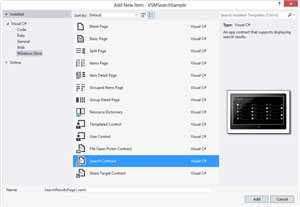
Before digging into the Search contract any further, it's important to mention a second approach to implementing the Search contract in your app. While the three requirements can all be added to your app manually, Visual Studio provides a templated solution for adding search to your app, which also contains a few extra goodies. Visual Studio includes a Search Contract template that will add the necessary pieces to your app. The Search Contract template is available for both XAML and JavaScript Window Store apps. To add the Search Contract to your app, right-click the project node in the Solution Explorer, then select Add | New Item. In the item list, there's a Search Contract, as shown in Figure 3. In a XAML app, the name should be the name you want to give the page that returns the search results.
 [Click on image for larger view.]
Figure 3. The Search Contract in Visual Studio.
[Click on image for larger view.]
Figure 3. The Search Contract in Visual Studio.
When adding the contract to your app, the template adds a search declaration to your appxmanifest, an override of the OnSearchActivated method in the App class, and a new search page to your solution. Depending on which project template you began your solution with, you may also find that several additional supporting files have been added to your project. These include some value converters, a layout-aware page that the new search page inherits from, and a suspension manager.
The search page created provides an example of how to fully implement a search page, including default templates that provide the same look and feel that the Grid and Split App project templates use. Depending on the structure of your app, using the template approach can sometimes add more work than benefit. However, regardless of whether you use the search contract template in your project or not, it's worth adding it to a sample project just to get an understanding of how to approach the implementation.
Designing a Search Page
When implementing a search page in your app, first get the search page loaded and pass the query text to it. Listing 1 takes the QueryText property of the SearchActivatedEventArgs and uses the main Frame object to navigate to the search page, passing the QueryText as the parameter. The OnNavigatedTo method of the Page object exposes the query information and can use that to update a view model for the page. A single view model is used in the demo application for simplification. The following code shows the override of the OnNavigatedTo method of the SearchPage:
protected override void OnNavigatedTo(NavigationEventArgs e)
{
  var searchText = e.Parameter.ToString();

  App.ViewModel.SearchFilter = ViewModels.SearchFilterType.All;
  App.ViewModel.Search(searchText);

  itemGridView.ItemsSource = App.ViewModel.SearchResults;
  tbQuery.Text = searchText;

}
A search page should contain certain information. First and foremost, the search results should be shown in some format. Most Windows Store apps will implement this by using a GridView; however, the results should be shown in a way that makes sense for your app.
The second important piece of information is the query text itself. By displaying the entered query text on the search screen, the user is given verification that the app is searching for the correct term. This is especially important when no results match the query.
An additional piece of beneficial information is the number of results returned. This tells the user if he needs to narrow the results by providing a more detailed search query. You can also use this number to inform the user if your app is limiting the result set to a certain number of results. For instance, the app could display a message informing the user that the results have been maxed out. Refer back to Figure 2 for an example of the basic search page layout.
The next feature that's commonly found in search pages is the ability to filter the scope of the search. The demo returns several types of data: categories, presenters and sessions. By adding a filter to the page, the user can fine-tune his search beyond a simple text search. Figure 4 shows the search screen with a dropdown filter added. The filter for the search page can be as simple or as complex as your data demands.
 [Click on image for larger view.]
Figure 4. The search screen with a dropdown filter added.
[Click on image for larger view.]
Figure 4. The search screen with a dropdown filter added.
Optimizing your Search Results
When providing data for your search queries, performance is a key factor. Searching data can be time-consuming, especially when your app pulls the search result from a remote data source. While optimizing searches can be a domain-specific function, there are a few things to consider when architecting your solution.
The first approach is to cache searches. It's not uncommon for users to search for the same thing multiple times. If the remote data hasn't changed, caching recent search results can improve the experience for your users.
Setting a maximum number of results to return is crucial when working with large data sets. When the user runs a search that returns hundreds of individual items, he can quickly become lost looking through the data. Setting a maximum number of items to return has a couple of benefits. The first and most obvious is that it speeds up the query. More items returned means more data to be downloaded and displayed. The other benefit, as previously stated, is that hitting the maximum result set informs the user he needs to focus his search more.
Searching cached result sets is another approach to increase performance. If you have a result set for the search term "windows," it might be feasible to search that result set for "windows phone" instead of making an additional remote call. Of course, this approach runs into some limitations depending on how you're handling your search algorithm.
Regardless of your techniques, it's important to spend some time focusing on optimizing the search process. In today's world of immediate responses from search engines such as Bing and Google, users aren't very patient when it comes to waiting for their search results.
Customizing the Search Experience
In addition to the Search contract calling your app when a user enters a query, the contract exposes an API that allows your app to customize the search experience for the user. These features allow you to bridge the gap between your app and the search screen, and help the user find what he's looking for. After all, the purpose of search is to find something, and the more effective your app is at that, the better the UX will be.
The API is exposed through the SearchPane class, located in the Windows.ApplicationModel.Search namespace. The SearchPane class includes a static method, GetForCurrentView, that returns an instance of the current SearchPane:
// Need to add reference to Search namespace.
using Windows.ApplicationModel.Search;
// Call reference of current SearchPane.
var mySearchPage = SearchPane.GetForCurrentView();
Setting the Placeholder Text
When the user launches the Search charm from within your app, the search box is an empty text box. By adding some placeholder text in that box, you can remind the user of what he's searching for. The placeholder text is set by the PlaceHolderText property of the SearchPane. The first time you can set the placeholder text is during the activation of your app. Because your app can be activated in multiple ways, it's important to handle the initialization in each case. For instance, the demo app initializes the app in the OnLaunched and OnSearchActivated override methods by calling the ConfigureSearchContract method in the App class:
public SearchPane AppSearchPane { get; set; }

private void ConfigureSearchContract()
{
  AppSearchPane = SearchPane.GetForCurrentView();

  // Set initial place holder text.
  AppSearchPane.PlaceholderText = "Enter something great!";
}
Figure 5 shows the search pane after setting the placeholder text. The search pane is exposed through a property of the App class. This allows you to change the experience based on the current screen. In the case of a line-of-business (LOB) app, you might want to prompt the user to search for a specific type of object depending on the screen the user is currently using.
 [Click on image for larger view.]
Figure 5. The search pane after setting the placeholder text.
[Click on image for larger view.]
Figure 5. The search pane after setting the placeholder text.
Launching Search from Code
The SearchPane object allows you to open the search pane from code. This is useful if your UI includes a search icon. There are two overrides to the Show method that will launch the Search contract. One of the overrides allows you to enter an initial string on which to search. This is a great way to pre-filter the results or search items related to the data with which the user is currently working. The following is an example of using the Show method when the user clicks the search icon at the top of the MainPage of the demo app:
private void btnSearch_Click(object sender, RoutedEventArgs e)
{
  App.AppSearchPane.Show("azure");
}
Automatically Searching from App
The Windows 8 Start screen doesn't include any type of search icon or any other indication that search is supported. However, if the user begins to type while on the Start screen, the search pane automatically opens and begins searching on what's entered. This is a great feature to add to any type of hub or data listing page within your app.
To enable this feature on a page, set the ShowOnKeyboardInput property of the SearchPane class to true. In the provided example, the ShowOnKeyboardInput is enabled on the MainPage and CategoryPage:
protected override void OnNavigatedTo(NavigationEventArgs e)
{
  App.AppSearchPane.ShowOnKeyboardInput = true;
}
As with most features, there's a time and place to use this feature. As previously stated, hub-type pages or pages that display a collection of data are great examples. In addition, you should always enable this on your search pages. The user is already searching your app, so this allows him to continue searching for other queries without having to switch focus back to the search pane.
In most other circumstances, you'll find that this feature provides a confusing experience for users. If you have any other input controls on the screen, like a data-entry screen, typing on the keyboard will switch focus away from your controls and to the search pane. This is most likely not what the user will expect, so it's important to only use this feature where it makes sense.
Suggestions and Results
By default, the search pane will remember the user's search history and use it for search suggestions in a dropdown box as the user enters a new search query. The SearchPane class allows you to override these suggestions by supplying two types of suggestions: query suggestions and result suggestions.
A query suggestion is a common or frequently used search term. You see examples of this on every search engine out there. This provides the users some guidance on what the acceptable term might be. When the user selects a query suggestion, he's shown the search results for that query.
A result suggestion is a strong or exact match to the query text. If the user selects one of these suggestions, he should be taken directly to that detail page and not a search results page. Result suggestions contain more information than a query suggestion. A result suggestion is made up of a title, a brief description and a thumbnail.
Adding Suggestions
Each time the user changes the query text in the search pane, the SearchPane class raises the SuggestionsRequested event. The event handler for this event has a SearchPaneSuggestionsRequestedEventArgs passed as the second parameter, which has a Request property that's an instance of the SearchPaneSuggestionsRequest class.
SearchPaneSuggestionsRequest has a SearchSuggestionCollection, which returns the collection of suggestions. The search pane will show a maximum of five suggestions, so it's important to surface the most relevant suggestion at the beginning of the list.
There are two methods available for adding query suggestions to the results. The first is the AppendQuerySuggestions method, which adds a single string to the results stack. The AppendQuerySuggestions method will add a collection of results passed in as an IEnumerable<string> collection. Listing 2 shows adding up to three matching category names as query suggestions to the search results.
Listing 2. Adding up to three matching category names as query suggestions.
void AppSearchPane_SuggestionsRequested(SearchPane sender, SearchPaneSuggestionsRequestedEventArgs args)
{
  if (ViewModel != null)
  {
    var cats = ViewModel.Categories
                        .Where(c => c.Name.ToLower().Contains(args.QueryText.ToLower()))
                        .Select(c=> c.Name)
                        .Take(3);

    if (cats.Count() > 0)
    {
      args.Request.SearchSuggestionCollection.AppendQuerySuggestions(cats);
    }
  }
}
Result suggestions can be added using the AppendResultSuggestion method; it has several parameters including a name, description, tag and thumbnail source. Listing 3 shows an example of adding matching sessions to the query. The tag should be a unique identifier that can be used to reference the specific result object.
Listing 3. Adding matching sessions to the query.
// Define an image source.
var imageUri = new Uri("ms-appx:///Assets/search40.png");
var imageSource =
  Windows.Storage.Streams.RandomAccessStreamReference.CreateFromUri(imageUri);

var sessions = ViewModel.Sessions
                        .Where(s => s.Name.ToLower().Contains(args.QueryText.ToLower()))
                        .Take(2);

if (sessions.Count() > 0)
{
  foreach (var session in sessions)
  {
    args.Request.SearchSuggestionCollection.AppendResultSuggestion(session.Name,
      session.Description,
      session.Id.ToString(),
      imageSource, "");

  }
}
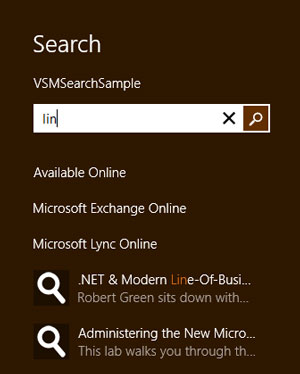
By adding both query suggestions and result suggestions to the search pane, you can get a customized search experience that looks like Figure 6.
 [Click on image for larger view.]
Figure 6. A customized search experience.
[Click on image for larger view.]
Figure 6. A customized search experience.
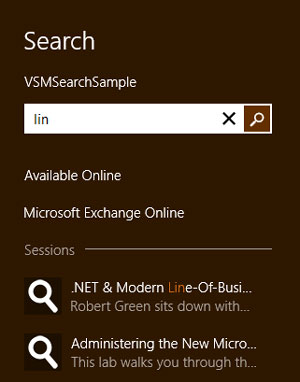
There's one additional search suggestion that can be added to the collection, and that's a separator. A separator is used to group different results together. Adding a separator to the collection counts as one of the five returnable results. A separator is added using the AppendSearchSeparator method. The method takes a string parameter that can be used as a label for the separator. The following is an example of adding a separator between the query and result suggestions (Figure 7 shows the results of the new separator):
args.Request.SearchSuggestionCollection.AppendSearchSeparator("Sessions");
 [Click on image for larger view.]
Figure 7. A separator between query and result suggestions.
[Click on image for larger view.]
Figure 7. A separator between query and result suggestions.
Responding to Result Suggestions
For query suggestions, you can let the default search experience handle routing the user to the appropriate search page. However, result suggestions require custom handling of the search selection. This is because when a user selects a result suggestion he should be directed to the detail page of the result, and not the standard search page. If the user selects a results suggestion, the SearchPane ResultSuggestionChosen event is raised. The SearchPaneResultSuggestionChosenEventArgs parameter (which is passed to the event handler) has a Tag property. This is the same tag that's added to the result suggestion in the previous section.
By adding an event handler to the ResultSuggestionChosen event, you can direct the user to the correct detail page within the app. The following code shows an example of navigating to a detail page using the given tag:
void AppSearchPane_ResultSuggestionChosen(SearchPane sender,
  SearchPaneResultSuggestionChosenEventArgs args)
{
  if (ViewModel != null)
  {
    var id = int.Parse(args.Tag);

    var session = ViewModel.Sessions.Where(s => s.Id == id).First();
    var frame = Window.Current.Content as Frame;

    frame.Navigate(typeof(SessionsPage), session);

  }
}
What's New in Windows 8.1
With the Windows 8.1 Preview released at Build 2013, the Search contract has seen a few new features. The most prominent new feature is the addition of the SearchBox control. Apps that are search-centric, like the Bing app, need to include a search box directly in the app. One of the downsides to this in Windows 8 was that it was difficult to try and keep the in-app search experience in sync with the Search contract experience. The SearchBox resolves this issue by keeping the two experiences in sync. All customizations and extensions available in the search contract are also available in the SearchBox. In addition, the SearchBox can be styled to fit into your app's branding and style.
The behavior of the search contract has also been extended. When the user first sets focus to the search box, the RequestSuggestions event is raised with a null query. This allows the app to override any search history available for the app. In addition, the SearchSuggestionCollection can now contain 25 entries, while the SearchBox implementation still only accepts five.
Search in Your App
Taking advantage of the Search contract provides your app with several benefits, the first being a consistent, intuitive and familiar search experience. At the same time, you also save yourself time and effort by taking advantage of an existing UI and search mechanism.
A more subtle benefit is the fact that your app is now always accessible to the user. The user can search your app without having to launch the app prior to searching. This gives you greater visibility to your user.
Regardless of whether you're taking advantage of the out-of-the-box solution or providing a more customized solution, the Search contract can be a great addition to your app.