Mobile Corner
Add Azure Active Directory Support to Azure Mobile Services-Enabled Windows Phone Apps
Windows Phone applications can use Azure Active Directory to authenticate users and authorize access to Azure Mobile Services. Nick Randolph walks through the process, step by step.
- By Nick Randolph
- 10/13/2014
Since its inception, Azure Mobile Services (AMS) has supported a number of different authentication providers such as Facebook and Twitter. It has also supported developers rolling their own custom authentication, which made possible authenticating against an exposed enterprise Active Directory. Microsoft Azure Active Directory (AAD) allows organizations to easily extend their Active Directory into the cloud, making it possible to authenticate and authorize access to cloud-based services, such as AMS with the same credentials users have for on-premises resources.
In this article, I'll walk-through setting up AAD in order to secure an AMS. Synchronizing an internal Active Directory into Azure will not be covered, but more information on directory integration can be found at the TechNet Library.
I'll start by creating both an AMS and a Universal Application (that is, both Windows and Windows Phone targets) that will connect to the AMS. I'll then add support for authenticating against AAD. Finally, I'll lock down the AMS to only accept requests from authorized users.
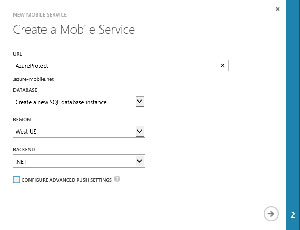
To get started I'll create the AMS via the Azure Management Portal. From the taskbar at the bottom of the portal I select + | Compute | Mobile Service | Create to launch the New Mobile Service wizard shown in Figure 1.
 [Click on image for larger view.]
Figure 1. New Mobile Service
[Click on image for larger view.]
Figure 1. New Mobile Service
The name of this AMS is going to be AzureProtect and will use a new database. I've also opted to use the Microsoft .NET Framework back-end. The next and final step in the wizard is to provide more information about the database that will be created.
Once the AMS has been created, which can take a couple of minutes, in the Quick Start tab (clicking on the cloud icon to the left of the Dashboard tab will open this tab if it doesn't open by default) there are steps to either create a new application or integrate with an existing application. I'll select the Windows platform, expand out the Create a New App section and skip to step two in order to download the starter project in C#.
Note: When downloading code from the Internet, don't forget to unblock the compressed file before trying to extract it.
After extracting the downloaded starter project it can be opened in Visual Studio by double-clicking on the .SLN solution file. Building the project will cause the necessary NuGet packages to be downloaded, after which the AzureProtect AMS project can be published into the cloud by right-clicking on the project and selecting Publish. The Publish Web wizard walks me through selecting an AMS into which to publish. Publish takes a couple of minutes after which the homepage of the published AzureProtect AMS appears.
The Windows Phone and Windows applications that were generated and downloaded alongside the AMS can be easily switched between connecting to a locally run instance of the AzureProtect AMS or one hosted in the cloud. This is done by uncommenting the following block of code from the App.xaml.cs, which is actually located in the Shared project:
public static MobileServiceClient MobileService = new MobileServiceClient(
  "https://azureprotect.azure-mobile.net/",
  "PWjLJRleJPvberglZHxYxrqhxFDeMn56"
);
Before adding the AAD authentication into the applications, it's worth running them and verifying that they can connect to the AMS and both retrieve and insert data. Adding authentication requires the three parties -- the client application, the AMS and AAD -- to know about each other, which in turn means updating the AMS with AAD parameters, registering both the AMS and the client application with AAD, and adding the authentication step to the client applications.
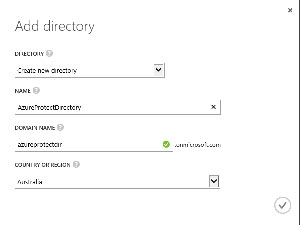
To begin, I'll register the AzureProtect AMS and the client applications with AAD, which is done via the Azure Management Portal. The first thing to do is to set up a new directory in AAD to use for authenticating users for the AzureProtect services. This directory is where the list of users and groups for your application will reside, and is associated with one or more tenants, which, for want of a simpler way of explaining, you can think of as the domain to which users belong. From the task bar I select New | App Services | Active Directory | Directory | Custom Create. Figure 2 shows the completed Add directory wizard, taking note that the Domain Name is azureprotectdir, which will result in a default tenant of azureprotectdir.onmicrosoft.com for the directory.
 [Click on image for larger view.]
Figure 2. Add Directory
[Click on image for larger view.]
Figure 2. Add Directory
Once the new directory has been created, I navigate to the Applications tab and click the Add An Application link, followed by the Add an application my organization is developing option. I'll give the application a name, AzureProtectAMS, and leave the default option of Web Application and/or Web API. On the next pane, I'm prompted for a Sign-On Url and App Id Uri. In another browser window or tab I have the Identity pane of the AzureProtect AMS, which is where settings for other identity providers, such as Facebook and Twitter, can be entered. At the bottom of this tab is a Windows Azure Active Directory section with an App Url predefined for the AMS. This value should be copied and used to complete both Sign-On Url and App Id Uri parameters for the application being created in AAD.
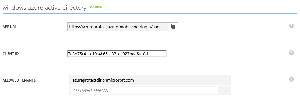
Upon completing the setup of the AAD application, AzureProtectAMS, I switch to the Configure tab and copy the Client Id value. This value is then used as the Client Id value under the Windows Azure Active Directory section on the Identity pane for the AzureProtect AMS. I also need to add the domain of the AAD (azureprotectdir.onmicrosoft.com) to the Allowed Tenants. The completed section of the Identity pane is shown in Figure 3.
 [Click on image for larger view.]
Figure 3. AzureProtect AMS Identity Pane
[Click on image for larger view.]
Figure 3. AzureProtect AMS Identity Pane
At this point the registration of the AzureProtect AMS in AAD is complete. However, in order for the client applications to be able to request access to it, the permissions on the AzureProtectAMS application in AAD needs to be updated to grant access to other AAD applications.
From the Configure tab of the AzureProtectAMS application in AAD, I can download the manifest file by selecting Manage Manifest, Download Manifest from the taskbar. I open the downloaded manifest file and replace the following line of code with the code in Listing 1:
"appPermissions": [ ],
Listing 1: Code to Use in Manifest File
"appPermissions": [
  {
    "claimValue": "user_impersonation",
    "description": "Allow the application access to the mobile service",
    "directAccessGrantTypes": [ ],
    "displayName": "Have full access to the mobile service",
    "impersonationAccessGrantTypes": [
      {
        "impersonated": "User",
        "impersonator": "Application"
      }
    ],
    "isDisabled": false,
    "origin": "Application",
    "permissionId": "b69ee3c9-c40d-4f2a-ac80-961cd1534e40",
    "resourceScopeType": "Personal",
    "userConsentDescription":
      "Allow the application full access to the mobile service on your behalf",
    "userConsentDisplayName": "Have full access to the mobile service"
  }
],
The manifest file is saved and then uploaded back into the AzureProtectAMS application by selecting ManageManifest, Upload Manifest from the taskbar on the Configure tab. This completes the AzureProtectAMS application and the registration of the AzureProtect AMS with AAD.
The next step is to register the client applications with AAD. The actual registration is done via the Azure management portal. However, in order to register the application I need to find out the application callback uri. This is exposed via a static method on the WebAuthenticationBroker, GetCurrentApplicationCallbackUri. The importance of this Uri will become relevant when I add the authentication logic into the application:
using Windows.Security.Authentication.Web;
private void AuthenticateClick(object sender, RoutedEventArgs e)
{
  var returnUri = WebAuthenticationBroker.GetCurrentApplicationCallbackUri();
  Debug.WriteLine(returnUri);
}
The returnUri should look something like this:
ms-app://s-1-15-2-3997043945-2308853857-938509092-202192821-2828204615-4119579785-151347001/
I'm going to register the Windows Phone native application with the AAD, so I select the Native Client Application option, and give it an appropriate name, AzureProtectClient. The next step in the Add Application wizard prompts for the Redirect Uri. This is the Uri retrieved earlier from running the Windows Phone application (ms-app://s-1-15-2-3997043945-2308853857-938509092-202192821-2828204615-4119579785-151347001/). The Windows application may have a different Redirect Uri, which can be added after the application has been created in AAD. Invoke the GetCurrentApplicationCallbackUri method in the Windows application and add the result to the list of Return Uris on the Configure tab of the AzureProtectClient application in AAD.
Note that if you associate your application with the Windows Store or Windows Phone Store, the Redirect Uri for your application may change, so as you move from development into production you might need to update or add Redirect Uri values to the AzureProtectClient application in AAD.
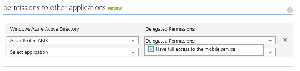
The last step in creating the AzureProtectClient application is to permit access to the AzureProtectAMS. On the Configure tab of the application, under the Permissions to other applications section, I select AzureProtectAMS and check the Have full access to the mobile service option under Delegated Permissions (see Figure 4).
 [Click on image for larger view.]
Figure 4. Permit Access to the AzureProtectAMS
[Click on image for larger view.]
Figure 4. Permit Access to the AzureProtectAMS
Registration, Completed
Now that I've finished the registration of applications and the configuration of AAD, the next step is to update the client applications so they can authenticate users. From NuGet, I'll add a reference to the Active Directory Authentication Library (ADAL) into both client applications, and the AMS project (this is required if you decide to use ADAL to protect access to individual AMSes).
I'll start with the Windows application because the flow is straightforward. The application requires three pieces of data that come from the application registration process with AAD:
- AADTenant -- This is the domain, or tenant, of the AAD. In this case I'm using the default tenant that was created when I specified the domain of the AAD, azureprotectdir.onmicrosoft.com
- AADClientApplicationClientId -- This is the Client Id value that can be found on the Configure tab of the AzureProtectClient application in AAD.
- AADWebApplicationAppIdUri -- This is the App Id Uri value found on the Configure tab of the AzureProtectAMS application in AAD, and is also the App Url on the Identity tab, under the Windows Azure Active Directory section, for the AzureProtect AMS.
The code request in Listing 2 calls AcquireTokenAsync in order to prompt the user to sign in and retrieve an AAD token, which can be used to grant access to the AzureProtect AMS:
Listing 2: Code Request to Call AcquireTokenAsync
private const string AADBaseTokenUrl= "https://login.windows.net/{0}";

private const string AADTenant = "azureprotectdir.onmicrosoft.com";
private const string AADClientApplicationClientId = "9a64afc0-2f00-4f78-b78e-8dd35e280d88";
private const string AADWebApplicationAppIdUri = "https://azureprotect.azure-mobile.net/login/aad";

private async void AuthenticateClick(object sender, RoutedEventArgs e)
{
  var authority = String.Format(CultureInfo.InvariantCulture, AADBaseTokenUrl, AADTenant);
  var authContext = new AuthenticationContext(authority);

  var returnUri = WebAuthenticationBroker.GetCurrentApplicationCallbackUri();

  var token = await authContext.AcquireTokenAsync(AADWebApplicationAppIdUri,
    AADClientApplicationClientId, returnUri);
  Debug.WriteLine(token);
}
There are two additions to be made to the code in Listing 2. The first is to prefix the call to AcquireTokenAsync with a call to AcquireTokenSilentAsync, as shown here:
var token = await authContext.AcquireTokenSilentAsync(AADWebApplicationAppIdUri, AADClientApplicationClientId);
if (token != null && token.Status == AuthenticationStatus.Success)
{
  Debug.WriteLine(token);
}
else
{
  token = await authContext.AcquireTokenAsync(AADWebApplicationAppIdUri,
    AADClientApplicationClientId, returnUri);
  Debug.WriteLine(token);
}
This means that if the user has previously authenticated, and assuming the previous token hasn't expired or been invalidated, a cached token will be returned without the user having to sign in again.
The second addition is a call to actually log in to the AzureProtect AMS by calling the LoginAsync method on the existing MobileServiceClient instance:
var payload = new JObject();
payload["access_token"] = token.AccessToken;

var msres = await App.MobileService.LoginAsync(
  MobileServiceAuthenticationProvider.WindowsAzureActiveDirectory, payload);
Debug.WriteLine(msres!=null);
The process for authenticating the Windows Phone application is very similar in that it acquires an AAD token and then calls the LoginAsync method on the MobileServiceClient object. However, the WebAuthenticationBroker for Windows Phone, which is used under the hood to host the sign-in page for AAD when acquiring a token, behaves slightly differently.
Rather than being able to await the result of the AcquireTokenAsync method, the corresponding call for Windows Phone is AcquireTokenAndContinue, which uses the concept of continuation instead. This allows for the fact that the Windows Phone application may be suspended while the WebAuthenticationBroker is authenticating the user. When completed the Windows Phone application is activated with the resulting token being passed back into the application via the OnActivated method on the Application object. Rather than having to write all the logic to handle the continuation arguments, there is a (ContinuationManager class, which can be added to the code base. That means only the additions in Listing 3 need to be made to App.xaml.cs.
Listing 3: Additions To Be Added to App.xaml.cs
private Frame CreateRootFrame()
{
  Frame rootFrame = Window.Current.Content as Frame;

  if (rootFrame == null)
  {
    rootFrame = new Frame();
    rootFrame.Language = Windows.Globalization.ApplicationLanguages.Languages[0];
    Window.Current.Content = rootFrame;
  }

  return rootFrame;
}

private ContinuationManager continuationManager;
protected override async void OnActivated(IActivatedEventArgs e)
{
  base.OnActivated(e);


  Frame rootFrame = CreateRootFrame();

#if WINDOWS_PHONE_APP
  continuationManager = new ContinuationManager();
  var continuationEventArgs = e as IContinuationActivatedEventArgs;
  if (continuationEventArgs != null)
  {
    Frame scenarioFrame = Window.Current.Content as Frame;
    if (scenarioFrame != null)
    {
      // Call ContinuationManager to handle continuation activation
      continuationManager.Continue(continuationEventArgs, scenarioFrame);
    }
  }
#endif
  if (rootFrame.Content == null)
  {
    rootFrame.Navigate(typeof(MainPage), e);
  }
  Window.Current.Activate();
}
The MainPage.xaml.cs, which is in the shared project, can be updated with refactored code handling both Windows and Windows Phone authentication flows, as shown in Listing 4.
Listing 4: Updating MainPage.xaml.cs with Refactored Code
private const string AADBaseTokenUrl = "https://login.windows.net/{0}";

private const string AADTenant = "azureprotectdir.onmicrosoft.com";
private const string AADClientApplicationClientId = "9a64afc0-2f00-4f78-b78e-8dd35e280d88";
private const string AADWebApplicationAppIdUri = "https://azureprotect.azure-mobile.net/login/aad";

private AuthenticationContext authContext;

private async void AuthenticateClick(object sender, RoutedEventArgs e)
{
  var authority = String.Format(CultureInfo.InvariantCulture, AADBaseTokenUrl, AADTenant);
#if WINDOWS_PHONE_APP
  authContext = await AuthenticationContext.CreateAsync(authority);
#else
  authContext = new AuthenticationContext(authority);
#endif

  var returnUri = WebAuthenticationBroker.GetCurrentApplicationCallbackUri();

  AcquireTokenAsync(returnUri);
}

private async void AcquireTokenAsync (Uri returnUri)
{
  var token = await authContext.AcquireTokenSilentAsync(AADWebApplicationAppIdUri,
    AADClientApplicationClientId);
  if (token != null && token.Status == AuthenticationStatus.Success)
  {
    Debug.WriteLine(token);
  }
  else
  {
#if WINDOWS_PHONE_APP
    authContext.AcquireTokenAndContinue(AADWebApplicationAppIdUri,
      AADClientApplicationClientId,returnUri,LoginAsync);
    return;

#else
  token =
    await
      authContext.AcquireTokenAsync(AADWebApplicationAppIdUri, AADClientApplicationClientId,
        returnUri);
    Debug.WriteLine(token);
#endif
  }
  LoginAsync(token);
}

private async void LoginAsync(AuthenticationResult token)
{
  var payload = new JObject();
  payload["access_token"] = token.AccessToken;

  var msres = await App.MobileService.LoginAsync(
    MobileServiceAuthenticationProvider.WindowsAzureActiveDirectory, payload);
  Debug.WriteLine(msres != null);
}


#if WINDOWS_PHONE_APP
#region IWebAuthenticationContinuable implementation

// This method is automatically invoked when the application is
// reactivated after an authentication interaction through WebAuthenticationBroker.
public async void ContinueWebAuthentication(WebAuthenticationBrokerContinuationEventArgs args)
{
  // Pass the authentication interaction results to ADAL,
  // which will conclude the token acquisition operation and
  // invoke the callback specified in AcquireTokenAndContinue.
  await authContext.ContinueAcquireTokenAsync(args);
}
#endregion
#endif
Azure Active Directory is an important component when delivering enterprise applications for Windows and Windows Phone because it allows an organization to extend the reach of single sign-on to any number of cloud-based services. In this article, I've shown how you can configure Windows and Windows Phone applications to use Azure Active Directory to authenticate a user before authorizing (that is, logging in to) Azure Mobile Services.
The next step is to use the Active Directory Authentication Library to add authorization checks to each of the mobile services. This can not only be used to confirm that a valid user is accessing the service but it can be used to restrict access to a specific subset of users if required.