Practical .NET
SpecFlow 2, Part Two: Gherkin Steps
In part 2, Jason will map the business-readable tests we created last time to test automation code.
- By Jason Roberts
- 04/13/2016
Last time, I introduced SpecFlow 2 and showed how to use it with the Gherkin business-readable, domain-specific language. I also offered up an example scenario (see Listing 1) to show how tests can be written in a higher-level, business-readable way. I'll take it another step and show how these high-level scenarios map to test automation code.
Creating Step Definitions
The steps in a scenario map to C# methods. It's inside these C# methods that the automation code is written. The "Add two numbers" scenario in Listing 1 has steps, each step (line) in the scenario will map to a separate method (though C# methods can be shared across steps to reduce maintenance overheads).
Listing 1: A Gherkin Feature
Feature: Calculator
  In order to make it easier on my brain
  As someone who is not good at mental arithmetic
  I want to use the computer to do basic maths

Scenario: Add two numbers
  Given The calculator is reset
  When I enter 40
    And I Add 20
  Then The value should be 60
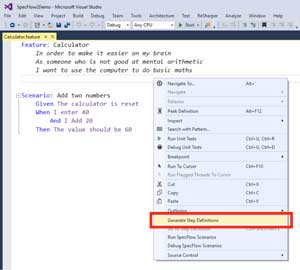
One of the features of the Visual Studio IDE integration is the ability to generate an initial steps definition class from a feature file. To do this, right-click in the feature file and in the context menu that appears, choose Generate Step Definitions, as shown in Figure 1.
 [Click on image for larger view.]
Figure 1. Generating Step Definitions
[Click on image for larger view.]
Figure 1. Generating Step Definitions
Choosing this option will bring up a dialog box with a number of options, as shown in Figure 2.
 [Click on image for larger view.]
Figure 2. Generate Steps Definition Dialog Box
[Click on image for larger view.]
Figure 2. Generate Steps Definition Dialog Box
Clicking the generate button will create a new C# class file that will be added to the Visual Studio project. This file (Listing 2) has the methods that map to the scenario steps in the feature file.
Listing 2: Generated Step Definition File
using System;
using TechTalk.SpecFlow;

namespace SpecFlow2Demo
{
  [Binding]
  public class CalculatorSteps
  {
    [Given(@"The calculator is reset")]
    public void GivenTheCalculatorIsReset()
    {
      ScenarioContext.Current.Pending();
    }

    [When(@"I enter (.*)")]
    public void WhenIEnter(int p0)
    {
      ScenarioContext.Current.Pending();
    }

    [When(@"I Add (.*)")]
    public void WhenIAdd(int p0)
    {
      ScenarioContext.Current.Pending();
    }

    [Then(@"The value should be (.*)")]
    public void ThenTheValueShouldBe(int p0)
    {
      ScenarioContext.Current.Pending();
    }
  }
}
There are a number of different ways that scenario steps map to C# methods. In Listing 2 the method being used is the attribute binding style. The [Given] [When] and [Then] attributes take a regular expression as a parameter; if this regular expression matches the text in the scenario then the method will be executed when that step executes.
Parameterized Step Definition Methods
In Listing 2 the When steps are parameterized. The regular expression contains "(.*)" that will match a value from the step text and parse it into a value that gets supplied to the parameter in the C# method. For example, taking the step text "When I enter 40," the "40" will be extracted by the regular expression in the "[When(@"I enter (.*)")]" step. SpecFlow will parse this and provide it to the p0 parameter in the "public void WhenIEnter(int p0)" method.
Adding Test Automation Code
Now that there are matching step definitions, the automation code can be written.
Listing 3 shows the Calculator class that's being tested.
Listing 3: Testing Calculator Class
namespace SpecFlow2Demo
{
  public class Calculator
  {
    public int Value { get; set; }

    public void Add(int number)
    {
      Value += number;
    }
  }
}
Listing 4 shows the completed step definitions with automation code added. Notice that the parameter names in the methods have been renamed from the default "p0" to something more readable.
Listing 4: Test Automation Code Added
using System;
using TechTalk.SpecFlow;
using Xunit;

namespace SpecFlow2Demo
{
  [Binding]
  public class CalculatorSteps
  {
    private Calculator _calculator;

    [Given(@"The calculator is reset")]
    public void GivenTheCalculatorIsReset()
    {
      _calculator = new Calculator();
    }

    [When(@"I enter (.*)")]
    public void WhenIEnter(int numberToEnter)
    {
      _calculator.Value = numberToEnter;
    }

    [When(@"I Add (.*)")]
    public void WhenIAdd(int numberToAdd)
    {
      _calculator.Add(numberToAdd);
    }

    [Then(@"The value should be (.*)")]
    public void ThenTheValueShouldBe(int expectedResult)
    {
      Assert.Equal(expectedResult, _calculator.Value);
    }
  }
}
Executing Tests with Visual Studio Test Explorer
Now that the test automation code is written, the scenario can be executed. The Visual Studio Test Explorer can be used to execute the tests (once the relevant test runner NuGet package has been installed) or by third-party commercial runners such as ReSharper or the SpecFlow+ Runner.
Once the NuGet runner package has been installed (for example, the "xunit.runner.visualstudio" package) the project can be built and the scenarios executed in the Test Explorer window, as shown in Figure 3.
 [Click on image for larger view.]
Figure 3. Executing Scenarios Using Visual Studio Test Explorer
[Click on image for larger view.]
Figure 3. Executing Scenarios Using Visual Studio Test Explorer
Executing the AddTwoNumbers test will execute each of the bound Given, When and Then step definitions in turn. If the "Assert.Equal(expectedResult, _calculator.Value);" in the Then step passes, then the test will pass and change to green Test Explorer.