Wahlin on .NET
Silverlight Control Touch Up in Blend
How to clean up the disabled state of a Silverlight control using Expression Blend.
Silverlight provides the ultimate in flexibility when it comes to styling controls. If you don’t like how something looks you can tweak the template in a tool like Expression Blend and quickly get something completely different. This article is geared for developers who may just be getting into Silverlight. My goal is to demonstrate how easy it is to change controls using a simple example that I went through on a client application. Let’s start out by talking about the problem being solved.
Being able to change the template of a control comes in handy when you don’t like the built-in style used by the framework. I’m working on a menu used in a client application and the disabled state of the HyperlinkButton control wasn’t looking good. I wasn’t looking to do anything fancy, but I did want to make it obvious that the control was disabled, while still making it easy for the end user to read the text. Figure 1 shows what the menu looked like when two HyperLinkButton controls were disabled using the built-in control template:

[Click on image for larger view.] |
| Figure 1. |
The “Edit Job” and “Job Plan” hyperlinks look pretty bad in my opinion. As mentioned earlier, Silverlight allows any control to be changed by simply modifying the control’s template. The easiest way to do this is to use Expression Blend, although you can do it in Visual Studio 2008 by hand as well. When the control you want to tweak is placed on the Blend design surface, you can right-click on it and select Edit Template > Edit a Copy:
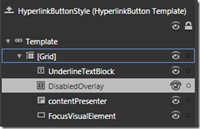
From there you can give the new style a name in the Create Style Resource dialog box, specify where it should be stored and then click OK. Once the style is created, you’ll be able to see it in Blend and locate an element named DisabledOverlay (see Figure 2). In my case this was the culprit of the ugliness.
[Click on image for larger view.] |
| Figure 2. |
I ended up adjusting the Foreground color of the DisabledOverlay to black and set the Opacity to .4 using the properties window. However, doing that isn’t quite enough. The HyperlinkButton template places the DisabledOverlay TextBlock over the actual link content when the control is disabled. That’s why you get the semi blurry effect, because two pieces of text are showing.
I decided I wanted to hide the contentPresenter element when the control was disabled and show the DisabledOverlay instead since it looked a lot cleaner. Fortunately that’s quite easy to do. Internally the control template uses the VisualStateManager to show and hide the DisabledOverlay. I went into the disabled state and changed it to hide the contentPresenter. That’s done by clicking on the States tab followed by the Disabled state.
Any changes you make to the contentPresenter are now tracked for that state. So I clicked on contentPresenter and then set the Visibility property to Collapsed for the Disabled state. Doing that modifies the disabled state. Listing 1 below shows what the XAML looks like (I cleaned it up slightly). You can see that it causes the contentPresenter’s Visibility to be set to Collapsed:
‹VisualState x:Name="Disabled"›
  ‹Storyboard›
    ‹ObjectAnimationUsingKeyFrames
      Storyboard.TargetName="DisabledOverlay"
      Storyboard.TargetProperty="Visibility" Duration="0"›
      ‹DiscreteObjectKeyFrame KeyTime="0"›
        ‹DiscreteObjectKeyFrame.Value›
          ‹Visibility›Visible‹/Visibility›
        ‹/DiscreteObjectKeyFrame.Value›
      ‹/DiscreteObjectKeyFrame›
    ‹/ObjectAnimationUsingKeyFrames›
    ‹ObjectAnimationUsingKeyFrames
      Storyboard.TargetName="contentPresenter"
      Storyboard.TargetProperty="Visibility" Duration="0"›
      ‹DiscreteObjectKeyFrame KeyTime="0"›
        ‹DiscreteObjectKeyFrame.Value›
          ‹Visibility›Collapsed‹/Visibility›
        ‹/DiscreteObjectKeyFrame.Value›
      ‹/DiscreteObjectKeyFrame›
    ‹/ObjectAnimationUsingKeyFrames›
  ‹/Storyboard›
‹/VisualState›
‹/VisualStateGroup›
Listing 1: XAML code generated by changing VisualStateManager states.
From there I applied the style and newly created template to each HyperlinkButton control:
‹HyperlinkButton Style="{StaticResource MenuHyperlinkButtonStyle}" Content="Job Plan" /›
The end result is a menu that looks much better (in my opinion anyway) when the controls are disabled. Here’s a before and after look at how the control:
Before:

[Click on image for larger view.] |
| Figure 3. |
After:

[Click on image for larger view.] |
| Figure 4. |
This is a really simple example of modifying control templates. But you can literally tweak any aspect of a control to get things looking just like you want them to look.
About the Author
Dan Wahlin (Microsoft MVP for ASP.NET and XML Web Services) is the founder of The Wahlin Group which specializes in .NET and SharePoint onsite, online and video training and consulting solutions. Dan also founded the XML for ASP.NET Developers Web site, which focuses on using ASP.NET, XML, AJAX, Silverlight and Web Services in Microsoft's .NET platform. He's also on the INETA Speaker's Bureau and speaks at conferences and user groups around the world. Dan has written several books on .NET including "Professional Silverlight 2 for ASP.NET Developers," "Professional ASP.NET 3.5 AJAX, ASP.NET 2.0 MVP Hacks and Tips," and "XML for ASP.NET Developers." Read Dan's blog here.