Code Focused
How to Validate Forms with ASP.NET MVC 2 Data Annotations
Simplify the task of validating Web form input by using attributes. If standard validators don't meet your needs, you can create custom data annotations for richer validations.
The movement toward declarative statements over detailed procedural programming and convention over configuration signify growing trends in application development. Declarative statements instruct the compiler more on what to do and less on how to do it. "Convention over configuration" refers to the practice of organizing and naming application elements in a predictable and expected manner so that the desired behavior can be inferred by the compiler. Both of these practices result in increased developer productivity and reduced complexity by offloading routine tasks to the compiler. Developers should welcome these changes and strive to take full advantage of them.
Data Annotations, introduced in version 2 of the Microsoft ASP.NET Model-View-Controller (MVC) platform, offer a declarative way to validate Web form fields and provide important error messages to users when necessary. In this article, we'll look at the standard validators in the ASP.NET MVC 2 platform and demonstrate the development of a custom validator that works at both the client level with JavaScript and the server level with managed code. You'll see how easily a functional Web site can be built by taking advantage of the convention over configuration provided by ASP.NET MVC 2.
Basic CRUD Applications
First, let's move through the process of building a standard ASP.NET MVC 2 Web application that provides basic Create Read Update Delete (CRUD) capabilities (the full source code of the sample application is available for download). The Visual Basic sample application was developed in Visual Studio 2010 and ASP.NET MVC 2, which is part of the Microsoft .NET Framework 4.
Select the ASP.NET MVC 2 Web Application template from the New Project dialog. Although you won't be building unit tests in this article, we recommend always responding yes to the Create Unit Test Project dialog for easier unit test coding at a later date.
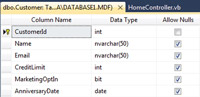
Right-click the App_Data folder, add new item and select the SQL Server Database template. Using Server Explorer, create a Customer table with the fields as shown in Figure 1. The CustomerId field is an identity seed column and must be marked as the primary key. Create a few rows of data for the Web site to work with when completed.
[Click on image for larger view.] |
| Figure 1. Customer table fields. |
LINQ to SQL is a quick way to build interaction with the database. Right-click the Model folder and create a data context by choosing the LINQ to SQL Classes template. Add the Customer table by dragging it from the Server Explorer to the LINQ to SQL design surface. Use the SQLMetal utility to create a data context for any non-trivial database. More information on LINQ to SQL and SQLMetal can be found in Roger Jennings' cover story, "Speed O/R Mapping with LINQ to SQL" (December 2008).
Controller and Action Methods
Add a controller named CustomerController, which will perform the interactions between the customer table and its related Web pages. Right-click the Controller folder and choose Add Controller or use the keyboard shortcut of Ctrl+M, Ctrl+C. Be sure to check the option "Add action methods for Create, Update, Delete and Details scenarios" of the resulting Add Controller dialog. This creates the scaffolding for all the action methods required for a simple CRUD controller. At this point, build the solution. This is an important step, required to see strongly typed classes in the Add View dialog box in the following step.
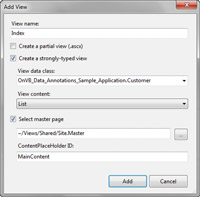
At the start of the Controller source, add Imports Models. Create Web page views for each of the actions defined within the CustomerController. Place your cursor within an action method in the CustomerController then right-click and choose Add View or use the keyboard shortcut Ctrl+M, Ctrl+V. Figure 2 shows how to create a strongly-typed List view for the Index action. Similarly, create strongly typed views for the other GET actions, using the corresponding View Content for each action. You should now have Create, Delete, Details, Edit and Index .ASPX files in the Customer folder within the Views folder. This ability to create default controllers and views is convention over configuration at work for you.
[Click on image for larger view.] |
| Figure 2. Create a strongly typed List view for the customer Index action. |
Complete the basic ASP.NET MVC 2 Web site by adding LINQ to SQL code to interact with the database. Listing 1 shows the code for the Index method that lists customers and the Edit methods that retrieve an existing customer for editing and updating; see the sample application online for the remaining controller methods.
To force the application to start with the Customer List page, add the statement Return RedirectToAction("Index", "Customer") as the only statement in the Index method of the HomeController.vb file.
For a production application, it would be appropriate at this point to clean up the Views by removing the prompt for the CustomerId field (it's automatically generated by the database), change the MarketingOptIn field to a checkbox and generally modify the Views to be more visually attractive. For our purposes, what we have now is sufficient to proceed to the discussion of validation with data annotations.
Why Data Annotations?
Data validation rightfully should be the concern of the Model. Unfortunately, the form data resides with the View. The ModelState property of the controller tracks errors to populate the next view. This makes data validation in ASP.NET MVC 1 particularly challenging. A quick look at the "Validating with a Service Layer" tutorial shows just how involved this can get.
DataAnnotations introduced in ASP.NET MVC 2 greatly simplify the task of validating the form input by using attributes. They also reduce code and ease application maintenance. DataAnnotations have the nice feature of automatically generating client-side JavaScript validations for the four built-in validation attributes. If the standard validators don't meet your needs, you can create custom validations and implement a wide variety of validation actions such as a database lookup, a Web service call, cross-field validations and so on.
Standard Data Annotations
Data Annotations are attributes that can be applied to the class properties of the objects that are represented in the Web form, similar to the <HttpPost()> attribute in Listing 1. By applying these attributes, you can specify which validations are appropriate for the particular field. Both server-side and optional client-side JavaScript validations are supported. The included standard validation annotations are Required, StringLength, RegularExpression and Range.
Each annotation provides parameters for a custom error message and resource support to optionally globalize the error message. In addition, the Required annotation provides a Boolean flag to allow empty strings. The StringLength annotation provides parameters for a maximum length and a minimum length. The RegularExpression annotation provides a parameter for the Regex match pattern. The Range annotation provides a lower limit and an upper limit parameter (both of the double numeric type, but able to support other data types). A Range annotation of DateTime type is shown on AnniversaryDate in Listing 2.
You may put multiple validation attributes on a single data field. The validations occur in the following order: Required, Custom Validation Attribute, StringLength, Range and, finally, RegularExpression.
You can't directly annotate the customer table in the DataClasses1.designer.vb file as produced by the LINQ to SQL design surface because it would be overwritten by any subsequent change to the designer. The solution is to create a "buddy" class called CustomerMetaData, which has public properties with the same field names. You can now put data annotation validators on these properties. To relate this new class back to Customer, create a partial customer class and decorate it with a MetadataType attribute of type CustomerMetaData, as shown in Listing 2.
Right-click the Models folder and add a new class named DataAnnotations.vb to hold the data annotations for all of your tables. Replace the default code with the code as shown in Listing 2.
The data type of each property in CustomerMetaData is ignored; we express the data type as Object for consistency and to avoid confusion if the underlying type changes.
If a field doesn't need validation, it doesn't need to appear in the CustomerMetaData class. Additional MetadataType classes can be defined for other tables in the database in a similar fashion.
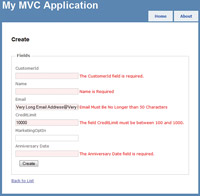
With these changes, error messages are shown after entering intentionally incorrect responses on the Create Customer form, as shown in Figure 3. The ModelState.IsValid method is false when any validations fail and should always be checked as shown in the Edit method of Listing 1.
[Click on image for larger view.] |
| Figure 3. Validation errors from the standard data annotations. |
For a more responsive UI, client-side JavaScript validations can be enabled in a view with a single line of HTML markup and the inclusion of three script tags. Add the line below just before the Html.BeginForm() tag in the view:
<% Html.EnableClientValidation()%>
Then add the following three script tags to the end of the View. An easy way to do this is to drag them over from the Scripts folder into the View markup:
    <!-- Drag and drop these here from the Scripts folder of the
      Solution Explorer -->
    <script src="../../Scripts/MicrosoftAjax.js"
      type="text/javascript"></script>
    <script src="../../Scripts/MicrosoftMvcAjax.js"
      type="text/javascript"></script>
    <script src="../../Scripts/MicrosoftMvcValidation.js"
      type="text/javascript"></script>
;
Custom Data Annotations
Professional-grade Web forms may require more advanced validation than what's available from the standard validators. Custom validators can be defined server-side and optionally client-side with custom JavaScript. An appropriate use of custom validators would be to overcome the limitation that attribute parameters must be constants. To perform a validation with a dynamic range of values, we must create a custom validator.
The custom validator WithinDays, which replaces the Range attribute, ensures the AnniversaryDate is within 30 days of the current date. This is shown in Listing 3. More complex validators are certainly possible but this will suffice as an example.
Creating a custom validator for both server-side and client-side consists essentially of three steps. First, create a class that inherits from ValidationAttribute to define the server-side validation by overriding the IsValid() function. Second, create the JavaScript to perform the validation in the browser. Third, create a class that inherits from DataAnnotationsModelValidator to identify the custom JavaScript as a validation rule and associate it with its server-side equivalent.
Server-Side Custom Data Annotation
The code in Listing 3 is added just before the last line of Listing 2, after the CreditLimit property. In Listing 3, the AnniversaryDate property has been extended with our custom WithinDays() validator in place of the Range() validator. This custom validator inherits from the ValidationAttribute class and overrides the IsValid() method. This is the place where you code your custom business-validation rules and return true if the field meets the requirements to be considered valid.
In addition, the DisplayName attribute has been added for a slightly more attractive error message and the DisplayFormat attribute has been added to suppress the display of the time portion of the Anniversary Date. You'll need to change the HTML markup for the Anniversary Date from TextBoxFor to EditorFor in the View for it to honor the DisplayFormat attribute, as shown here:
<%: Html.EditorFor(Function(model) model.AnniversaryDate,
String.Format("{0:g}", Model.AnniversaryDate))%>
Client-Side Custom Data Annotation
The custom JavaScript to perform the WithinDays validation in the client browser is shown in Listing 4. The code is assigned as a member of Sys.Mvc.ValidatorRegistry.validators, identified by withindays. It accepts a single parameter of type ModelClientValidationRule named "rule," which contains the attribute parameters defined in the WithinDaysValidator class shown in Listing 5, and provides a mechanism for returning an error message if appropriate.
Now we're ready to add a WithinDaysValidator class at the end of the DataAnnotations.vb file, as seen in Listing 5. This class identifies the custom JavaScript as a validation rule and associates it with its server-side equivalent.
Finally, the custom attribute needs to be registered in the Global.asax as a member of the DataAnnotationsModelValidatorProvider, as shown by the last statement of the Application_Start() method of Listing 6.
Go ahead and build the project and run it to test out the new custom validator; check out the client-side validation. Note that the date validator expects input in the format of mm/dd/yyyy. As soon as you tab out of a field, the validator is instantly called and you'll see an error message. When you go back to the field, it validates on every keyup event.
It's worthwhile to note that the client-side validations don't have to be an exact replica of the server validations. A good rule of thumb is to treat client validations as a quick check -- a first line of defense. Then, when the user posts the form, more complete server-side validations can be put in place. Also note that client validations are just a convenience to the user, and shouldn't be trusted. It's the server validations that have the final say on the veracity of the data.
Room for Improvement
ASP.NET MVC is still a young and evolving Web application-development platform. While preparing this article, we identified a few issues of which you should be aware:
- The RegularExpression attribute has limitations. RegularExpression pattern-matching options such as ignorecase are absent from the implementation. These can be specified inside a parenthesized group as a modifier; however, client-side JavaScript (ECMAScript) doesn't support them, therefore they don't translate well if you want to do client-side validations. So, if you need an ECMAScript-incompatible regular expression and have client validation enabled, you'll need to create a custom validator.
- The DisplayFormat attribute doesn't emit the correct helper methods in the generated views. You'll have to manually change the helper method to use EditorFor templates.
- The Range attribute for Date type doesn't work with client-side validation. A custom validator such as the one we created may be a better solution, but it does require additional coding.
- If you override the default error message in a custom validator, the error message doesn't propagate into the client-side validations. Only an explicitly specified error message parameter in the attribute propagates.
- Putting the StringLength attribute on a field that's associated with an underlying numeric data type gives an InvalidCastException error.
- The default validators don't allow for non-string literal error messages.
- If a validation attribute is applied to a collection type, you can only apply the exact same validation rules to each item of the collection.
The ASP.NET MVC 3.0 preview is already out and has many nice features and additions. Hopefully, it will address some of these issues in its final release.
In this article we saw how quickly you can create a fully functional CRUD Web application using ASP.NET MVC 2. Version 2 introduces data annotations, which provide a non-procedural way to add common validations. Standard data annotations can provide commonly used declarative validation on HTML form fields. Custom data annotations can be created to provide richer validation rules for almost any needed rule.