C# Corner
ASP.NET MVC 6, Part 1: Tag Helpers
Clean up your Razor views with the new tag helpers in ASP.NET MVC 6.
Welcome to part one of two in a series on ASP.NET MVC 6. ASP.NET MVC 6 has some great new features to make developing enterprise-level Web applications easier. Here, I'll be covering the new Tag Helpers feature that can be used to clean up your Razor views.
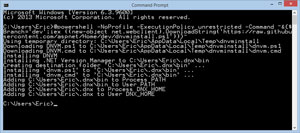
To get started, download Visual Studio 2015. The Community version of Visual Studio 2015 works fine for the sample application. Next, open up a command prompt and run the Powershell script in Figure 1 to install DNVM.
 [Click on image for larger view.]
Figure 1: Installing DNVM
[Click on image for larger view.]
Figure 1: Installing DNVM
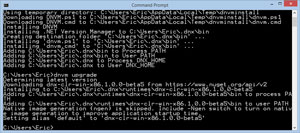
Next upgrade DNVM by running dnvm upgrade. as seen in Figure 2.
 [Click on image for larger view.]
Figure 2: DNVM Upgrade
[Click on image for larger view.]
Figure 2: DNVM Upgrade
Then run dnvm upgrade –u to install the latest unstable build of DNVM as seen in Figure 3.
 [Click on image for larger view.]
Figure 3: DNVM Upgrade to Unstable Build
[Click on image for larger view.]
Figure 3: DNVM Upgrade to Unstable Build
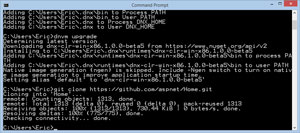
Next, clone the ASP.NET MVC 6 Home repository by running git clone https://github.com/aspnet/Home.git as seen in Figure 4.
 [Click on image for larger view.]
Figure 4: Git Clone of ASP.NET MVC 6 Repository
[Click on image for larger view.]
Figure 4: Git Clone of ASP.NET MVC 6 Repository
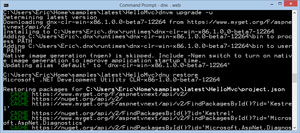
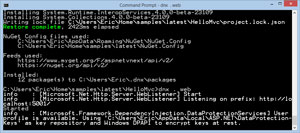
Then navigate to the Home/samples/latest/HelloMvc directory and run dnu restore from the command line. Once the restore is complete you can run the sample Website by running dnx . web as seen in Figure 5.
 [Click on image for larger view.]
Figure 5: Running Website in DNVM
[Click on image for larger view.]
Figure 5: Running Website in DNVM
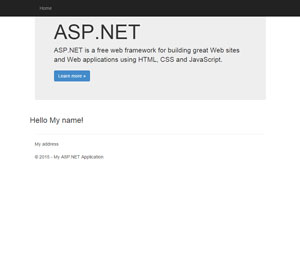
You should now be able to navigate to the hosted Website at http://localhost:5001 as seen in Figure 6.
 [Click on image for larger view.]
Figure 6: Running ASP.NET MVC 6 Hello Mvc App
[Click on image for larger view.]
Figure 6: Running ASP.NET MVC 6 Hello Mvc App
Now let's edit the HelloMvc application to see Tag Helpers in action. Open up the Home/samples/latest/HelloMvc/HelloMvc.xproj file within Visual Stuio 2015. To enable Tag Helpers support open up the project.json file and add the following two dependencies:
"Microsoft.AspNet.Mvc.TagHelpers": "6.0.0-beta7-14347",
"Microsoft.AspNet.Tooling.Razor" : "1.0.0-beta7-13639"
Your updated project.json file should now resemble Listing 1.
Listing 1: Updated project.json with Tag Helpers References
{
  "version": "1.0.0-*",
  "webroot": "wwwroot",
  "exclude": [
    "wwwroot"
  ],
  "packExclude": [
    "**.kproj",
    "**.user",
    "**.vspscc"
  ],
  "dependencies": {
    "Kestrel": "1.0.0-*",
    "Microsoft.AspNet.Diagnostics": "1.0.0-*",
    "Microsoft.AspNet.Mvc": "6.0.0-*",
    "Microsoft.AspNet.Server.IIS": "1.0.0-*",
    "Microsoft.AspNet.Server.WebListener": "1.0.0-*",
    "Microsoft.Framework.Logging.Console": "1.0.0-*",
    "dnx.host": "1.0.0-beta7-12264",
    "Microsoft.Framework.PackageManager": "1.0.0-beta7-12264",
    "Microsoft.AspNet.Mvc.TagHelpers": "6.0.0-beta7-14347",
    "Microsoft.AspNet.Tooling.Razor" : "1.0.0-beta7-13639"
  },
  "commands": {
    "web": "Microsoft.AspNet.Hosting --server Microsoft.AspNet.Server.WebListener --server.urls http://localhost:5001",
    "kestrel": "Microsoft.AspNet.Hosting --server Kestrel --server.urls http://localhost:5004"
  },
  "frameworks": {
    "dnx451": { },
    "dnxcore50": { }
  }
}
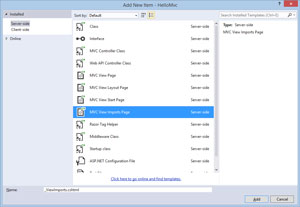
Next add a View Import Razor partial as seen in Figure 7.
 [Click on image for larger view.]
Figure 7: Adding View Imports Page
[Click on image for larger view.]
Figure 7: Adding View Imports Page
Then open the _ViewImports.cshtml partial and add the following line to enable Tag Helpers supports in all views:
@addTagHelper "*, Microsoft.AspNet.Mvc.TagHelpers"
You will need to stop the app by pressing Ctrl+C in the command prompt. Then run dnu restore to install Tag Helpers and finally re-run the app with dnx . web again.
Now that the app is running with Tag Helpers support let's add a simple Tag Helper to test it. Open up the _Layout.cshtml file again and change the <a href="/" >Home </a > anchor tag to:
<a asp-action="Index" asp-controller="Home">Home</a>
The old way to create the same link using an Html Helper is:
@Html.ActionLink("Home", "Index", "Home")
As you can see the Tag Helper implementation is easier for a designer to read and looks like regular HTML compared to the Html ActionLink helper method approach. Beyond hyperlink generation there are also many other Tag Helpers for form generation that really clean up your Razor views.
Now let's take a look at the Tag Helpers for form generation. The sample form will submit the user's name, address, and age to the server, report back any errors, and display a success message for a valid user.
First open up Index.cshtml and then add the following Razor code to display the success message:
 <div class="row" >
    @if(!String.IsNullOrWhiteSpace(ViewBag.Success)){
        <div class="alert alert-success" role="alert" >@ViewBag.Success </div >
}
Then I add the form that performs a POST to the CreateUser action on the Home Controller:
<form asp-controller="Home" asp-action="CreateUser" method="post" class="form-horizontal" role="form">
Next I add the validation summary to the form:
<div asp-validation-summary="ValidationSummary.All" class="text-danger"></div>
Then I add the form label, text box, and validation span for the user's name:
 <div class="form-group">
     <label asp-for="Name" class="col-md-2 control-label"></label>
     <div class="col-md-10">
         <input asp-for="Name" class="form-control" />
         <span asp-validation-for="Name" class="text-danger"></span>
     </div>
 </div>
Next I add the form label, text box, and validation message for the user's address:
<div class="form-group">
     <label asp-for="Address" class="col-md-2 control-label"></label>
     <div class="col-md-10">
         <input asp-for="Address" class="form-control" />
         <span asp-validation-for="Address" class="text-danger"></span>
     </div>
 </div>
Next I add the form label, text box, and validation message for the user's age:
<div class="form-group">
    <label asp-for="Age" class="col-md-2 control-label"></label>
    <div class="col-md-10">
        <input asp-for="Age" class="form-control" />
        <span asp-validation-for="Age" class="text-danger"></span>
    </div>
</div>
Lastly I add the submit button for the form:
<div class="form-group">
    <div class="col-md-offset-2 col-md-10">
        <input type="submit" value="Save" class="btn btn-default" />
    </div>
</div>
See Listing 2 for the completed Index.cshtml Razor markup for the User form.
Listing 2: Completed Index.cshtml View for User Creation
@using MvcSample.Web.Models
@model User
@{
    Layout = "/Views/Shared/_Layout.cshtml";
    ViewBag.Title = "Home Page";
}

<div class="row">
    @if(!String.IsNullOrWhiteSpace(ViewBag.Success)){
        <div class="alert alert-success" role="alert">@ViewBag.Success</div>
}

    <form asp-controller="Home" asp-action="CreateUser" method="post" class="form-horizontal" role="form">
        <div asp-validation-summary="ValidationSummary.All" class="text-danger"></div>
        <div class="form-group">
            <label asp-for="Name" class="col-md-2 control-label"></label>
            <div class="col-md-10">
                <input asp-for="Name" class="form-control" />
                <span asp-validation-for="Name" class="text-danger"></span>
            </div>
        </div>
        <div class="form-group">
            <label asp-for="Address" class="col-md-2 control-label"></label>
            <div class="col-md-10">
                <input asp-for="Address" class="form-control" />
                <span asp-validation-for="Address" class="text-danger"></span>
            </div>
        </div>
        <div class="form-group">
            <label asp-for="Age" class="col-md-2 control-label"></label>
            <div class="col-md-10">
                <input asp-for="Age" class="form-control" />
                <span asp-validation-for="Age" class="text-danger"></span>
            </div>
        </div>
        <div class="form-group">
            <div class="col-md-offset-2 col-md-10">
                <input type="submit" value="Save" class="btn btn-default" />
            </div>
        </div>
    </form>
</div>
As you can see the Tag Helpers clean up the form markup quite a bit compared to the old HTML helper methods. The Tag Helpers are executed server-side just like the HTML helper methods but the resulting markup is much more concise and readable for designers and programmers alike.
Next update the User class to make the Age property a nullable integer:
public int? Age { get; set; }
The next step is to update the HomeController class. First I update the Index action to take a success message and put it into the ViewBag and return an empty view:
public IActionResult Index(string successMessage)
 {
     ViewBag.Success = successMessage;
     return View(new User());
 }
Then I add the CreateUser controller action that takes a User model. If the model state is valid it redirects to the Index action passing in a success mage of "Success". If the submitted user is invalid then the page is reloaded with any errors displayed:
public IActionResult CreateUser(User model)
 {
     if (ModelState.IsValid)
     {
         return RedirectToAction("Index", "Home", new { successMessage = "Success" });
     }
     return View("Index", model);
 }
See Listing 3 for the completed HomeController class:
Listing 3: Completed HomeController.cs
using Microsoft.AspNet.Mvc;
using MvcSample.Web.Models;

namespace MvcSample.Web
{
    public class HomeController : Controller
    {
        public IActionResult Index(string successMessage)
        {
            ViewBag.Success = successMessage;
            return View(new User());
        }

        public IActionResult CreateUser(User model)
        {
            if (ModelState.IsValid)
            {
                return RedirectToAction("Index", "Home", new { successMessage = "Success" });
            }
            return View("Index", model);
        }
    }
}
Next open up the _Layout.cshtml Razor view and add the following Style block under the Boostrap CSS include:
<style type="text/css">
     body {
       padding-top: 60px;
     }
 </style>
Your final _Layout.cshtml should look like Listing 4 now.
Listing 4: Completed _Layout.cshtml Razor View
<!DOCTYPE html>
<html>
<head>
    <meta charset="utf-8" />
    <meta name="viewport" content="width=device-width, initial-scale=1.0">
    <title>@ViewBag.Title - My ASP.NET Application</title>
    <link rel="stylesheet" href="//netdna.bootstrapcdn.com/bootstrap/3.0.3/css/bootstrap.min.css" />
    <style type="text/css">
        body {
          padding-top: 60px;
        }
    </style>
</head>
<body>
    <div class="navbar navbar-inverse navbar-fixed-top">
        <div class="container">
            <div class="navbar-header">
                <button type="button" class="navbar-toggle" data-toggle="collapse" data-target=".navbar-collapse">
                    <span class="icon-bar"></span>
                    <span class="icon-bar"></span>
                    <span class="icon-bar"></span>
                </button>
            </div>
            <div class="navbar-collapse collapse">
                <ul class="nav navbar-nav">
                    <li><a asp-action="Index" asp-controller="Home">Home</a></li>
                </ul>
            </div>
        </div>
    </div>
    <div class="container body-content">
        @RenderBody()
        <hr />
        <address>
            @if (@Model != null)
            {
                @Model.Address
            }
        </address>
        <footer>
            <p>© @DateTime.Now.Year - My ASP.NET Application</p>
        </footer>
    </div>
</body>
</html>
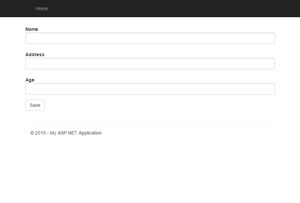
The sample application is now completed and you can create a new user as seen in Figure 8.
 [Click on image for larger view.]
Figure 8: Creating a New User
[Click on image for larger view.]
Figure 8: Creating a New User
Try to save an invalid user and get validation as seen in Figure 9.
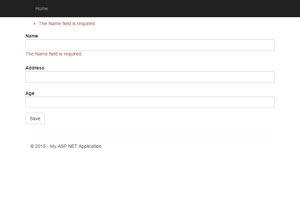 [Click on image for larger view.]
Figure 9: Trying to Save an Invalid User
[Click on image for larger view.]
Figure 9: Trying to Save an Invalid User
Lastly you can save a valid user as seen in Figure 10.
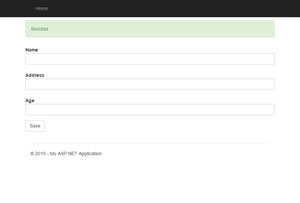 [Click on image for larger view.]
Figure 9: Redirect after a Successful User Submission
[Click on image for larger view.]
Figure 9: Redirect after a Successful User Submission
As you can see Tag Helpers are a nice new addition to ASP.NET MVC 6. ASP.NET MVC 6 takes a little bit of effort to set up but it's worth it.
Stay tuned to the next installment in the series, where I will cover how to create a custom Tag Helper and View Component to further clean up your Razor views.