The Data Science Lab
Image Classification Using Keras
Suppose you have a collection of digital photos you took on a trip to a zoo. You want to programmatically classify each photo as one of the 100 different kinds of animals you photographed: "aardvark," "zebra" and so on. This is an example of image classification. In this article I show you how to get started with image classification using the Keras code library.
Take a look at the demo program in Figure 1. The demo uses the well-known MNIST (modified National Institute of Standards and Technology) dataset, which has a total of 70,000 small images of handwritten digits from "0" to "9." The images are divided into a 60,000-item training set and a 10,000-item test set.
The demo program creates and trains a CNN (convolutional neural network). CNNs are deep neural networks that are designed specifically for image recognition. The trained model has 97.82 percent accuracy on the training images (58,692 correct and 1,308 wrong) and 98.71 percent accuracy on the test images.
After training, the demo uses the model to classify a dummy image that has a vertical stroke and a diagonal stroke from upper left to lower right. The raw prediction is (0.0, 0.0, 0.0, 0.0, 0.0, 0.0, 1.0, 0.0, 0.0, 0.0). The prediction vector has 10 values, where each corresponds to the probability of the digit "0" through "9." Because the value at [6] is the largest, the model's prediction is that the dummy digit image is a "6," which makes sense if you look closely.
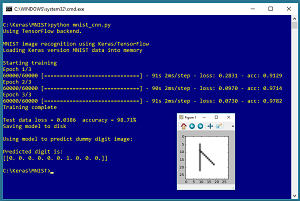 [Click on image for larger view.]
Figure 1. Image Classification on the MNIST Dataset Using Keras
[Click on image for larger view.]
Figure 1. Image Classification on the MNIST Dataset Using Keras
This article assumes you have intermediate or better programming skill with a C-family language and a basic familiarity with machine learning but doesn't assume you know anything about CNN networks. All the demo code is presented in this article. The source code is also available in the download that accompanies this article. All normal error checking has been removed to keep the main ideas as clear as possible.
Installing Keras
Keras is a code library that provides a relatively easy-to-use Python language interface to the relatively difficult-to-use TensorFlow library. Installing Keras involves three main steps. First you install Python and several required auxiliary packages such as NumPy and SciPy. Then you install TensorFlow and Keras as add-on Python packages.
Although it's possible to install Python and the packages required to run Keras separately, it's much better to install a Python distribution, which is a collection containing the base Python interpreter and additional packages that are compatible with each other. For my demo, I installed the Anaconda3 4.1.1 distribution (which contains Python 3.5.2), TensorFlow 1.7.0, and Keras 2.1.5.
The Demo Program
The structure of demo program, with a few minor edits to save space, is presented in Listing 1. I indent with two spaces rather than the usual four spaces to save space. And note that Python uses the "\" character for line continuation. I used Notepad to edit my program. Most of my colleagues prefer a more sophisticated editor, but I like the elegant simplicity of Notepad.
Listing 1: The Image Classification Demo Program Structure
# mnist_cnn.py
# uses built-in keras.datasets data

import numpy as np
import keras as K
import tensorflow as tf
import os
os.environ['TF_CPP_MIN_LOG_LEVEL']='2'
import matplotlib.pyplot as plt

def main():
  # 0. get started
  print("\MNIST image recognition using Keras/TensorFlow ")
  np.random.seed(1)
  tf.set_random_seed(1)

  # 1. load data into memory
  # 2. define and compile CNN model
  # 3. train model
  # 4. evaluate model
  # 5. save model
  # 6. use model to make a prediction
if __name__=="__main__":
  main()
The demo program is named mnist_cnn.py and it starts by importing the NumPy, Keras, TensorFlow, OS and PyPlot packages. You don't need to explicitly import TensorFlow, but the demo program does so just to be able set the global TensorFlow random seed. The OS package is used just to suppress an annoying startup message. The PyPlot package is used to visually display the dummy digit that's predicted by the model.
Loading Data into Memory
Working with the raw MNIST data is a bit difficult because it's saved in a binary and proprietary format. However, the Keras library has a built-in sub-module named datasets that can import the MNIST training and test datasets:
# 1. load data
print("Loading Keras version MNIST data into memory \n")
(train_x, train_y), (test_x, test_y) = K.datasets.mnist.load_data()
train_x = train_x.reshape(60000, 28, 28, 1).astype(np.float32)
test_x = test_x.reshape(10000, 28, 28, 1).astype(np.float32)
train_x /= 255; test_x /= 255
The load_data() function reads all 70,000 images into memory. Each image is 28 x 28 = 784 pixels. Each pixel is a grayscale integer value between 0 and 255. Each image has an associated label which is "0" through "9." After the training, the x-values are loaded into a 60,000 rows by 784 columns train_x object, then the object is reshaped to 60,000 x 28 x 28 x 1 because this is the format expected by a Keras CNN network. After reshaping, the values in the object are normalized to float32 type values between 0.0 and 1.0 because normalization makes training easier. The test_x values are reshaped and normalized in the same way as the train_x values.
The train_y and test_y values are encoded into a format required for a multiclass classification problem like so:
train_y = K.utils.to_categorical(train_y, 10).astype(np.float32)
test_y = K.utils.to_categorical(test_y, 10).astype(np.float32)
The to_categorial() function converts one of 10 discrete values to a one-hot format. For example, if an image has label "2," it will be converted to (0, 0, 1, 0, 0, 0, 0, 0, 0, 0).
Defining the CNN Model
The demo program creates a CNN model with the code shown in Listing 2. The CNN model consists of two convolution layers, followed by a pooling layer, followed by two dense (ordinary fully connected) layers. The flatten layer acts as a shape adapter between the second convolution layer and the first dense layer.
Listing 2: Creating the CNN Model
# 2. define model
init = K.initializers.glorot_uniform(seed=1)
model = K.models.Sequential()
model.add(K.layers.Conv2D(filters=32, kernel_size=(3,3),
  strides=(1,1), padding='same', kernel_initializer=init,
  activation='relu', input_shape=(28,28,1)))
model.add(K.layers.Conv2D(filters=64, kernel_size=(3,3),
  strides=(1,1), padding='same', kernel_initializer=init,
  activation='relu'))
model.add(K.layers.MaxPooling2D(pool_size=(2,2)))
model.add(K.layers.Dropout(0.25))
model.add(K.layers.Flatten())
model.add(K.layers.Dense(units=100, kernel_initializer=init,
  activation='relu'))
model.add(K.layers.Dropout(0.5))
model.add(K.layers.Dense(units=10, kernel_initializer=init,
  activation='softmax'))

model.compile(loss='categorical_crossentropy',
 optimizer='adadelta', metrics=['acc'])
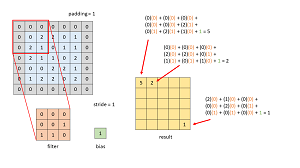
It is possible to create an MNIST image classification model by feeding the model one-dimensional vectors of 784 values. However, this approach isn't feasible for large images with millions of pixels, and doesn't take into account the two-dimensional structure of the pixel data, and doesn't handle images where the pixels are shifted horizontally or vertically. Convolution deals with all these issues. The image in Figure 2 illustrates how convolution works.
 [Click on image for larger view.]
Figure 2. Convolution
[Click on image for larger view.]
Figure 2. Convolution
The figure uses a dummy 5 x 5 image, shown in blue, with a 3 x 3 filter (also called a kernel) shown in orange. The filter starts in the upper left of the image, where the image has a one-pixel padding, shown in gray, on the edges. The figure shows how a value of 5 is computed into the upper left corner of the result. After applying the filter, convolution shifts the filter one pixel to the right. The shift distance is set by the strides parameter. When the filter reaches the end of a row, it is shifted down one pixel and repositioned at the beginning of the row. The net result of this convolution is a 5 x 5 matrix, shown in yellow.
If C represents a convolution layer, P for pooling, F for flatten, and D for dense, the demo model's architecture is C-C-P-F-D-D. All but three of these layers are optional. The most basic form of a CNN classifier is C-F-D. Designing an effective CNN architecture is problem-dependent and mostly a matter of trial and error guided by experience and intuition.
Training and Evaluating the CNN Model
The CNN image classification model is trained with these statements:
# 3. train model
bat_size = 128
max_epochs = 3  # too few
print("Starting training ")
model.fit(train_x, train_y, batch_size=bat_size,
  epochs=max_epochs, verbose=1)
print("Training complete")
The batch size, 128, is a hyperparameter and a good value must be determined by trial and error. The demo program uses an artificially small number of training epochs (three) to keep the size of the output display small. A more realistic value would be 10 to 100 epochs. The verbose=1 parameter tells Keras to display loss/error and current model accuracy on every training epoch.
After training completes, the model is evaluated:
# 4. evaluate model
loss_acc = model.evaluate(test_x, test_y, verbose=0)
print("\nTest data loss = %0.4f  accuracy = %0.2f%%" % \
  (loss_acc[0], loss_acc[1]*100) )
The evaluate() method returns a list of values where the first value at index [0] is always the (required) loss function. The remaining values are optional metrics specified in the call to the compile() method, in this case, just the classification accuracy at index [1].
Saving and Using the CNN Model
The trained model is saved using these statements:
# 5. save model
print("Saving model to disk \n")
mp = ".\\Models\\mnist_model.h5"
model.save(mp)
This code assumes there is a sub-directory named Models. Keras saves models in the hierarchical data format (HDF) version 5, which you can think of as somewhat similar to a binary XML. A saved model can be loaded from a different program using the keras.models.load() method. The demo program prepares and displays a new, previously unseen dummy digit like this:
# 6. use model
print("Using model to predict dummy digit image: ")
unknown = np.zeros(shape=(28,28), dtype=np.float32)
for row in range(5,23): unknown[row][9] = 180  # vertical line
for rc in range(9,19): unknown[rc][rc] = 250   # diagonal line
plt.imshow(unknown, cmap=plt.get_cmap('gray_r'))
plt.show()
The demo program concludes by making and displaying a prediction:
. . .
  unknown = unknown.reshape(1, 28,28,1)
  predicted = model.predict(unknown)
  print("\nPredicted digit is: ")
  print(predicted)
if __name__=="__main__":
  main()
In the reshape() function call, the first 1 argument is the number of images to predict, and the second 1 argument is the number of channels. A grayscale image has one channel, and an RGB color image has three channels.
The predicted digit is returned in raw form as an array of a vector of probabilities. You could write code that's a bit more user friendly:
lbls = ["zero", "one", "two", "three", "four", "five",
  "six", "seven", "eight", "nine"]
idx = np.argmax(predicted[0])
print(lbls[idx])
Because the return value from the call to the predict() method is an array-of-arrays-style matrix, the single vector of probabilities is stored at index [0]. The argmax() function returns the index of the largest value in an array.
Wrapping Up
Image classification is a very difficult problem. As recently as about two years ago, trying to create a custom image classification model wouldn't have been feasible unless you had a lot of developer resources and a lot of time. Instead, you'd likely have had to use a canned image classification approach such as Azure Cognitive Services computer vision API. But now, even though image classification is still challenging, the existence of neural network libraries like Keras with built-in CNN functionality has made custom image classification feasible.
About the Author
Dr. James McCaffrey works for Microsoft Research in Redmond, Wash. He has worked on several Microsoft products including Azure and Bing. James can be reached at [email protected].