The Data Science Lab
Preparing CIFAR Image Data for PyTorch
CIFAR-10 problems analyze crude 32 x 32 color images to predict which of 10 classes the image is. Here, Dr. James McCaffrey of Microsoft Research explains how to get the raw source CIFAR-10 data, convert it from binary to text and save it as a text file that can be used to train a PyTorch neural network classifier.
A common dataset for image classification experiments is CIFAR-10. The goal of a CIFAR-10 problem is to analyze a crude 32 x 32 color image and predict which of 10 classes the image is. The 10 classes are plane, car, bird, cat, deer, dog, frog, horse, ship and truck.
The CIFAR-10 (Canadian Institute for Advanced Research, 10 classes) data has 50,000 images intended for training and 10,000 images for testing. This article explains how to get the raw source CIFAR-10 data, convert the data from binary to text and save the data as a text file that can be used to train a PyTorch neural network classifier.
Most popular neural network libraries, including PyTorch, scikit and Keras, have some form of built-in CIFAR-10 dataset designed to work with the library. But there are two problems with using a built-in dataset. First, data access becomes a magic black box and important information is hidden. Second, the built-in datasets use all 50,000 training and 10,000 test images and these are difficult to work with because they're so large.
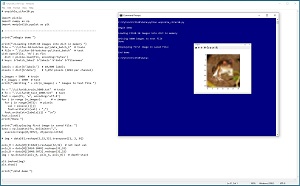 [Click on image for larger view.]Figure 1: Converting Source CIFAR-10 Data to Text Files
A good way to see where this article is headed is to take a look at the screenshot of a Python language program in Figure 1. The program loads a batch of 10,000 training images into memory. The first 5,000 images are converted from binary to text and then saved as "cifar10_train_5000.txt." The program concludes by opening the saved text file, and displaying the first image, which is a creepy frog with red eyes.
This article assumes you have an intermediate or better familiarity with a C-family programming language, preferably Python, but doesn't assume you know anything about the CIFAR-10 dataset. The complete source code for the demo program is presented in this article, and the code is also available in the accompanying file download.
Getting the Source Data Files
The source CIFAR-10 data can be found at www.cs.toronto.edu/~kriz/cifar.html. There are three different versions of the data: Python pickle format, Matlab data format and raw binary format. The Python format is the easiest to work with in my opinion. If you click on the "CIFAR-10 Python version" link, you will download a file named cifar-10-python.tar.gz (tape-archive, gnu-zip format) to your machine.
Unlike regular zip files, Windows cannot extract tar.gz files so you need to use an application. I recommend the free 7-Zip utility, available from www.7-zip.org/. After installing 7-Zip you can open Windows File Explorer and then right-click on the cifar-10-python.tar.gz file and select the Extract Here option. This will result in a file named cifar-10-python.tar. If you right-click on that tar file and select the Extract Here option again, you will get an uncompressed root directory named cifar-10-batches-py.
The cifar-10-batches-py directory contains six binary files that have names with no file extension: data_batch_1, data_batch_2, data_batch_3, data_batch_4, data_batch_5 and test_batch. Each of these files contains 10,000 images in Python "pickle" binary format.
Each image is 32 x 32 pixels. Because the images are in color, there are three channels (red, green, blue). Each channel-pixel value is an integer between 0 and 255. Therefore, each image is represented by 32 * 32 * 3 = 3,072 values between 0 and 255.
Converting the Images from Binary to Text
To convert the CIFAR-10 images from binary pickle format to text, you need to write a short Python language program. See Listing 1.
Listing 1: Converting CIFAR-10 Images from Binary to Text
# unpickle_cifar10.py

import numpy as np
import pickle
import matplotlib.pyplot as plt

# -----------------------------------------------------------

print("\nBegin demo ")

print("\nLoading CIFAR-10 images into dict in memory ")
file = ".\\cifar-10-batches-py\\data_batch_1"  # train
# file = ".\\cifar-10-batches-py\\test_batch"  # test
with open(file, 'rb') as fin:
  dict = pickle.load(fin, encoding='bytes')
# keys: b'batch_label' b'labels' b'data' b'filenames'

labels = dict[b'labels']  # 10,000 labels
pixels = dict[b'data']    # 3,072 per image (1024 per channel)

n_images = 5000  # train
# n_images = 1000  # test
print("\nWriting " + str(n_images) + " images to text file ")


fn = ".\\cifar10_train_5000.txt"  # train
# fn = ".\\cifar10_test_1000.txt"  # test
fout = open(fn, 'w', encoding='utf-8')
for i in range (n_images):      # n images
  for j in range(3072):  # pixels
    val = pixels[i][j]
    fout.write(str(val) + ",")
  fout.write(str(labels[i]) + "\n")
fout.close()
print("Done ")

print("\nDisplaying first image in saved file: ")
data = np.loadtxt(fn, delimiter=",",
  usecols=range(0,3072), dtype=np.int64)

# img = data[0].reshape(3,32,32).transpose([1, 2, 0])

pxls_R = data[0][0:1024].reshape(32,32)  # not last val
pxls_G = data[0][1024:2048].reshape(32,32)
pxls_B = data[0][2048:3072].reshape(32,32)
img = np.dstack((pxls_R, pxls_G, pxls_B))  # depth-stack

plt.imshow(img)
plt.show()

print("\nEnd demo ")
The program is named unpickle_cifar10.py. The program begins by importing three modules:
import pickle
import numpy as np
import matplotlib.pyplot as plt
All standard Python distributions, such as Anaconda, contain these three modules by default. If your distribution doesn't have the pickle module, you can install it using the pip package manger.
The program specifies which binary file to use as the source and then loads 10,000 images into memory:
file = ".\\cifar-10-batches-py\\data_batch_1"  # train
# file = ".\\cifar-10-batches-py\\test_batch"  # test
with open(file, 'rb') as fin:
  dict = pickle.load(fin, encoding='bytes')
# keys: b'batch_label' b'labels' b'data' b'filenames'
The pickle.load() function stores the specified 10,000 images and their associated '0' through '9' class labels in a Python dictionary object that has four keys: b'batch_label', b'labels', b'data', b'filenames'. The important keys are b'data' (the pixel values) and b'labels' (the labels in 0 to 9 integer form). The 'b' means the strings are in byte format rather than Unicode character format. The 'rb' argument passed to the file open() function means "read binary."
Next, the program extracts the pixel values and the labels from the dictionary object, and specifies how many of the 10,000 images to save:
labels = dict[b'labels']  # 10,000 labels
pixels = dict[b'data']    # 3,072 per image (1024 per channel)
n_images = 5000  # train
# n_images = 1000  # test
print("\nWriting " + str(n_images) + " images to text file ")
The program uses only 5,000 of the 10,000 images just to show how to limit the number of images. In most scenarios you would save all 10,000 images in each batch.
The program iterates through each image, writing 3,072 pixel values and the associated class labels to a specified text file:
fn = ".\\cifar10_train_5000.txt"  # train
# fn = ".\\cifar10_test_1000.txt"  # test
fout = open(fn, 'w', encoding='utf-8')
for i in range (n_images):      # n images
  for j in range(3072):  # pixels
    val = pixels[i][j]
    fout.write(str(val) + ",")
  fout.write(str(labels[i]) + "\n")
fout.close()
Each image is stored on one line of the destination text file. The first 32 x 32 = 1,024 values are the red components of the image. The next 1,024 values are the green components, and then the next 1,024 values are the blue components. The last value on each line is the '0' through '9' class label. Each value is comma delimited. You can use a different delimiter, such as a tab, if you wish.
If you want to save all 50,000 training images to a file, you can repeat the program code using the five binary files and then pass an 'a+' argument ("create for writing or append") to the file open() function.
Displaying a CIFAR-10 Image
After converting CIFAR-10 images from binary to text, it's a good idea to examine the text data to make sure the conversion worked properly. The demo program displays the first saved image using these statements:
data = np.loadtxt(fn, delimiter=",",
  usecols=range(0,3072), dtype=np.int64)
pxls_R = data[0][0:1024].reshape(32,32)  # not last val
pxls_G = data[0][1024:2048].reshape(32,32)
pxls_B = data[0][2048:3072].reshape(32,32)
img = np.dstack((pxls_R, pxls_G, pxls_B))  # depth-stack
plt.imshow(img)
plt.show()
The text file that holds the images is loaded into memory using the np.loadtxt() function. You only need the first 3,072 values on a line but you could also fetch the class label to use as an image title. Each set of 1,024 RGB channel values is reshaped to a 32 x 32 plane. The three planes are combined into a single image using the dstack() function ("depth-wise stack") that is designed specifically for this purpose.
The 3,072 pixel values are now in a geometry that the imshow() function can handle. The imshow() function automatically scales all values to a (0.0, 1.0) range, so you don't need to explicitly scale by loading the data as type np.float32 (instead of np.int64) and then dividing all values by 255.
Instead of working with the RGB channels separately, you could work with all three at once:
img = data[0].reshape(3,32,32).transpose([1, 2, 0])
This saves three lines of code but is more difficult to understand in my opinion.
Wrapping Up
Several years ago, classifying the MNIST (modified National Institute of Standards and Technology) image dataset was considered a difficult challenge. MNIST images are one-color (i.e., grayscale) handwritten digits with just 28 x 28 pixels. Classifying MNIST data became too easy and so the more difficult CIFAR-10 data is often used instead. With current techniques, it's relatively easy to get about 90% accuracy on CIFAR-10 but getting better than 90% accuracy is quite difficult.
A related dataset you might encounter is CIFAR-100. The CIFAR-100 dataset has 60,000 images with 100 classes (600 images of each class). The 100 classes are objects like "apple" (0), "bicycle" (8), "turtle" (93) and "worm" (99).
About the Author
Dr. James McCaffrey works for Microsoft Research in Redmond, Wash. He has worked on several Microsoft products including Azure and Bing. James can be reached at [email protected].