Inside VSTS
VSTS 2008 Web Testing: Running a Web Test (Part 2 of 3)
In the second column of a series, Mickey shows you how to run a Web test using Visual Studio Team System 2008.
Visual Studio Team System 2008 (both the Testing edition and the Team Suite edition) have a type of test referred to as a Web test. These Web tests are used to test the functionality of Web applications and are also designed to be used to load test Web applications. In Part 1 of this series on Web tests (
VSTS08 Web Testing), we covered how Web test are used in Visual Studio Team System and how to record Web tests. In this column, we will look at the results of that recording in Visual Studio and show how to execute a Web test.
The Web Test In Visual Studio
All the information related to the Web test recorded in Part 1 of this series is stored in a file called MySimpleWebTest.webtest. At its core, this file is simply an XML file. In Solution Explorer, if you right-click on the file, select Open With, and then select XML editor, you can access the raw XML that comprises the Web test, as shown in Figure 1.
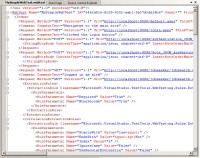
[Click on image for larger view.] |
| Figure 1. |
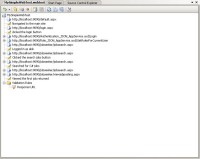
Visual Studio 2008 provides a much nicer graphical interface for editing Web tests. Simply double-click on the Web test in Solution Explorer to open the GUI for editing Web tests (Figure 2).
[Click on image for larger view.] |
Figure 2.
|
As you can see, the Web test is made up of a series of requests that will be made to the Web server. There are also comments interspersed throughout the Web test, to help make sense of what the test is trying to accomplish. Comments can be added while the test is being recorded (see part 1 of this series for more information) or they can be added through the interface in Visual Studio.
You should always run your Web test immediately after recording it, before you start customizing it with validation rules and plug-ins. Since no changes have been made to the initial test, it should pass, which indicates that there are no problems with the recorded Web test.
Executing A Web Test
The easiest way to execute a single Web test is to click the Run Test button on the Web test toolbar in Visual Studio. You can also right-click on the Web test, and from the context menu select Run Test -> Run Test. This will open the Test Results window. In this window, you will see the Web test you have started to execute. The test will show as In Progress while it is running, and then when completed, will show as either Passed or Failed.
You may have noticed, when you ran the Web test, that it did not actually open a browser to execute the test. Instead, Visual Studio sent the HTTP requests directly to the Web server and received the response information back. This direct contact with the Web server makes it easy to include Web tests as part of a load test. However, one thing to be aware of is that, since the test does not execute in a browser, client-side Javascript is not executed during the test.
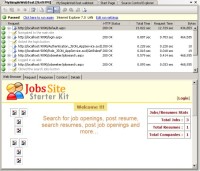
To see detailed information related to the test run, double-click the test in the Test Results window. This will open a tab containing detailed information related to the Web test execution, as shown in Figure 3.
[Click on image for larger view.] |
| Figure 3. |
For each request, you can see if the request passed or failed, the HTTP status code, the total time it took the request to execute, and the bytes of information that were passed. By selecting a particular request, you can then, by selecting the appropriate tab, view what the response would look like in the Web browser, view request information, view response information, view test context information, or view any detailed information related to validation or extraction rules that you might have added to the test.
Conclusion
In this column, part two of a series, we have looked at how to view a Web test using Visual Studio Team System, as well as how to execute a simple Web test and view the results. In part three, we will start to delve deeper and look at how we can make our Web tests more useful, by adding validation rules to them.
About the Author
Mickey Gousset spends his days as a principal consultant for Infront Consulting Group. Gousset is lead author of "Professional Application Lifecycle Management with Visual Studio 2012" (Wrox, 2012) and frequents the speaker circuit singing the praises of ALM and DevOps. He also blogs at ALM Rocks!. Gousset is one of the original Team System/ALM MVPs and has held the award since 2005.