Visual Studio Toolbox
Automate All the Things: An AutoHotKey Primer for Developers
Avoid the drudgery of repetitive tasks. AutoHotKey is the most powerful keyboard scripting and automation tool for Windows, and I'll show you how to get started.
- By Terrence Dorsey
- 06/08/2015
Anyone who's had to perform the same mindless task over and over -- or mindlessly forgot to perform an important-but-tedious task correctly -- knows the value of automation. And I'd bet programmers know this better than anyone, because automating tasks is both free (discounting employer cost of automation "R&D" time) and, often, curiously challenging.
How many times have you said to yourself, "I spend a lot of time on this task. I should write a program automating it!"?
The Mac OS world has a wide selection of keyboard automation and text expansion tools to choose from, each of which typically specializes in providing a specific niche of macro or automation functionality. Many of them are quite polished and highly capable within their respective niches.
In the Windows world, one automation tools reigns supreme: AutoHotKey.
It's free. It's open source. It automates pretty much anything. Let's take a look at how this amazing tool works and get a taste of how it might simplify aspects of your daily development tasks.
Technically, AutoHotKey is a scripting language and interpreter that enables you to automate actions within Windows and installed actions. In practice, many people use AutoHotKey for tasks such as text expansion, mapping keys and mouse clicks to shortcuts or other actions, and launching programs.
Some more advanced capabilities of AutoHotKey include scripting keystrokes, menu selections, and mouse actions, which you might use for, say, GUI testing. AutoHotKey can also parse data feeds, and you can even create graphical interfaces to accept input for your scripts.
In addition, you can use AutoHotKey to call into DLLs, access memory addresses, interact with COM objects and more. Or, going the other way, you can call AutoHotKey scripts from external code including C#, Visual Basic, VBScript and VBA.
This is a seriously sophisticated tool, and you can quickly find yourself deep in the weeds. So let's take a step back and cover some of the basics first.
Getting Started with AutoHotKey
While AutoHotKey can be incredibly powerful once you understand the extensive capabilities of its macro language and deep integration with the OS, those "anything's possible" capabilities make for a steep initial learning curve. In addition, many AutoHotKey tutorials attempt to cover too many features initially, making the learning process akin to mastering a new programming language.
You'll find many tutorials spread around the Internet, but not all are created equal, and I found quite a few that used outdated script formats.
The obvious place to start is "AutoHotkey Beginner Tutorial" in the official documentation. Another useful resource is evamarie's Auto Hotkey tutorial for absolute beginners at DonationCoder.com.
I'll cover some basics quickly here as a primer, but I recommend reading through those guides, which cover some gotchas and provide a bit more context, as well as hitting the Tutorials section of the AutoHotkey Forum and StackOverflow questions on AutoHotKey for tips.
Installation and Setup
Grab the latest release version of AutoHotKey from the Web site and install it. As I write this, v1.1.22.00 is the current version. Unless you have some special needs -- and as a first-time user, you probably don't -- the current Unicode 32-bit version should be perfectly fine.
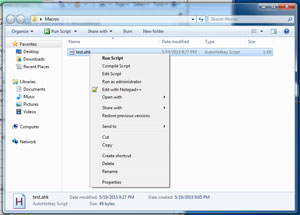
Run the installer. Select the defaults. Once that finishes, you'll have some new commands in Finder, including a New | AutoHotKey Script command and Run Script, Compile Script and Edit Script commands when you right-click on a script file (see Figure 1).
 [Click on image for larger view.]
Figure 1. Context Menu Script Commands for AutoHotKey
At this point trying to run AutoHotKey should just bring up the help because you don't have any scripts to run yet. Let's fix that.
Text Expansion
The most basic type of automation you can accomplish with AutoHotKey is text expansion: You type a key combination or phrase and AutoHotKey replaces it with the text you specify in your script.
Create a new file in your Documents folder called vsm.ahk. The .ahk extension is important -- it identifies the file as an AutoHotKey script. Under the covers, however, it's just a text file. Right-click the file and select Edit Script to open the file in the built-in AutoHotKey editor. If you prefer, you can edit the file in any plain text programming editor.
Expansions are simply two colons, the trigger text, two more colons, and the expansion or replacement text, all on one line, like this:
::trigger::expansion
Type this example in your script file and save it:
::;vsmag::Visual Studio Magazine
Once the file is saved, right-click it and select Run Script, which enables the script. In this case the trigger is ;vsmag. When you type that string and press Space, AutoHotKey expands it to Visual Studio Magazine.
The semicolon isn't necessary, but it's a trick I learned from Dr. Drang's TextExpander abbreviation design blog post years ago that I've carried over to many of my script triggers. But it's not necessary at all. Use triggers that make sense and are easy to remember for you.
Another use of expansion is to automatically fix common misspellings:
::teh::the
Now you've got your first script.
Remapping Keys
Another simple use for AutoHotKey -- and essentially why it was created in the first place -- is mapping keys or keyboard shortcuts to actions. The syntax for remapping scripts is the keyboard combination, two colons and the action.
keys::action
A canonical example in most tutorials is a key combo to pop up a message:
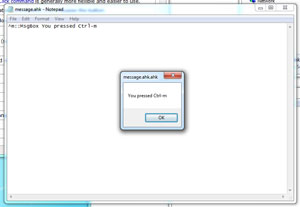
^m::MsgBox You pressed Ctrl-m
In this case the ^ symbol is a token for the Control key, so the keyboard shortcut Ctrl+M tells AutoHotKey to pop up a MsgBox with your text (see Figure 2).
 [Click on image for larger view.]
Figure 2. Popping Up a Message Box
Create a new script called beep.ahk, open it in the editor and type the following script:
+^!b::SoundBeep
In this case + is Shift, ^ is Control and ! is Alt. When you run the script, typing Shift+Ctrl+Alt+B triggers the SoundBeep command, which plays the default system beep.
There's a full list of key tokens and commands for using keyboard keys, mouse buttons, scroll wheels, joystick buttons and more in the Hotkeys (Mouse, Joystick and Keyboard Shortcuts) help.
Scripting
One-liners are handy, but AutoHotKey scripts can tackle much more complicated tasks.
A great example posted by Laszlo on the AutoHotKey forums is a short script to Paste plain text from items on the clipboard:
^#v::                       ; Text–only paste from ClipBoard
  Clip0 = %ClipBoardAll%
  ClipBoard = %ClipBoard%   ; Convert to text
  Send ^v                   ; For best compatibility: SendPlay
  Sleep 50                  ; Don't change clipboard while it is pasted!
                                 ; (Sleep > 0)
  ClipBoard = %Clip0%       ; Restore original ClipBoard
  VarSetCapacity(Clip0, 0)  ; Free memory
Return
This shows a few new syntax features. First, # is the token for the Windows key. The shortcut Ctrl+Win+V triggers the script.
You might also have noticed that multiple-line snippets are supported. "Return" indicates the end of the script. Also, semicolons within the action part of the script indicate comments and the comments are, I think, pretty clear here about what's happening.
In short, the script swaps out the clipboard contents with a plain-text version, pastes it and swaps the original clipboard contents back onto the clipboard.
Here's another brief script that uses the FormatTime command to manipulate timestamps:
::ymd::
FormatTime, TimeString, , yyyy-MM-dd
Send %TimeString%
Return
This script replaces "ymd" with the current date (empty second parameter to FormatTime) as something like 2015-10-21.
Scripts can be far more complicated, containing evaluations, looping structures and more. Take a look at the help and dive in.
Enabling Your AutoHotKey Scripts
As you've noticed, AutoHotKey scripts have to be running if you want to use them. Taking the time to explicitly run each script you need sort of defeats the purpose of automating a task. So it makes sense to configure your most-used scripts to run at system startup.
The AutoHotkey FAQ has a brief answer to the question, "How do I put my hotkeys and hotstrings into effect automatically every time I start my PC?" However, in practice, it's both simpler and more complicated.
Basically, you want to put a shortcut to any script you want to be available (running and enabled) at startup in your Startup folder.
On Windows 7 that's in Start | All Programs | Startup, or C:\Users\[user]\AppData\Roaming\Microsoft\Windows\Start Menu\Programs\Startup.
On Windows 8 use the Run command to open shell:startup, or C:\Users\[user]\AppData\Roaming\Microsoft\Windows\Start Menu\Programs\Startup.
Automation for Mac Users
As I mentioned earlier, there are several useful automation apps similar to AutoHotKey for Mac OS. I won't go into them in depth here, but if you spend much time bouncing between development environments, you might find them useful for having similar scripting functions wherever you're coding.
In addition, I've found apps like these extremely useful for duplicating my favorite keyboard shortcuts or OS functionality on other platforms. For example, Witch, by Many Tricks, duplicates Windows Alt+Tab window switching (which I love) on Mac.
Keyboard macro scripting Mac apps you might want to check out include Keyboard Maestro, which is similar in breadth of ability to AutoHotKey, and Karabiner (formerly known as KeyRemap4MacBook), which is more of a straightforward key-to-command mapping tool.
TextExpander is, as the name implies, a text expansion utility with some scripting capabilities.
Alfred, LaunchBar and Quicksilver are apps that many people use simply as customizable, keyboard-centric application launchers, but which also have script-ready engines that enable you to build custom actions and workflows.
Script Away
You follow the DRY principle in your code, right? Now you have no excuse for repeating yourself in mundane everyday tasks. Grab a copy of AutoHotKey and get scripting.
In a future column I'll follow up with some more advanced, programming-specific uses for AutoHotKey. In the meantime, tell me how you're using this great tool.
Hat tip to Gabe Weatherhead for much appreciated tips and feedback on this column.
About the Author
Terrence Dorsey is a technical writer, editor and content strategist specializing in technology and software development. Over the last 25-plus years he has worked on developer-focused projects at ESPN, The Code Project, and Microsoft. Read his blog at http://terrencedorsey.com or follow @tpdorsey on Twitter.