In-Depth
Azure Functions and Serverless Architecture in Action
Part 2: Now that we've nailed down the serverless compute concepts, we'll use a handful of online tools to develop Azure Functions.
- By Joseph Fultz, Darren Brust
- 07/21/2017
Last time, we looked at what's possible with the Azure IoT platform in providing a rich set of services to support the collection and analysis of data. In this article, we'll take an existing IoT implementation built to collect vehicle telemetry and store it in the cloud, with basic analytic functionality. And then we'll explore adding new capabilities to the solution, such as being able to query the data in real time in order to find the closest vehicle to a given location. You might use this type of functionality in a free-floating car-sharing program or even to find your car in a parking lot.
We must note some caveats in this example implementation as we're purposefully taking some shortcuts in order to demonstrate the tools and platform. First, we're working directly with a single partition DocumentDB. In a more prime-time implementation we would have at minimum sharded the DocumentDB based on the expected volume of data, but we might have also chosen to do other things, such as adding Azure Redis Cache and Azure Elastic Search as the means for optimizing some of the read paths.
Second, since the current DocumentDB API would require a bit more client-side processing to get to the records that we want to compare, we've taken the shortcut of just asking for the top 100 records. Partitioning and search capabilities would be a more typical path to find the records needed in a large set. In any case, you'd still use the function to find the potential records and then compare them to the given location and return the closest vehicle out of the set.
Creating the Function
At the time of this writing, the Visual Studio tooling isn't available to help speed the development process. To that end, we'll start by creating the Azure Function via the portal interface. After you start the Azure Functions creation in the Azure portal, you'll be presented with the blade to set a few settings for your function. Note the options for the App Service plan selection: Consumption Plan and App Service Plan. Choosing between these two seems like the simplest of choices, but in reality you're being presented with choosing between the old style of managing resources and the idealistic goals of a serverless architecture. In choosing App Service Plan, you must make guesses about how much processing power is needed. If you choose too much, you're paying for resources that you're not using, but choose too little and you might have issues with your implementation that ultimately impacts your customers and your bottom line. Choosing Consumption Plan is the preferred style as it leaves the scaling up and down to the system and you, as the consumer, pay for as much or as little as your app consumes.
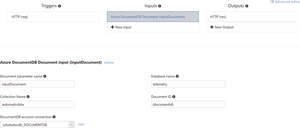
Your final step is to actually create the function itself. You're going to start with the WebHook premade function using C#. This will preconfigure a Trigger to prosecute the function based on receiving an HTTP request. By selecting the Integrate item on the left menu, several options can be chosen as a matter of configuration for Trigger, Input and Ouput. The Trigger selection page has some useful information on it, including information about the WebHook bindings, information about how to use the API keys, and some sample code for calling the WebHook from both C# and Node.js. Once presented with the dialog, you'll configure the Input and the Output bindings, as shown in Figure 1.
 [Click on image for larger view.]
Figure 1: Input Binding Configuration
[Click on image for larger view.]
Figure 1: Input Binding Configuration
While you can include libraries and adapters to make calls to external systems, the system works via Bindings and has first-class support for many data sources such as EventHubs and DocumentDB. The development experience is enhanced through the Bindings infrastructure that's part of Azure Functions. Bindings abstract the actual target software infrastructure (DocumentDB, EventHubs, Storage and so on), letting the developer code to the parameter representing the target, while remaining flexible because the target can be changed by changing the configuration. Here, you've configured it to talk to the source DocumentDB. From that configuration you'll be able to write code directly against the DocumentDB client within the function and you won't have to make the connection yourself. Note the document parameter name: inputDocument. That's the variable that's passed into the function you'll use to make calls to the DocumentDB.
Here, the output options can be seen and include a number of storage, queuing and other external systems. All of the items that can be selected and configured through the UI can be accessed later via the function app Settings UI and can be configured as part of a template or through the programmatic interfaces. You're simply returning the JSON result over HTTP to the caller. Because the HTTP(res) is already set for Output with an output parameter defined, you'll accept it as is.
Developing the Code
Once Develop is selected in the left menu, you're presented with an online editor. This is good for quick iterative changes and seeing your log in real time, and it gives you an interface for triggering the WebHook Function. Tooling is underway for both Visual Studio and Visual Studio Code that will give a richer experience. If you're working with Azure Functions today, you'd want to use an IDE, and Visual Studio easily connects to the Function App through the Server Explorer.
There are a few things you need to do in editing the files. Right below the Code window there's a link for View Files. Open the File Explorer directly to the right of the Code window. First, you'll need the DocumentDB client. There are a number of libraries that are automatically available to be referenced by using the #r directive at the top. The list of those libraries, as well as a number of other pieces of developer information, can be found in the online developer reference at bit.ly/2gaWT9x. For example, you'll need access to the DocumetDB client objects because there's first-class support for DocumentDB there. You'll simply add the #r directive for that assembly at the top of the file. If a library that you need isn't included, say one you maintain and publish to NuGet, it can be added to a project.json file (package.json in Node.js).
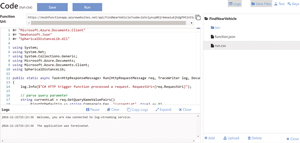
At this point you're ready to edit the run.csx file, which will hold all of your code. To do this you'll edit it directly in the online IDE for Azure Functions, as shown in Figure 2.
 [Click on image for larger view.]
Figure 2: Editing Function Code
[Click on image for larger view.]
Figure 2: Editing Function Code
Starting with the template code, first add your own custom external library to the function, as it contains the code for the haversine function. If you have custom classes or functions that aren't too large and are specific to the function, you can add them directly into the run.csx file. However, if you have reusable pieces, you'll want to go a different route and include their compiled version in a \bin folder or reference them as NuGet packages via the project.json file and reference the library with #r. Alternately, you could place the code into a different .csx file and use the #load directive.
You need a couple of functions to help determine the distance between the vehicles for which you're checking proximity and the point they passed into the function. It's been a while since school days and it turns out that you don't regularly need a haversine formula. Wikipedia provides a good reference for it at bit.ly/2gCWrgb and we borrowed the C# function from bit.ly/2gD26mK and made a few changes. We've created the necessary functions as static members of a haversine class:
namespace SphericalDistanceLib { public class Haversine { public static double CalculateDistance( double currentLong, double currentLat, double vehicleLong, double vehicleLat){…} public static double ToRadians(double degrees){...} } }
The code is compiled and then uploaded into a bin folder relative to the root folder of the function. In our case the path is FindNearVehicle/bin, but the bin folder must be created as it's not there by default. With that bit of setup completed, you turn your focus to the code you need. At the top of the function you'll need to ensure that you're referencing any libraries you need. In particular, you need the DocumentDB client object types, Newtonsoft, and the custom library that was uploaded to the /bin folder. These get added at the top of the file using the #r directive:
#r "Microsoft.Azure.Documents.Client" #r "Newtonsoft.Json" #r "SphericalDistanceLib.dll"
As previously noted, you'll grab the last 100 records based on the created_at timestamp field. DocumentDB has a nice SQL syntax that makes that pretty easy:
IQueryable<Document> telemDocs = inputDocument.CreateDocumentQuery<Document>( UriFactory.CreateDocumentCollectionUri(dbName, collectionName), new SqlQuerySpec("SELECT TOP 100 c.vehicle.vin, c.vehicle.model, c.location FROM c ORDER BY c.created_at DESC"), queryOptions);
You're using the Document type, which eases things a bit, because you'll cast it to a Dynamic type to add properties to the object easily. The SQL is passed in the form of a SqlQuerySpec and you'll project only the vin, model and location into your object. At this point you have to iterate the list of documents, calculate the distance using the haversine function in the external library, and determine the nearest one and return it. However, it gets a little tricky.
You need to keep track of all of the vins you've seen, because you only want the latest location record for that vin. Because you'll have ordered it in descending order, the first document is the last document you've received. You'll check the vin for null, because you're looking at vehicles that are being driven and if there's a null in the vin, you can assume that the document is invalid. If the element has a non-null value, you'll simply attempt to add the vin to a HashSet. If it's unique to the list, the addition will succeed, but if not, it'll fail and you know that you have the most recent record for that vehicle already in the list, as shown in Listing 1.
Listing 1: Last Known Location for Distinct VINs
HashSet<string> seen = new HashSet<string>(); foreach(dynamic doc in telemDocs){ if(seen.Add(doc.vin)){ // Calculate the distance if (doc.location != null) { doc.distance = Haversine.CalculateDistance(double.Parse(currentLong), double.Parse(currentLat), double.Parse( doc.location.lon.ToString()), double.Parse(doc.location.lat.ToString())); lastKnownLocations.Add(doc); } else{ // Location is null, so we won't take this // record as last known location seen.Remove(doc.vin); } } }
You add the entire document to the lastKnownLocations list, making it easy to turn around and query out the first document based on ordering by the least distance value:
var nearestVehicle = lastKnownLocations.OrderBy(x => ((dynamic)x).distance).First(); return currentLat == null || currentLong == null ? req.CreateResponse(HttpStatusCode.BadRequest, "Please pass a lat and lon on the query string or in the request body") : req.CreateResponse(HttpStatusCode.OK, nearestVehicle);
The first document in the ordered list can be returned, as seen in the last line, where a null param check is also handled, and the serialization of the document is handled for you.
Running the Example
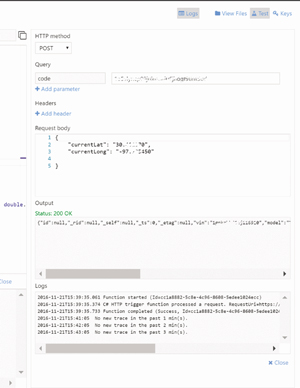
The last step of this is to see it in action. At the top right of the development view there's a link with a flask icon attached to it labeled Test. Clicking this will open the testing UI, as shown in Figure 4. Within it you can change the HTTP method, add parameters, add headers and set the body to be passed to the selected HTTP method. We typically use Postman when we're doing a lot of this work, because we have a library of tests. However, the built-in testing facilities for HTTP functions are excellent and immediately available for quick iterative work.
 [Click on image for larger view.]
Figure 4: Testing a Function
[Click on image for larger view.]
Figure 4: Testing a Function
We've grabbed the latitude and longitude and formatted it into the expected JSON format in the Run window. Once Run is clicked, any output from calls to the log object and general log output can be seen in the Logs window with the output and the status seen on the bottom right in the Output window. Taking note of the timing on the log output it looks like it took around 250 ms for our function to run. That's well within the execution model for which we're striving with Azure Functions: singlepurpose and relatively short execution times. Pulling the content out of the Output window and formatting it, we can see a lot more clearly that we have the vehicle, the timestamp when the location was recorded, the location and the distance:
{ "vin": "wmwrxxxxxxxx54251", "model": "Cooper Hardtop", "location": { "lat": 30.4xxxxxx, "lon": -97.8xxxxxx, "accuracy_m": 22.505, "ts": 1473116792970 }, "distance": 13.552438042837085 }
When we did the distance calculation we gave the circumference of the Earth in kilometers, so the distance that's represented in the return is about 13.6 km.
Wrapping Up
In the example, we used a mixture of online tools to develop and prosecute Azure Functions, but a more realistic approach for a development team would be to develop locally and set up continuous integration and deployment via a Git repo. Using the WebJobs.Script and WebJobs SDK, you can set up the ability to develop and run Azure Functions locally. A good walk-through of how to do that can be found at bit.ly/2hhUCt2. You'll also find there are a number of different sources that can be configured as the source for deployments.
Azure Functions is the new kid on the block in the Azure platform. It's a key ingredient of serverless compute that's needed to achieve the benefits of a cloud PaaS implementation. Azure Functions turns the focus to the value of the code and away from managing infrastructure. The platform, tools support, and language support continues to evolve, but it already supports a number of languages and can be tied into your CI/CD pipeline. More information can be found at bit.ly/2ktywWE.
If you're not already working with Azure Functions, you should give it a try. You can get started at bit.ly/2glBJnC.
Thanks to Microsoft technical expert Fabio Calvacante, who reviewed both parts 1 and 2 of this article.