Inside VSTS
Work Item Templates Revisited
In a previous column, "Using Work Item Templates," we covered the work item template functionality in Visual Studio Team System 2008 Team Foundation Server Power Tools. In this column, we're going to look at a couple of more features in work item templates that make them attractive for use.
Organizing Your Work Item Templates
Your work item templates are stored in the "Work Item Templates" folder under your Team Project in Team Explorer. One organizational tool you have is the ability to create a nested folder structure under the Work Item Templates folder, which provides a way to quickly and easily find a specific work item template. Simply right-click on the Work Item Templates folder and select "New Folder." A new folder will be created under the Work Item Templates folder. You can create a nested series of folders in the same way.
To create a work item template in a particular subfolder, right-click on the folder and select "New Template." Once you create the work item template and save it, it will be saved to that particular folder.
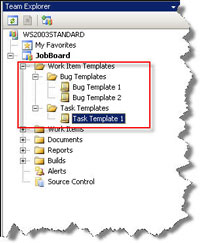
If you create a work item template from an existing work item, by default it will be created in the root of the Work Item Templates folder. At that point, you can drag and drop the template to the appropriate subfolder. Figure 1 shows an example of a nested folder hierarchy. By default, work item templates are stored in a folder in your local profile: <DocumentsAndSettings>\<User>\<Documents>\Work Item Templates.

[Click on image for larger view.] |
| Figure 1. A nested folder hierarchy for work item templates.
|
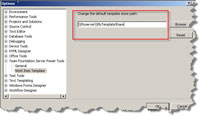
If you want to share work item templates with other team members, the easiest way is to store all the work item types on a shared drive and change the storage location. To do that, open Visual Studio and select "Tools | Options." This will open the "Options" window, shown in Figure 2. On the left-hand side, drill down under Team Foundation Server Power Tools and select "Work Item Template." Then modify the default template store path to be a shared drive accessible to all team members. Once all team members make this change, your entire team will be able to create, edit and share the same collection of work item templates.

[Click on image for larger view.] |
| Figure 2. Change the default template storage path to be a shared drive.
|
Setting a Default Template
You have the ability to set a particular work item template as the default template. This allows you to use the "Team" menu option to quickly create a work item using that template, without having to go to Team Explorer and right-click on the template itself. This is a nice feature to have if you're constantly using the same template to create work items.
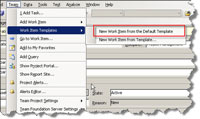
In Visual Studio, select "Team | Work Item Templates | New Work Item" from the Default Template (see Figure 3). This will automatically open the appropriate work item type and apply the default work item template to it.

[Click on image for larger view.] |
| Figure 3. Create a work item from the default work item template.
|
Making Bulk Changes with Work Item Templates
Work item templates also make it easy to make bulk changes to your work items. For example, say you want to set a list of work items to a state of Closed. Before work item templates, you had two options: open each work item by hand, or import the work items into Microsoft Excel, copy and paste the Closed state to each row, then publish the results back to Team Foundation Server.
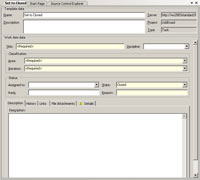
Using work item templates, you can accomplish the same task without leaving Visual Studio, and without having to open each individual work item. First, create a work item template that just sets the state of the work item to Closed (see Figure 4). Next, run a work item query to return a list of tasks in the Team Project. Holding down the CNTRL key, select all the tasks you want to set to Closed. In Team Explorer, right-click on the "Set to Closed" work item template, and select "Apply to Selected Work Items." This will apply the template to the selected work items, changing their states to Closed. Click the "Save All" button to save your changes, and you've now made a bulk edit to your work items without having to use Excel.

[Click on image for larger view.] |
| Figure 4. A work item template that sets a task's state to Closed.
|
Over my past two articles, you've learned what work item templates are, how to create and use them, as well as some novel uses for templates (like performing bulk edits). Remember, work item templates are just one of the many tools available in the VSTS 2008 TFS Power Tools, so be sure to download and learn about the rest.
About the Author
Mickey Gousset spends his days as a principal consultant for Infront Consulting Group. Gousset is lead author of "Professional Application Lifecycle Management with Visual Studio 2012" (Wrox, 2012) and frequents the speaker circuit singing the praises of ALM and DevOps. He also blogs at ALM Rocks!. Gousset is one of the original Team System/ALM MVPs and has held the award since 2005.