In-Depth
Plug in to Mono for Android for Lights, Camera and Video Apps
Multimedia is expected in today's mobile applications, and the fun isn't only for smartphone and tablet users. Mono for Android, based on the Mono project's open source implementation of the Microsoft .NET Framework, can help you take advantage of Android Camera APIs in Visual Studio.
I don't know about you, but I'm amazed at what you can do with the multimedia in today's mobile devices. I grew up playing "Pong" and remember when games had to fit into big boxes with green screens and ASCII art. About 10 years ago, I had to create an interpreter for the graphics processor in the IBM AS/400 systems (iSeries now) to generate graphics in a screen-scraping application. How did we survive those days?
Now, mobile devices allow you to take pictures, record audio and video, and send it all to friends and relatives in minutes. You're seeing this happen all over the world, even in uprisings, as people compete to get their stories out.
Many people are confused by what multimedia actually is (including me), but for our purposes, I'll look at how .NET developers can use the Xamarin Mono for Android plug-in with Visual Studio 2010 to create Android applications that use pictures and video. If you're new to Mono for Android, check out my tutorial, "Introduction to MonoDroid".
While Mono for Android has definitely grown and matured since then, many of the basics are still applicable. However, the Mono garbage collector (GC) is not quite as advanced as the GC in the Microsoft .NET Framework. Sometimes, you'll need to help the GC along by calling GC.Collect at an appropriate part of your application.
There are a large number of Android devices in the marketplace. What works on one may not work properly on another. The code in this article was tested and validated against Mono for Android 4.0.x. Testing was done on two devices: an HTC EVO 4G running Android 2.3 (code-named "Gingerbread"), and a Motorola Xoom tablet running Android 4.0.3 (code-named "Ice Cream Sandwich").
I've found that if an app will work on my HTC EVO 4G and my Motorola Xoom, it typically works across many devices.
Asking for Permissions
Mobile applications shouldn't just allow complete access to the hardware and other software in a device. With Android, developers must request access to various features on the device, such as the camera. To ask for access, you must include an AndroidManifest.xml file in your application. Mono for Android includes a default AndroidManifest.xml file based on the various attributes of the activities. It's not something you see in the file system, but if you unzip the output .apk file, you'll find an AndroidManifest.xml file. Unfortunately, the resulting file is in binary, so it's rather hard to read, but it's there.
To set permissions and use other features of Android (basically, all of the cool stuff), you must create an explicit AndroidManifest.xml file for your Mono for Android project. This is done by going to the properties of the project, selecting the Android Manifest tab and then creating the AndroidManfest.xml file, as shown in Figure 1.
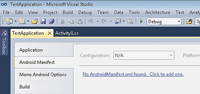
[Click on image for larger view.] |
| Figure 1. To set permissions and use other features of the Android OS, you must create an explicit AndroidManifest.xml file for your Mono for Android project. |
Once this is done, an AndroidManifest.xml file is created in the Properties folder of the project. This is shown in Figure 2.
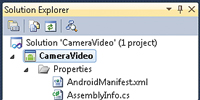
[Click on image for larger view.] |
| Figure 2. An AndroidManifest.xml file is created in the Properties folder of the project. |
Now that you have an AndroidManifest.xml file, you can edit it in one of two ways. Mono for Android has an editor for setting the permissions. You can add various permissions to use features in the phone, specify the minimum supported version of Android, identify what features are required in the device for the application and stipulate other items. For example, an application that's writing images to the device's file system will probably need android.permission.WRITE_EXTERNAL_STORAGE. An application that records audio will need android.permission.RECORD_AUDIO. If the application needs to embed GPS data into images, then it will require either adroid.permission.ACCESS_FINE_LOCATION or adroid.permission.ACCESS_COARSE_LOCATION.
Listing 1 shows the XML code for the AndroidManifest file. The application requests the Camera, Internet and Record_Audio permissions so it can use these features in the device.
Once you have permissions, you need to document the features you'll need to have on the device. In Figure 3, the file documents that the application will use the camera.
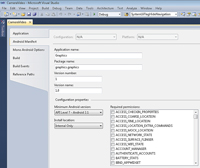
[Click on image for larger view.] |
| Figure 3. The Camera permission is requested by the application. |
Displaying Images
Pictures allow people to process a story much better than just text alone. Android has the ability to display pictures as well as create them with a camera. Displaying images is fairly simple in Android, but there's one situation in which you need to be careful. You can get pictures in Android in three ways. First, images can be built into an application. The advantage of this method is that the image is basically guaranteed to be available. It's fairly simple programmatically because you can reference the image with the code Resource.Drawable.PictureName, so that you can access it via IntelliSense. An example call is:
iv.SetImageResource(Resource.Drawable.AndroidLocalImage);
Note that the resource is created for you in the Android.Designer.cs file. There's also a limit on local images stored as resources. This scenario is good for standard images that are necessary in your application. There's no need to go outside the device, so you won't be required to use a network, which is often spotty at best.
Second, images can be on the device, but not built into the application. In this scenario, you don't have IntelliSense access to the images. To load an image off the device, you call an ImageView SetImageURI method and pass in a local Android.Net.Uri path to the file.
Third, images can be pulled from a location outside the device, typically over the Internet.
Mobile networks are not as reliable as wired networks. Add in that Android will close applications that have locked the UI thread for too long, and you can have problems if you attempt to access this on the UI thread. Think about displaying a Twitter search in a ListView. Instead of displaying one picture from outside the device, now you have to display up to 20 images. A better strategy is to load an image asynchronously on a background thread. An example call to start loading the image off of a network resource is shown in Listing 2.
In Listing 2, the button's Click event starts a ThreadPool that will load images from a remote resource. Once the thread is started, the image is downloaded into a bitmap object in the local device's memory, and then loaded in the application. Note that you have to use RunOnUIThread to perform the loading on the UI control because it's running on a background thread.
Using Native Camera Functionality
The APIs in Android allow developers to integrate with cameras in different ways. The question is whether you want to use the existing functionality in your Android phone or build custom functionality.
Most applications can use the existing camera application. Creating an Intent is an easy and quick way to enable taking pictures from within your app. Once the Camera Intent is fired, the native camera application loads and a user can "point and shoot"; then program control is returned to your application. Here's how to use a Camera Intent to take pictures in your application:
- Create a Camera Intent. This Camera Intent will have the action Adroid. Prvider.MediaStore.ActionImageCapture. Inside this Intent, pass in the file where you want to save the image. Some Android devices require the image save file; some do not. I've found that passingthis value in results in more devices working than if I didn't take this step.
- To start the Camera Intent, call the method StartActivityForResult.
This will start the camera application and allow the user to take a picture.
- Once a user is done taking a picture and execution passes back to your program, you'll override the OnActivityResult method to receive the callback, get the picture and then finish any processing there.
The code to handle this processing is shown in Listing 3.
Out of this Listing 3 code, you should see the sequence of pictures shown in Figure 4.
Figure 4 (A) is the image shown in the Camera Activity before the picture is actually taken. Figure 4 (B) is the same image after it has been selected in a Camera Intent and is waiting for the user to select. The Camera Activity is asking if the user is "Done," which sends execution back to your application. There's also an option to return to the Camera Activity and take a different picture. Figure 4 (C) shows the original application displaying the returned image.
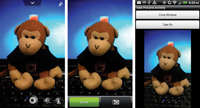
[Click on image for larger view.] |
| Figure 4. (A) The image is shown in the Camera Activity before the picture is actually taken. (B) The same image after it has been selected in a Camera Intent and is waiting for the user to select.
(C) The image is returned and displayed back in the original application. |
Note that when a program interfaces with the built-in Activities, they have the built-in security permissions.
Taking Your Own Pictures
Depending on the built-in Activities, and communicating with Intents, is the way to go for more than 90 percent of applications. Other apps can implement their own functionality to integrate with the camera.
The Mono for Android framework provides access to the Android Camera APIs via the Android.Hardware.Camera class. The Camera class is used to set image capture values, perform preview operations, take pictures and retrieve frames for encoding video. The Camera class will interface with the Android Camera service, which manages communications with the camera hardware.
Follow this general sequence to take pictures in your app using a custom Camera:
- Create an instance of the Camera by calling Open.
- Get a set of the default settings by calling the Camera's GetParameters method.
- Modify any parameters as necessary.
- Save the new parameters back to the Camera by calling SetParameters.
- If necessary, call SetDisplayOrientation. This will set the clockwise rotation of the preview display.
- To provide a preview surface, pass a fully initialized SurfaceHolder into the method SetPreviewDisplay.
- To start previewing, call StartPreview. Previewing must be started before a picture can be taken.
- A picture can be taken by calling TakePicture. The image data will be provided in the necessary callbacks.
- After taking a picture, previewing will stop. To start previewing again, call StartPreview.
- To stop updating the preview surface, call StopPreview.
- To allow use of a camera in other applications, make sure that Release is called as appropriate. For example, Release is invoked in OnPause, and open is called in OnResume.
The following interfaces can be implemented from the Camera class:
- Android.Hardware.Camera.IAutoFocusCallback This interface includes the OnAutoFocus method, which can be implemented to notify the application that the camera has completed auto-focus. According to the Android document, devices that don't support auto-focus will receive a "face" callback to this interface. If an application requires auto-focus support in hardware, it should declare this support in the AndroidManifest.xml file. This support is declared by placing the android.hardware.camera.autofocus feature in the <uses-feature> tag.
- Android.Hardware.Camera.IErrorCallback This interface is error notification from the camera. The OnError method is called if there's an error.
- Android.Hardware.Camera.IFaceDetectionListener This interface is used for face detection in the preview frame. The OnFaceDetection method is called when a face is detected.
- Android.Hardware.Camera.IOnZoomChangeListener This interface is used to handle zoom changes during a smooth zoom operation. The method associated with this interface is OnZoomChangeListener.
- Android.Hardware.Camera.IPictureCallback This interface is used to get the image data from a photo capture. The method associated with this interface is OnPictureTaken.
- Android.Hardware.Camera.IPreviewCallback This interface is used to deliver preview frames. The method associated with the interface is OnPreviewFrame.
- Android.Hardware.Camera.ShutterCallback This interface is used to notify the application that an image capture occurred at that particular moment.
Associated with the Camera class, and its methods and interfaces, is the SurfaceView. The SurfaceView is used to provide a drawing surface for previewing and displaying content.
It exposes a SurfaceHolder object via the Holder property. The SurfaceHolder provides an ISurfaceHolder interface. This interface has three methods: SurfaceCreated, SurfaceChanged and SurfaceDestroyed. These methods are asynchronous and used to perform any operations needed, such as displaying an image, video or cleanup.
Now, take a look at the code. In this class definition, you inherit from an Activity and then implement the interfaces:
public class SimpleCameraActivity : Activity,
  Android.Hardware.Camera.IAutoFocusCallback,
  Android.Hardware.Camera.IPictureCallback,
  Android.Hardware.Camera.IPreviewCallback,
  Android.Hardware.Camera.IShutterCallback,
  ISurfaceHolderCallback
Next, set up the SurfaceView, its holder and the callback associated with it:
SurfaceView surface = (SurfaceView)FindViewById(Resource.Id.Surface);
var holder = surface.Holder;
holder.AddCallback(this);
holder.SetType(Android.Views.SurfaceType.PushBuffers);
holder.SetFixedSize(300, 200);
Once the holder is created, the code in Listing 4 will run when it's called from the SurfaceCreated event. This code will run the moment that the holder is created.
One thing to notice within the Listing 4 code is that you can test the device to verify it has a feature. In this case, I'm using the PackageManager to test if the camera has the ability to perform auto-focus. If so, then I allow auto-focus to occur.
The sequence to take the pictures is shown next. Here, you get the camera's parameters, set the PictureFormat property to Jpeg, and then tell the camera to take the picture:
Android.Hardware.Camera.Parameters p = camera.GetParameters();
p.PictureFormat = (int)Format.Jpeg;
camera.SetParameters(p);
camera.TakePicture(this,this,this);
If you step through the code in debug mode in Visual Studio, notice that taking the picture is an asynchronous operation. There's no return for the TakePicture method. Instead, you process the picture in the OnPictureTaken method.
The final piece of code is the callback for the OnPictureTaken method, shown in Listing 5. This code will write the content to the local SD card and then set various parameters in the JPG output file.
Now that the picture is taken, let's look at the screen output of the code. You can display the image with Windows Photo Viewer. Be careful when your device is attached to your Windows system for application development, because the default configuration maps the phone's SD card to a drive letter in Windows. The SD card is no longer available to your device, so it can't save the image. I work around this problem by just setting the device to charge by default when it connects to my development system.
I don't know about you, but I find that it's a lot of work to take the pictures on your own. Given the open nature of Android and the various devices that are on the market, I prefer to make use of as much built-in code as possible to make my life easier.
Playing Video
If pictures are worth a thousand words, videos are priceless. In Mono for Android, you have the ability to play video as well as record video. Mono for Android allows for video to be played easily. As you create video for mobile devices, remember that video will most likely be played over a wireless network. Rarely is video distributed on a device with an application. Therefore, you need to do two things. First, create video content that's as small as possible. This will speed delivery and create the least amount of problems during the download process. Second, you need to make sure you perform as many operations as possible asynchronously within your application. You'll need to watch this when you're preparing the media player.
Follow this sequence of actions to play video in this example:
- Within your Activity, implement the ISurfaceHolder interface.
- Set up the SurfaceView, the SurfaceHolder, and set the callback.
- Create a MediaPlayer object that's available within the class.
- Inside of the SurfaceCreated method, assign the holder in SetDisplay. This will assign the location that the video will play at. Set the data source in SetDataSource. This will be the URL to the media file that will be played. Finally, you need to prepare the media player. This is the part that needs to be done asynchronously, especially when you're going off of the device. This will be a two-step process. The first step is to create a Prepared event handler. The next step is to call PrepareAsync on the media player.
- Once the media player fires the Prepared event, the user's video will play because the Prepared event you have created calls the media player's Start method.
- There are various methods that can be called on the media player such as Seek to go to a specified location, Stop to stop play and Pause to pause play.
- Once the content is downloaded, you need to call Release on the media player. This will release any necessary resources once the player is done playing the video.
Recording Video
Now that you've seen how to play a video stream, let's look at how to record a video stream. Just like taking a picture, there are two ways to record a video stream. You can record the video using the built-in Camera Activity, or you can interface with the camera directly. Personally, I find that interfacing with the camera seems to have a number of issues across devices, so I'll show you how to interact with the Camera Activity.
Using the Camera Activity to record video is similar to taking pictures. You don't need to handle all of the painful issues regarding video recording because the Camera Activity handles them for you. Follow these steps to record the video:
- Create an Intent with the action of video capture.
- With the Intent, add extra information regarding the video quality you want to save. A value of 0 for video quality will result in the lowest-quality output. A value of 1 results in the highest-quality output. Unlike when you took pictures, you don't need to set the file name of the video file via ExtraOutput. With my devices, I've found the data that comes back is empty (yes, isn't that confusing) if I attempt to set the filename. You might have more success with your devices. Extra information that you can pass to the Camera Activity includes ExtraDurationLimit -- to set the length of the video to be captured in seconds; and ExtraSizeLimit -- to set the limit of the file size capture in bytes of the video to be captured.
- The next step is to call StartActivityForResult. This will start the camera.
- Once you've taken your video and saved it, the Camera Activity will return to your application. Inside of your application, the OnActivityResult method will be called. This method will handle the returned data.
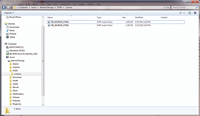
- Inside of your OnActivityResult method, you can get the Uri that's returned by calling out to the returned data Intent's Data property (see Listing 6 in the code download). Now you have the Uri and can operate on the image from there. Note that the file is stored by default in the DCIM folder of the device (Figure 5,). The video that's created is a .3gp file format, which is a mobile-optimized standard for video.
[Click on image for larger view.] |
| Figure 5. The video file is stored by default in the DCIM folder of the Motorola Xoom tablet. |
The video and other files are available in the code download for this article. You can pull the video out and play it on your local system.
Taking pictures, and recording and playing video, is the basis for a lot of the excitement around mobile devices. After all, why carry a camcorder and a phone when the phone will do the job of both and is smaller and lighter? Smartphones, and Android, are a great way to record multimedia and share it with the world quickly and easily. I hope you'll start developing applications to take advantage of these great features in Mono for Android.